Follow the 8 Simple Steps to Start Sending WhatsApp Business Messages via WhatsApp Cloud API
Just follow the steps explained in below guide and you are ready to send Business related WhatsApp messages via META Cloud API platform

In order to send WhatsApp business related messages via API you need to follow the guidelines set by the META. In this article we have try to cover everything you need to get started with WhatsApp Business API.
Pre-requisite for WhatsApp Business API
- Business Mobile or Landline Number
- Facebook Account
- Valid Business Details including Email ID
- Business Website and Privacy Policy
- Business Registered Documents
- Active Debit or Credit Cards
Check per message business initiated messages pricing by the META here : https://developers.facebook.com/docs/whatsapp/pricing/#rates
Follow the steps below to get access of WhatsApp Business API Hosted by META
Business Number
In order to send Business Messages via API you should have existing or new business mobile number or Landline number that is NOT already in use on WhatsApp App and WhatsApp for Business APP.
New Business Number
If you don’t have a seperate mobile number for sending business messages, we recommend you to buy a new mobile number or you can use activate landline number
Existing Business Number
If you wish to use your existing mobile number then need to first delete your account from WhatsApp then only it will allowed to use in the business API platform. Before deleting the account, make sure you take the complete backup of your exisitng WhatsApp account.
Once you migrate your existing mobile number to WhatsApp Business API platform, you will no longer able to use the same on your mobile WhatsApp applications.
However you will still able to send and recive messages on our Panel under Chat section.
Check detailed guidlines by META
Create Your Business Account
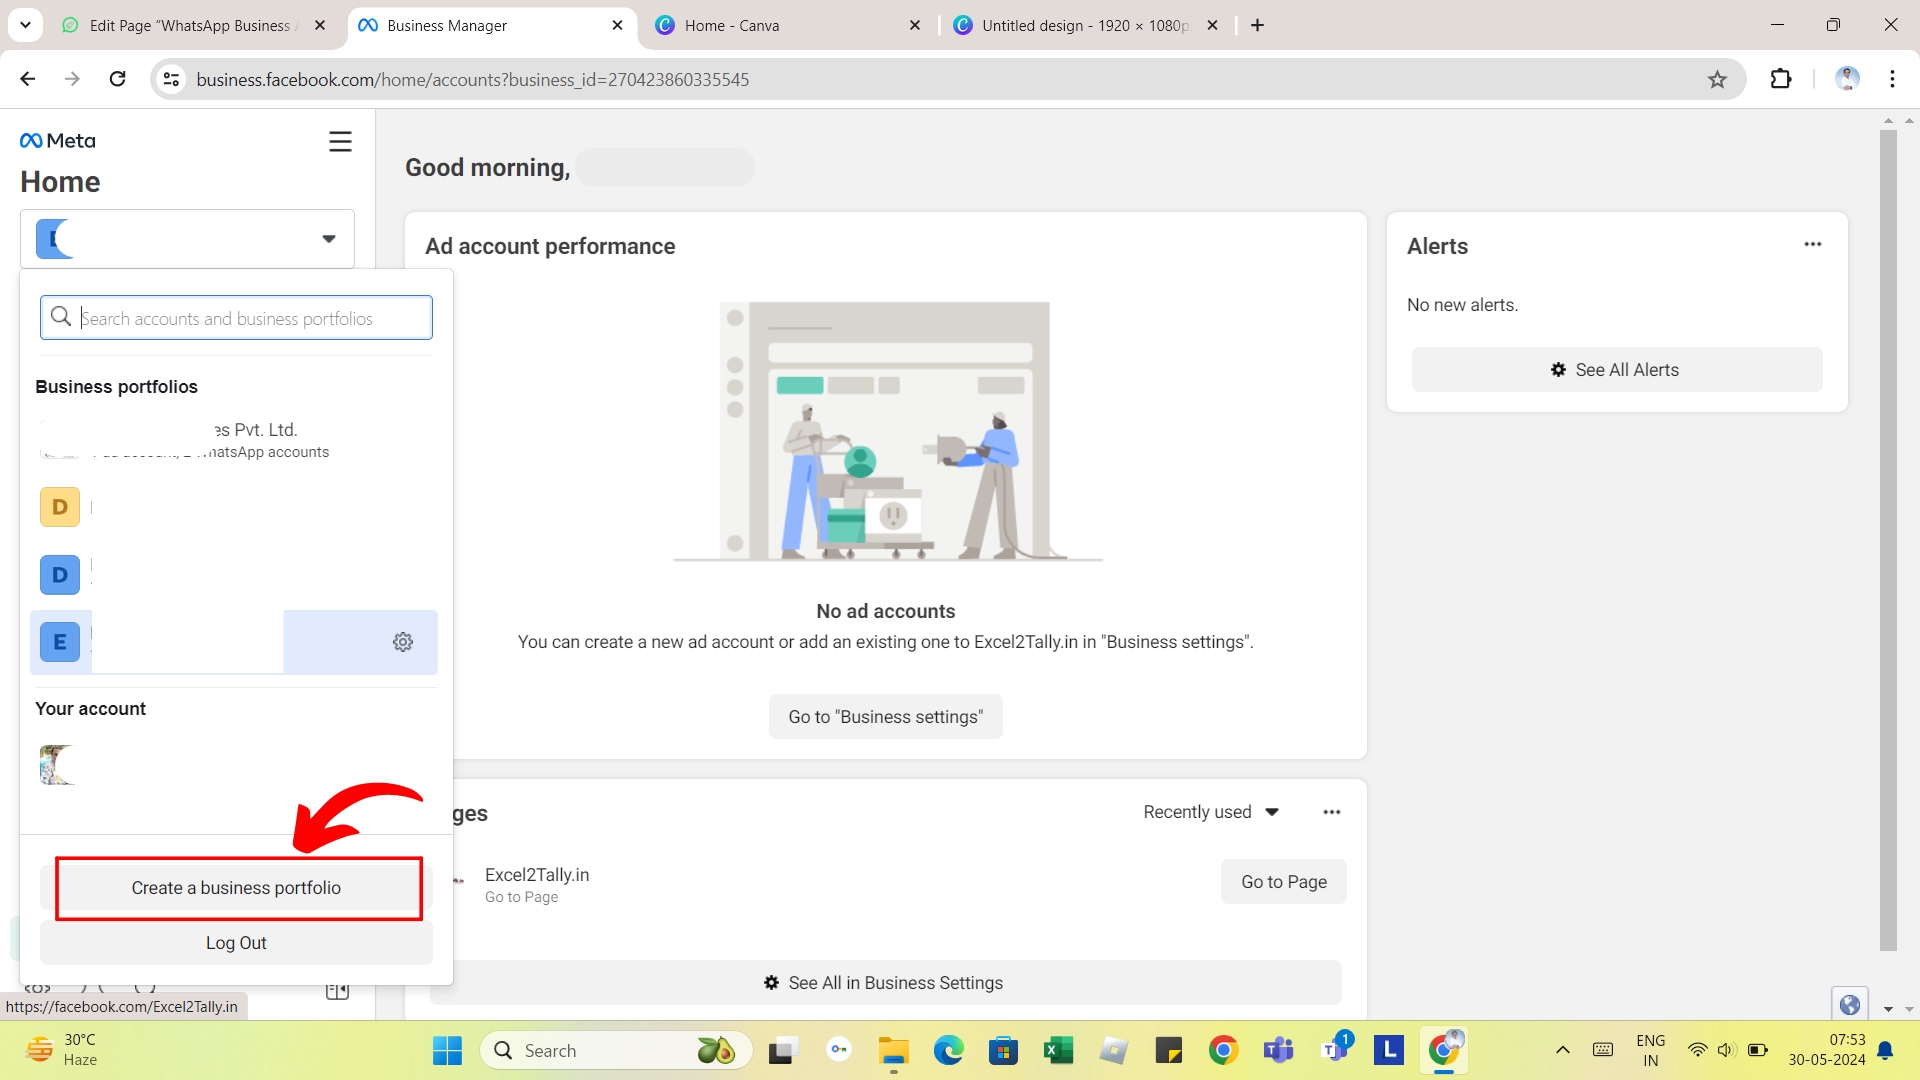
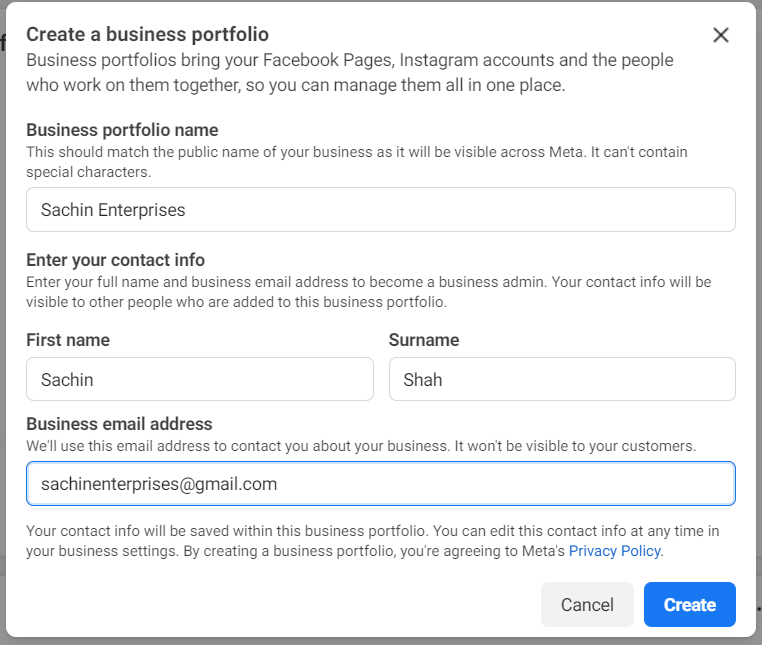
In order to send WhatsApp business message via API you need to create your Business Account using your Facebook profile on https://business.facebook.com as shown in below snapshots;
Make sure your enter proper business information as per your registered documents.
Verify Your Business
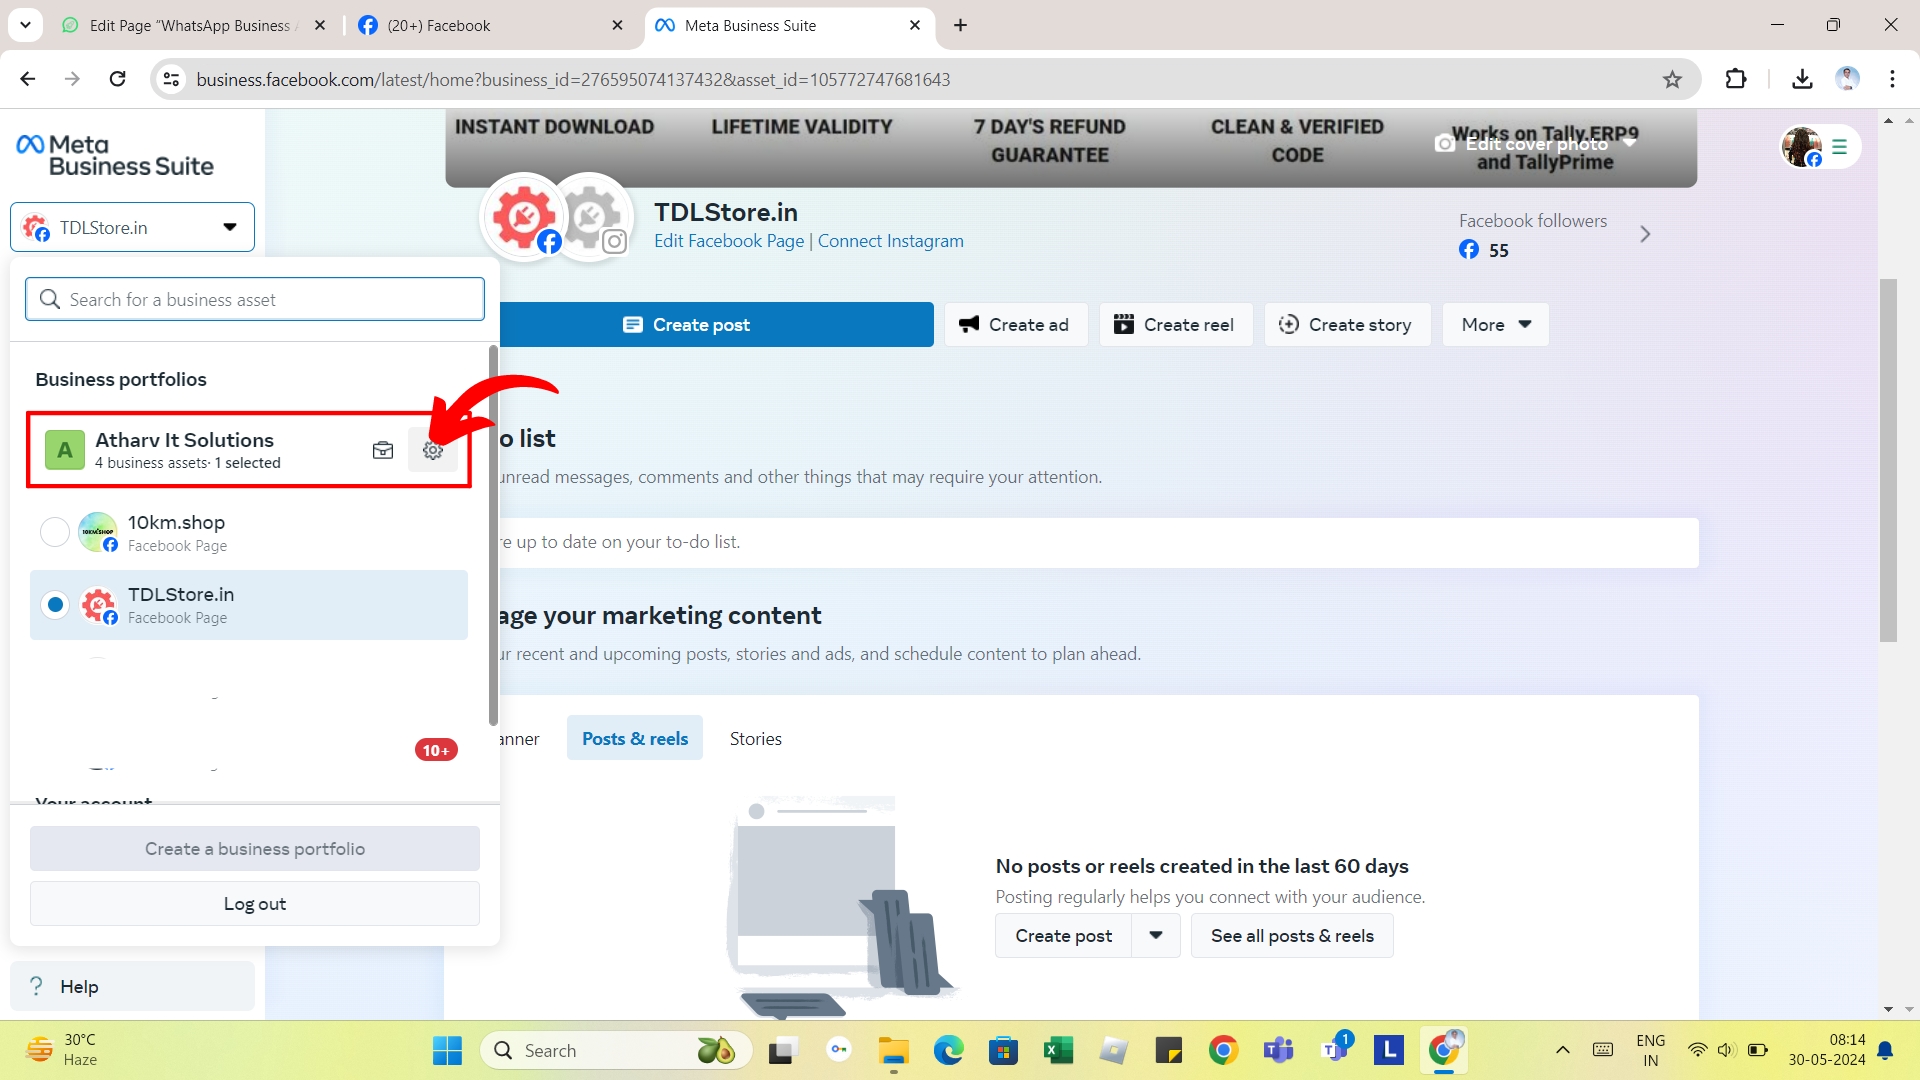
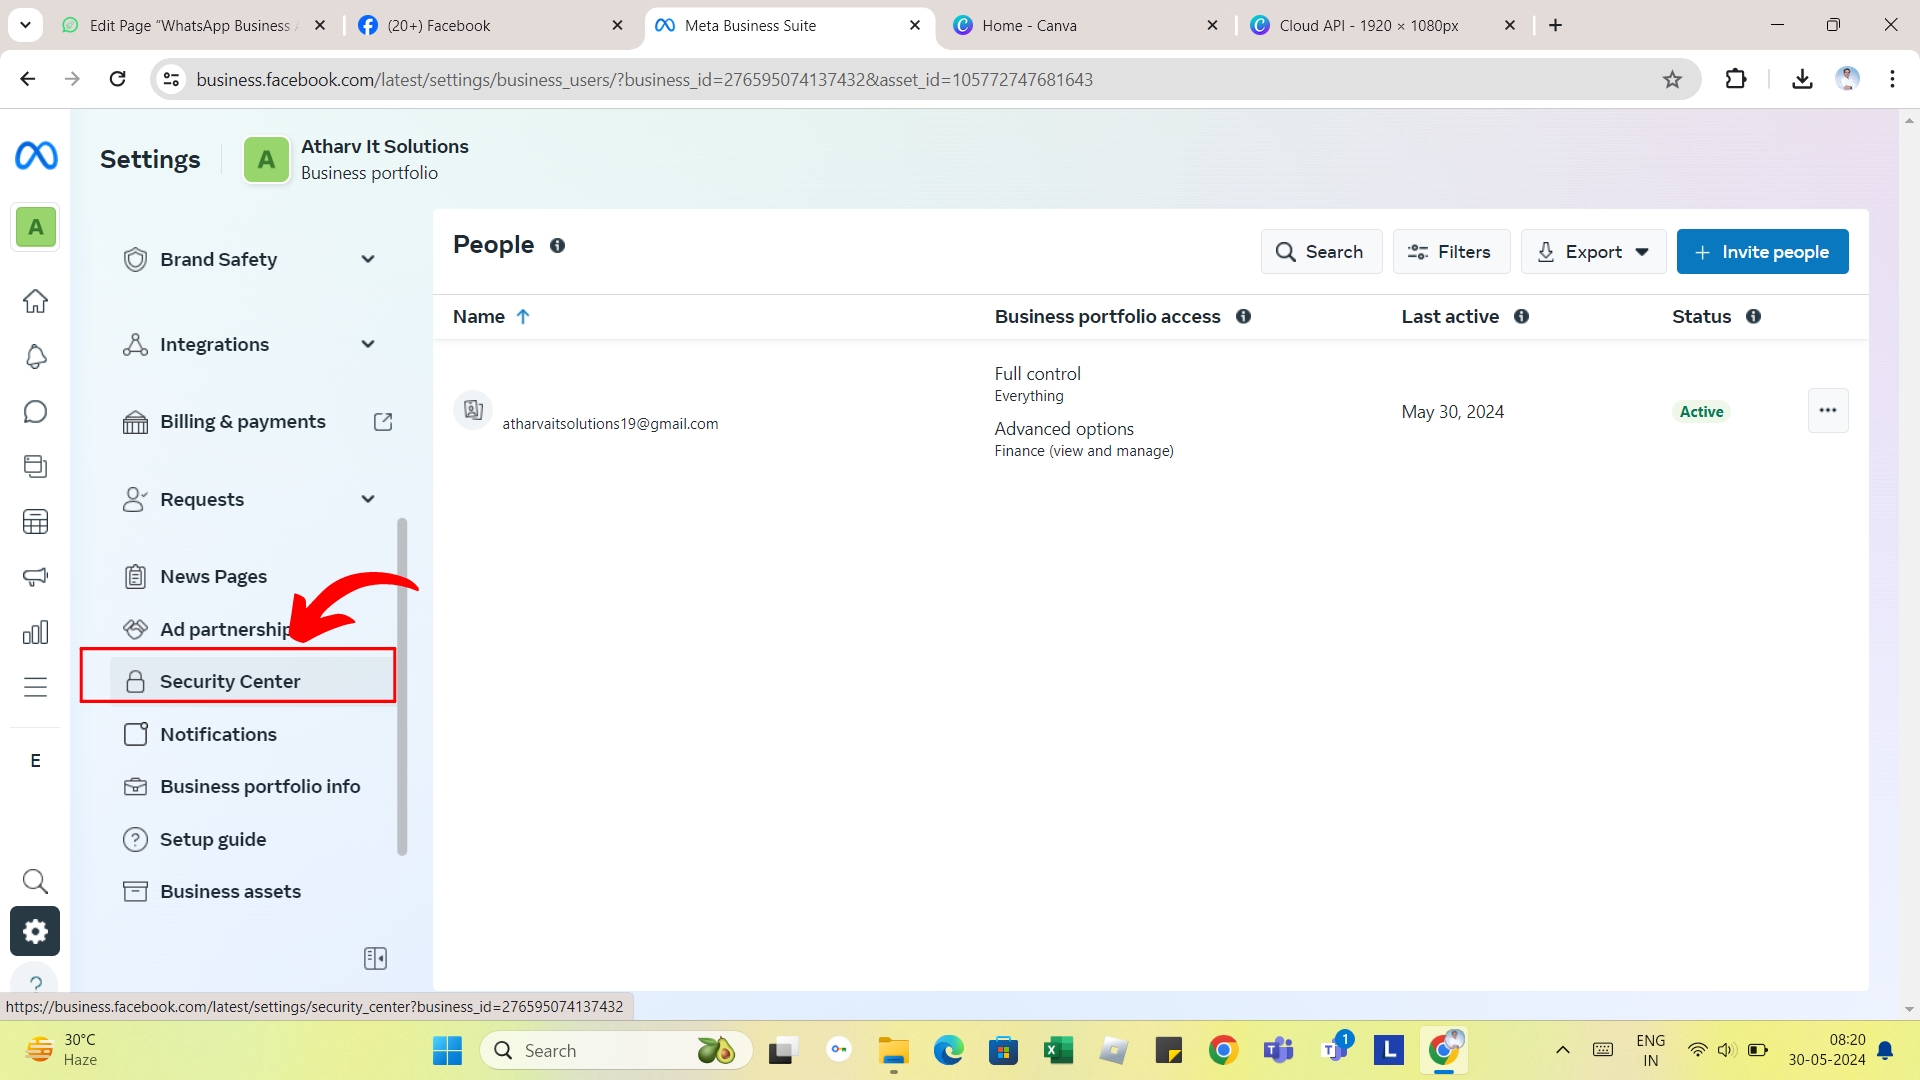
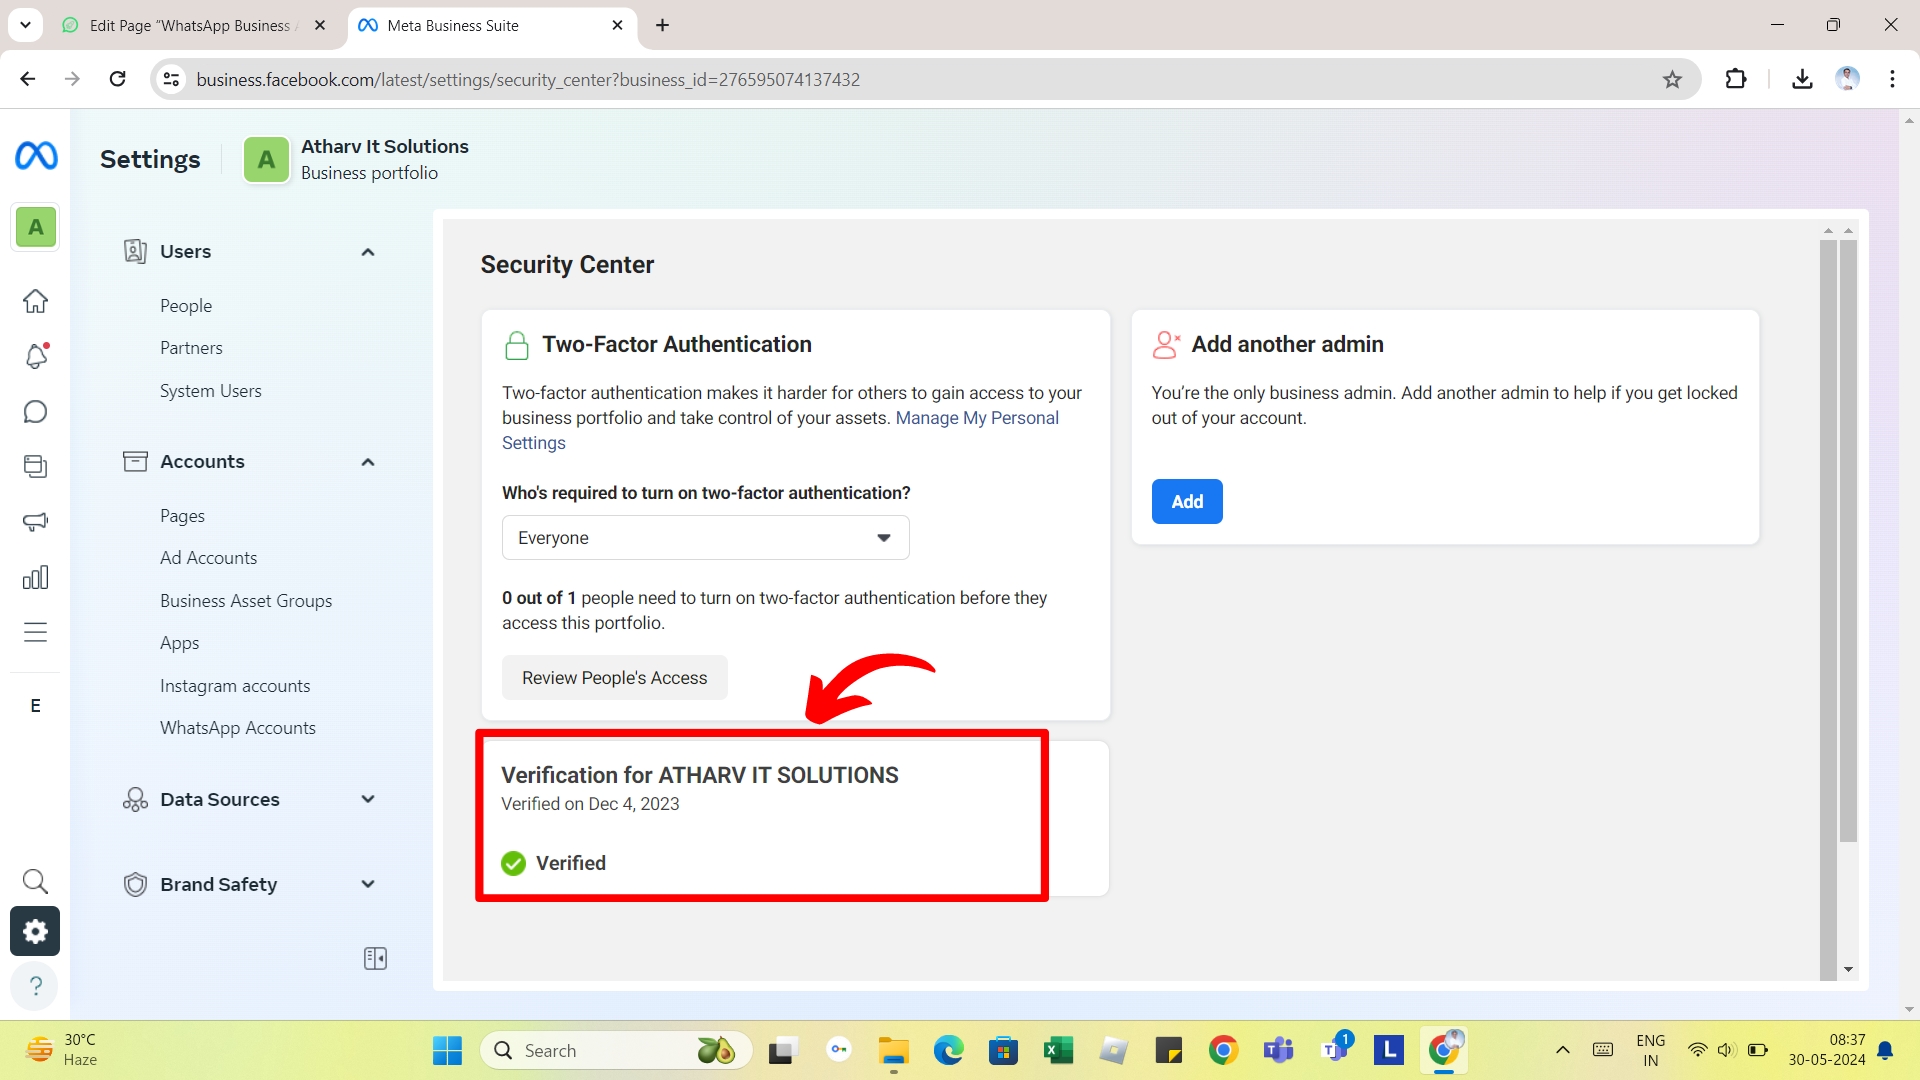
Your business account must be verified and approved by the facebook before you start using WhatsApp Business messages. To check and verify your business go to https://business.facebook.com > Settings > Security Center as shown in below snapshots;
Verified Business
If your business is already verified then it will show a Verified green tick and your account is ready to send WhatsApp Business messages.
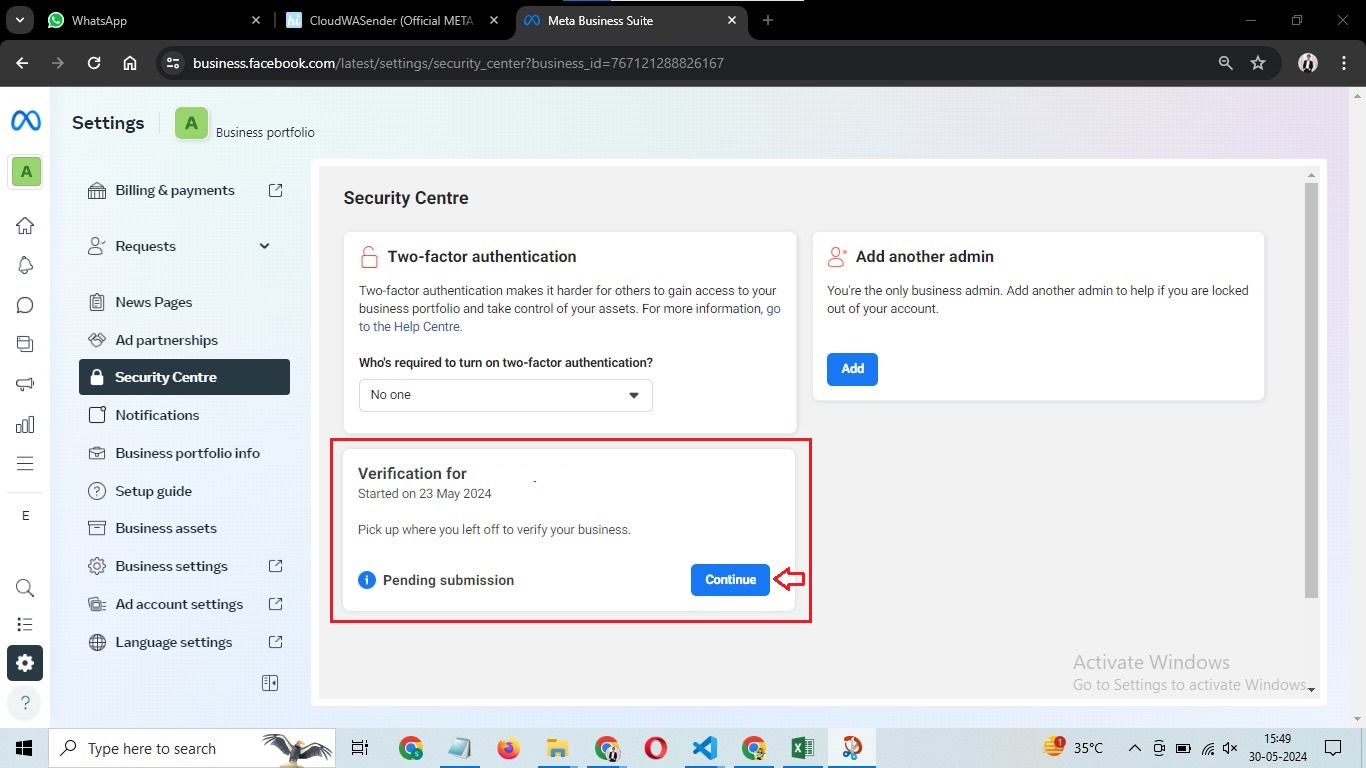
Pending for Verification
If it is showing pending for verification then you must complete the business verification by providing META required details and documents in next steps.
Accepted List of Business Documents for India
-
- Business bank statement
- Business licence
- Certificate of incorporation
- Goods and services tax registration certificate (GST)
- Permanent account number card (PAN)
- Shop establishment certificate
- Udyog Aadar (UID)
- Utility bill
Create Free Website
- You must have a active Website with Privacy Policy OR Facebook Business Page OR Instagram Profile that represents your business
- If you don’t have the website then we recommend to create a Free Website here for WhatsApp Business Account approval
- Buy a domain name for your company from Godaddy and link with free website created
- Debit or Credit Card for Payment Method Verification
Ineligible for Verification
If you are getting option as “Ineligible for Verification” then we recommend you to continue creating the App first inside developer.facebook.com account as per the steps explained below.
Check detailed guidlines by META
Create Business App
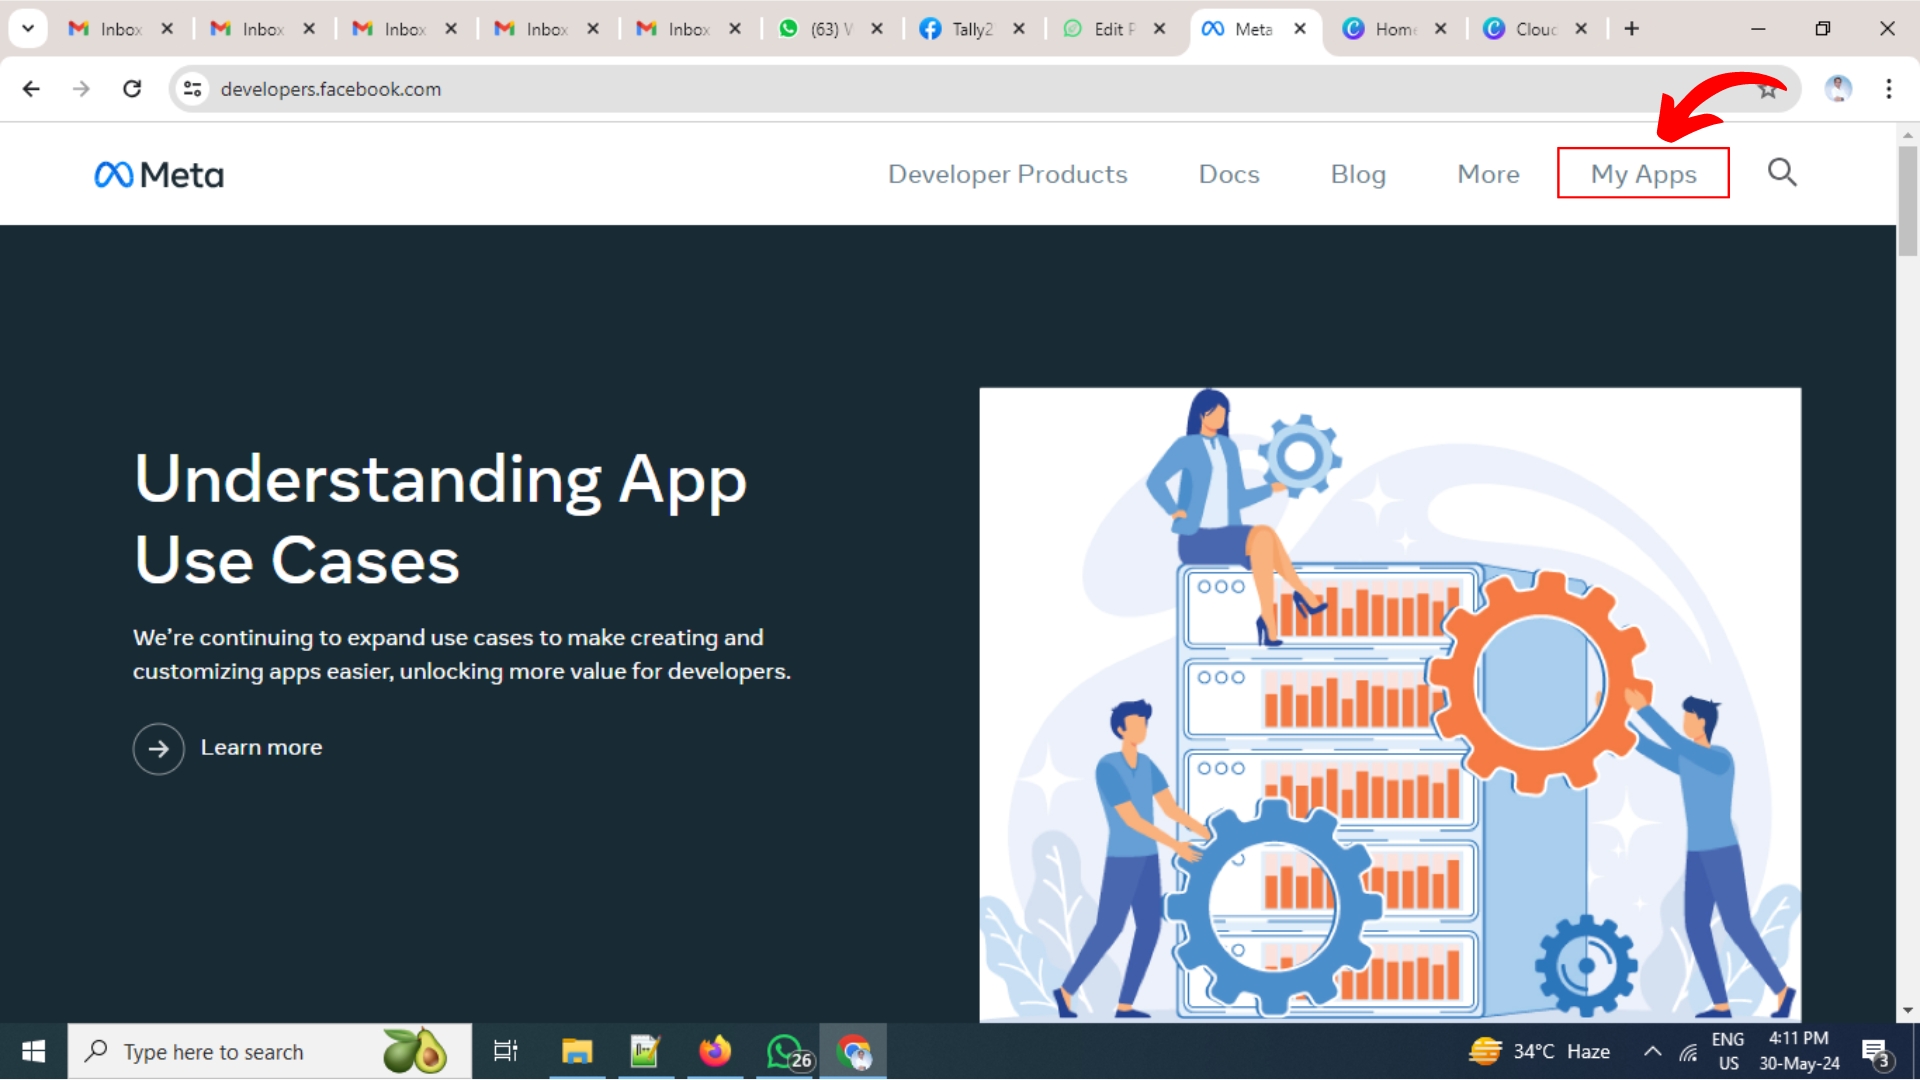
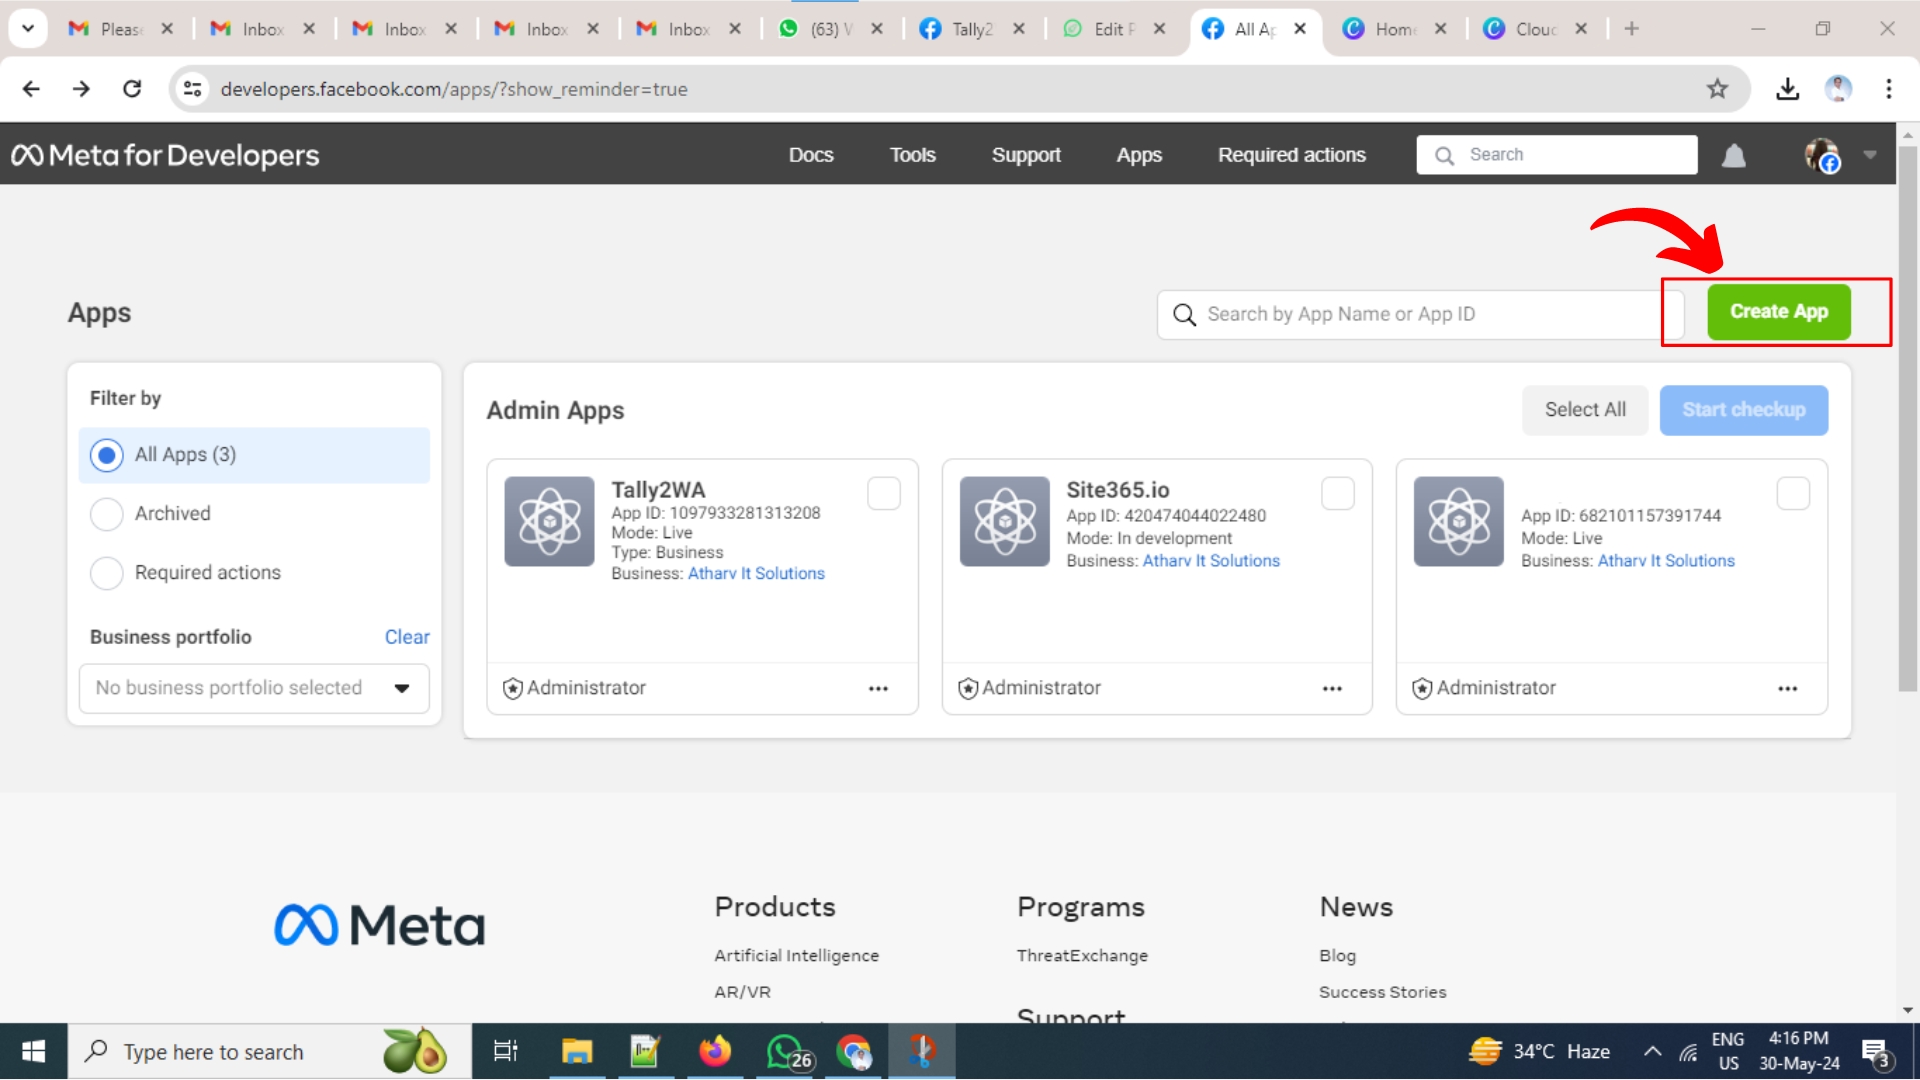
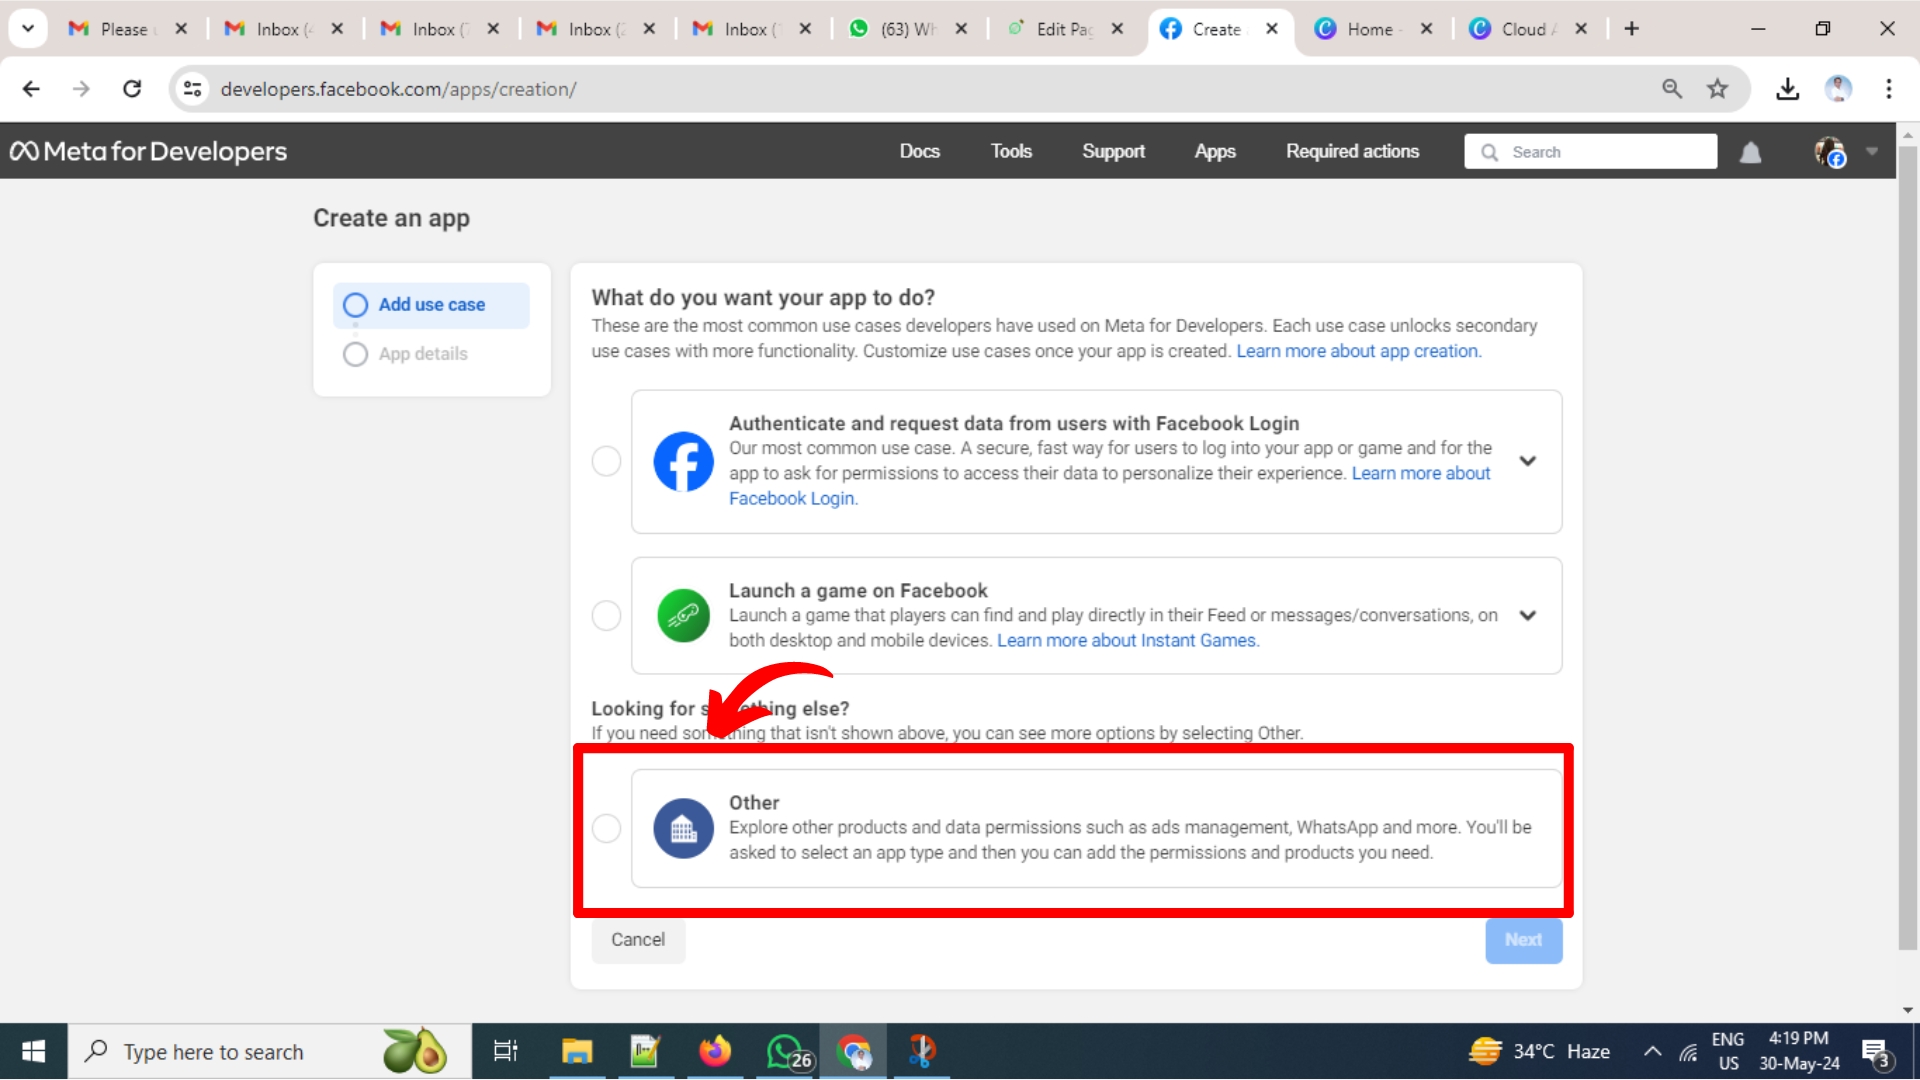
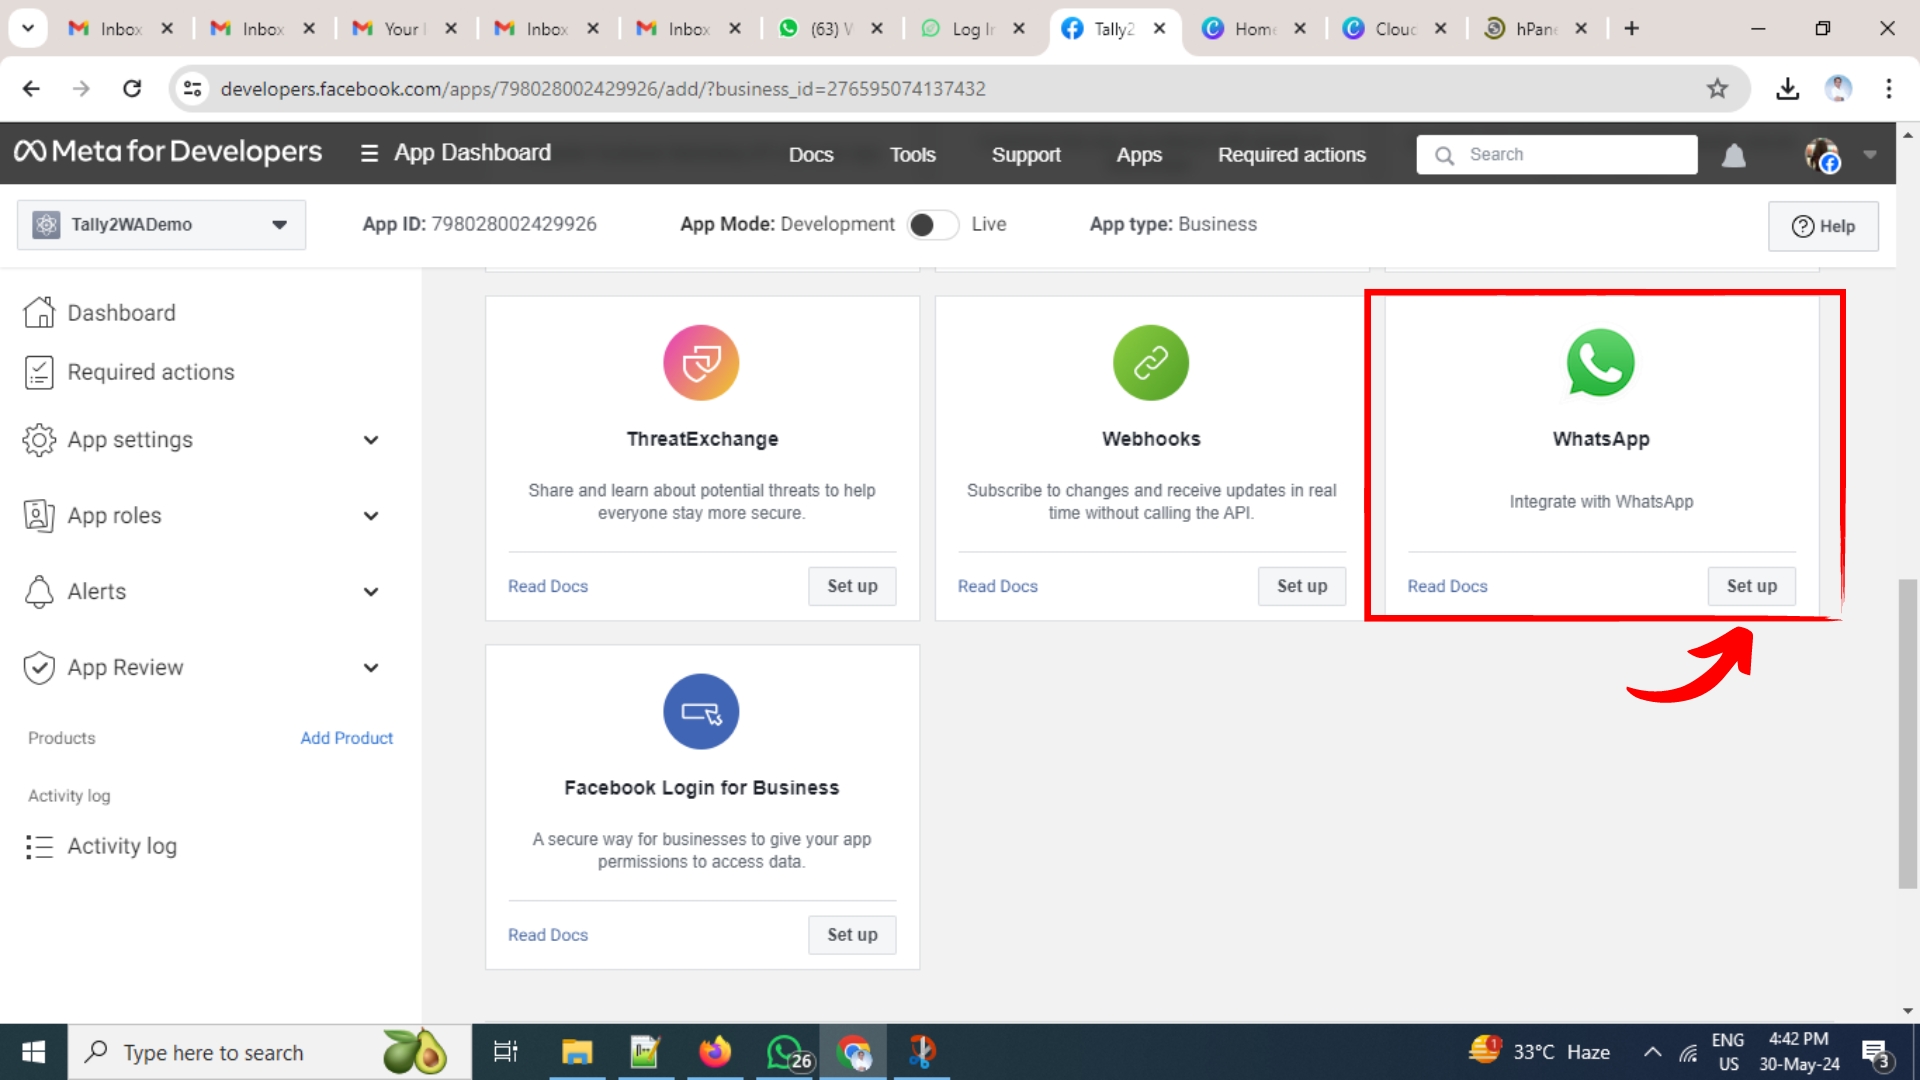
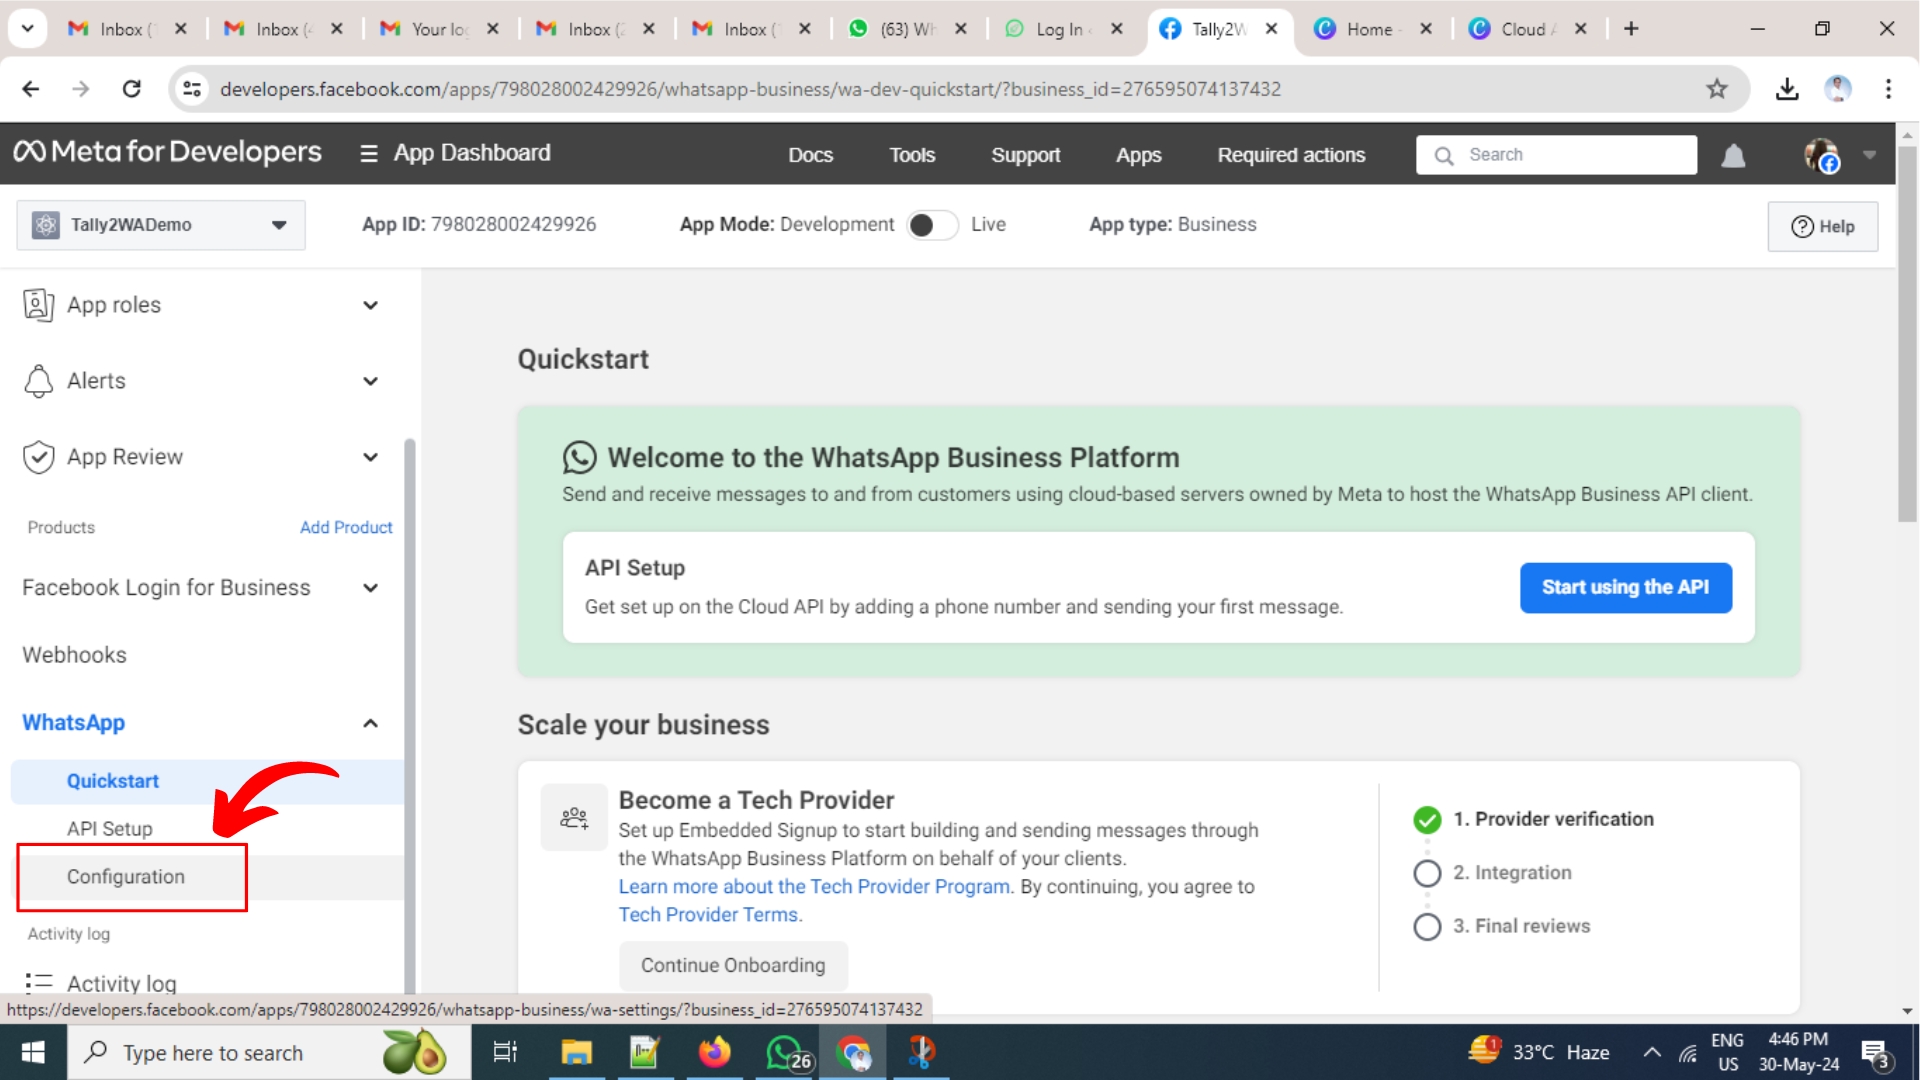
In order to send WhatsApp Business Messages via API you will need to create a App inside Facebook’s Developer Account https://developer.facebook.com as shown in below screenshot;
WhatsApp Webhook
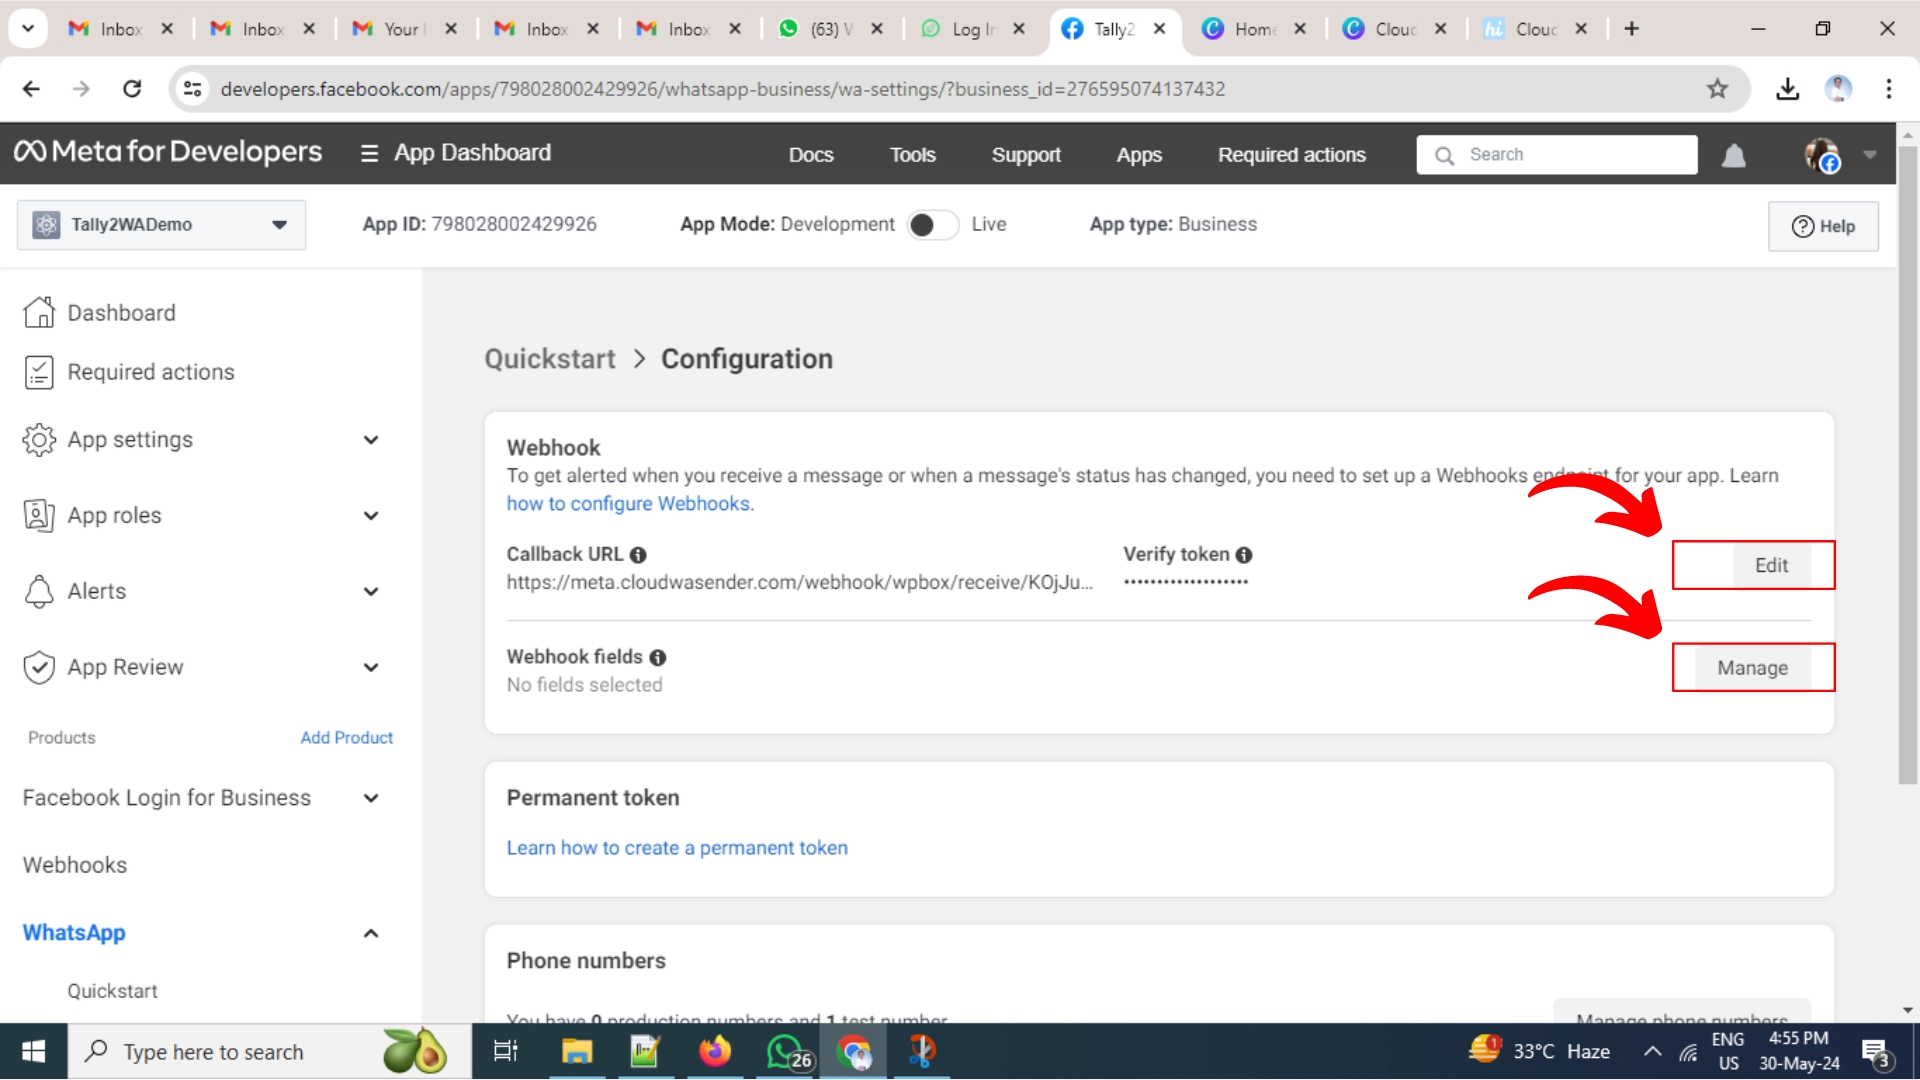
Configure your WhatsApp webhook as show in below snapshot to send and receive messages via WhatsApp Cloud API
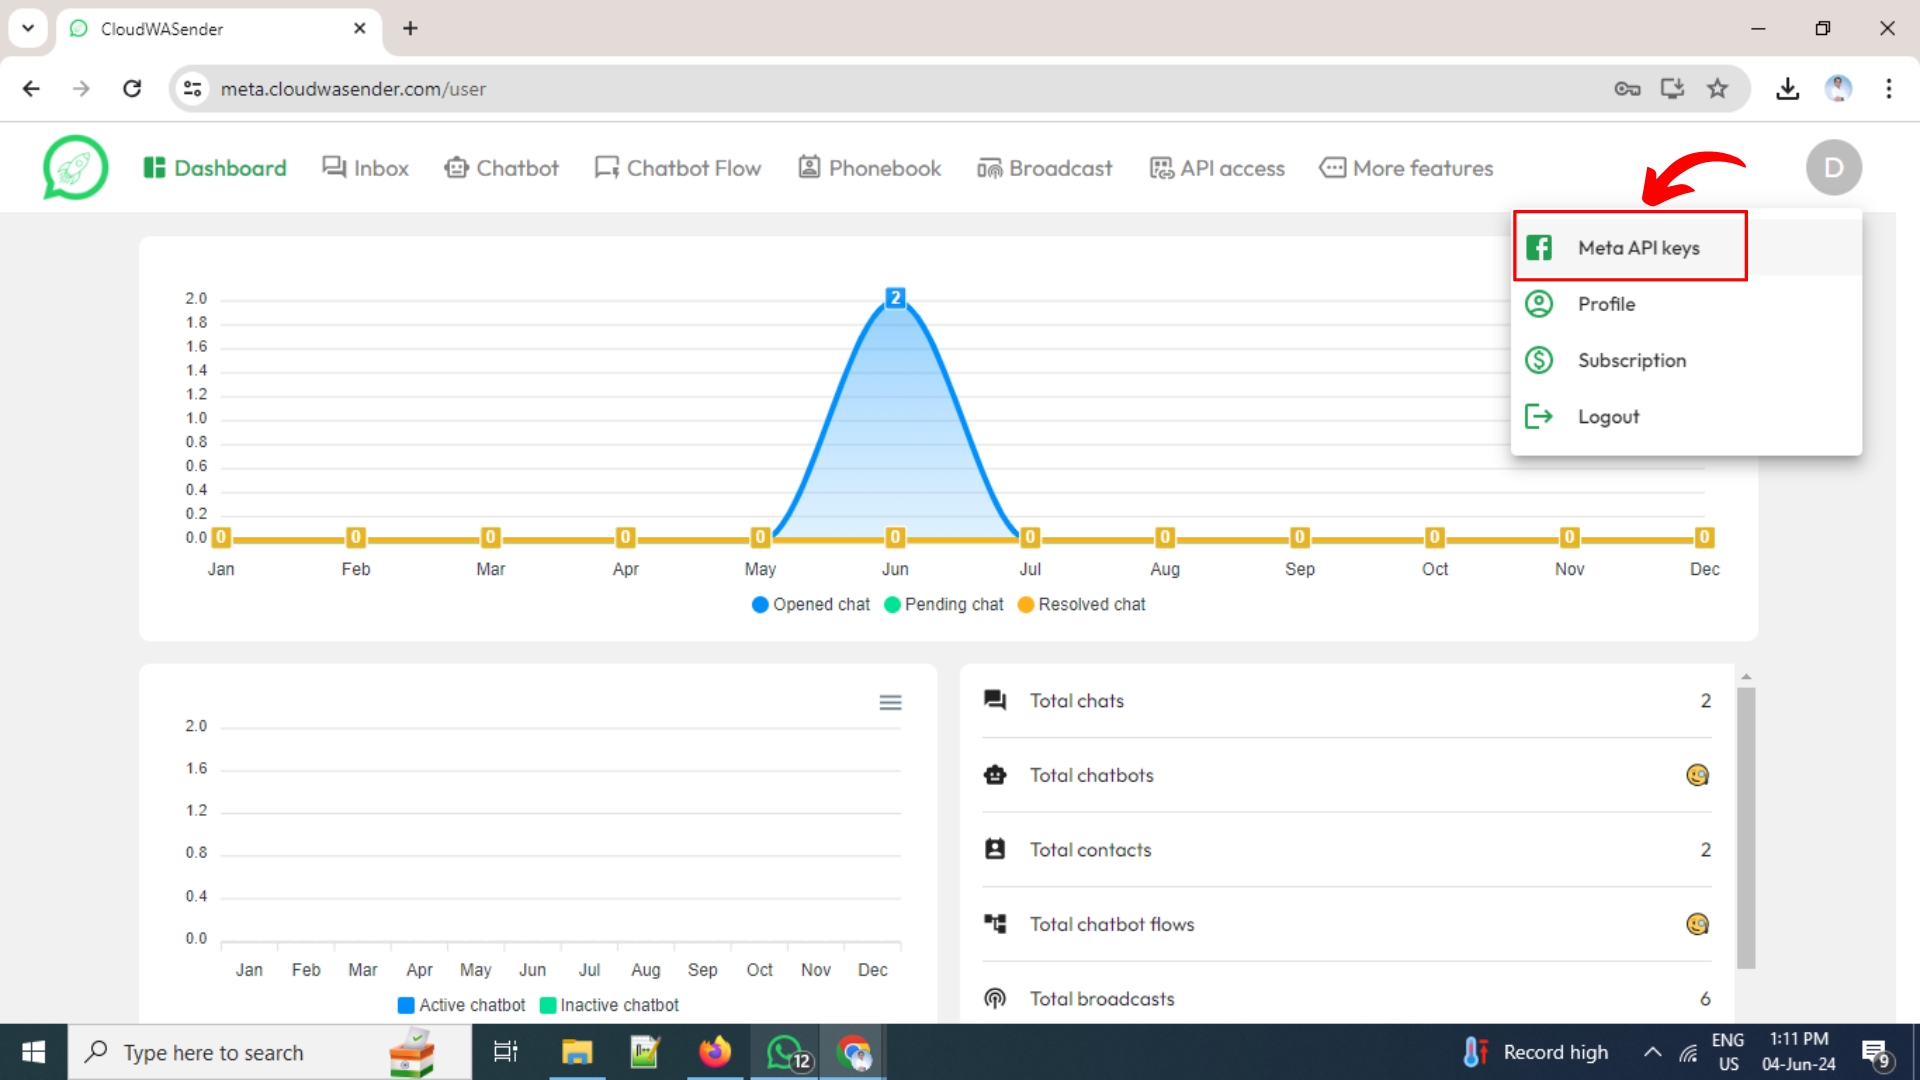
Find Your WhatsApp Webhook
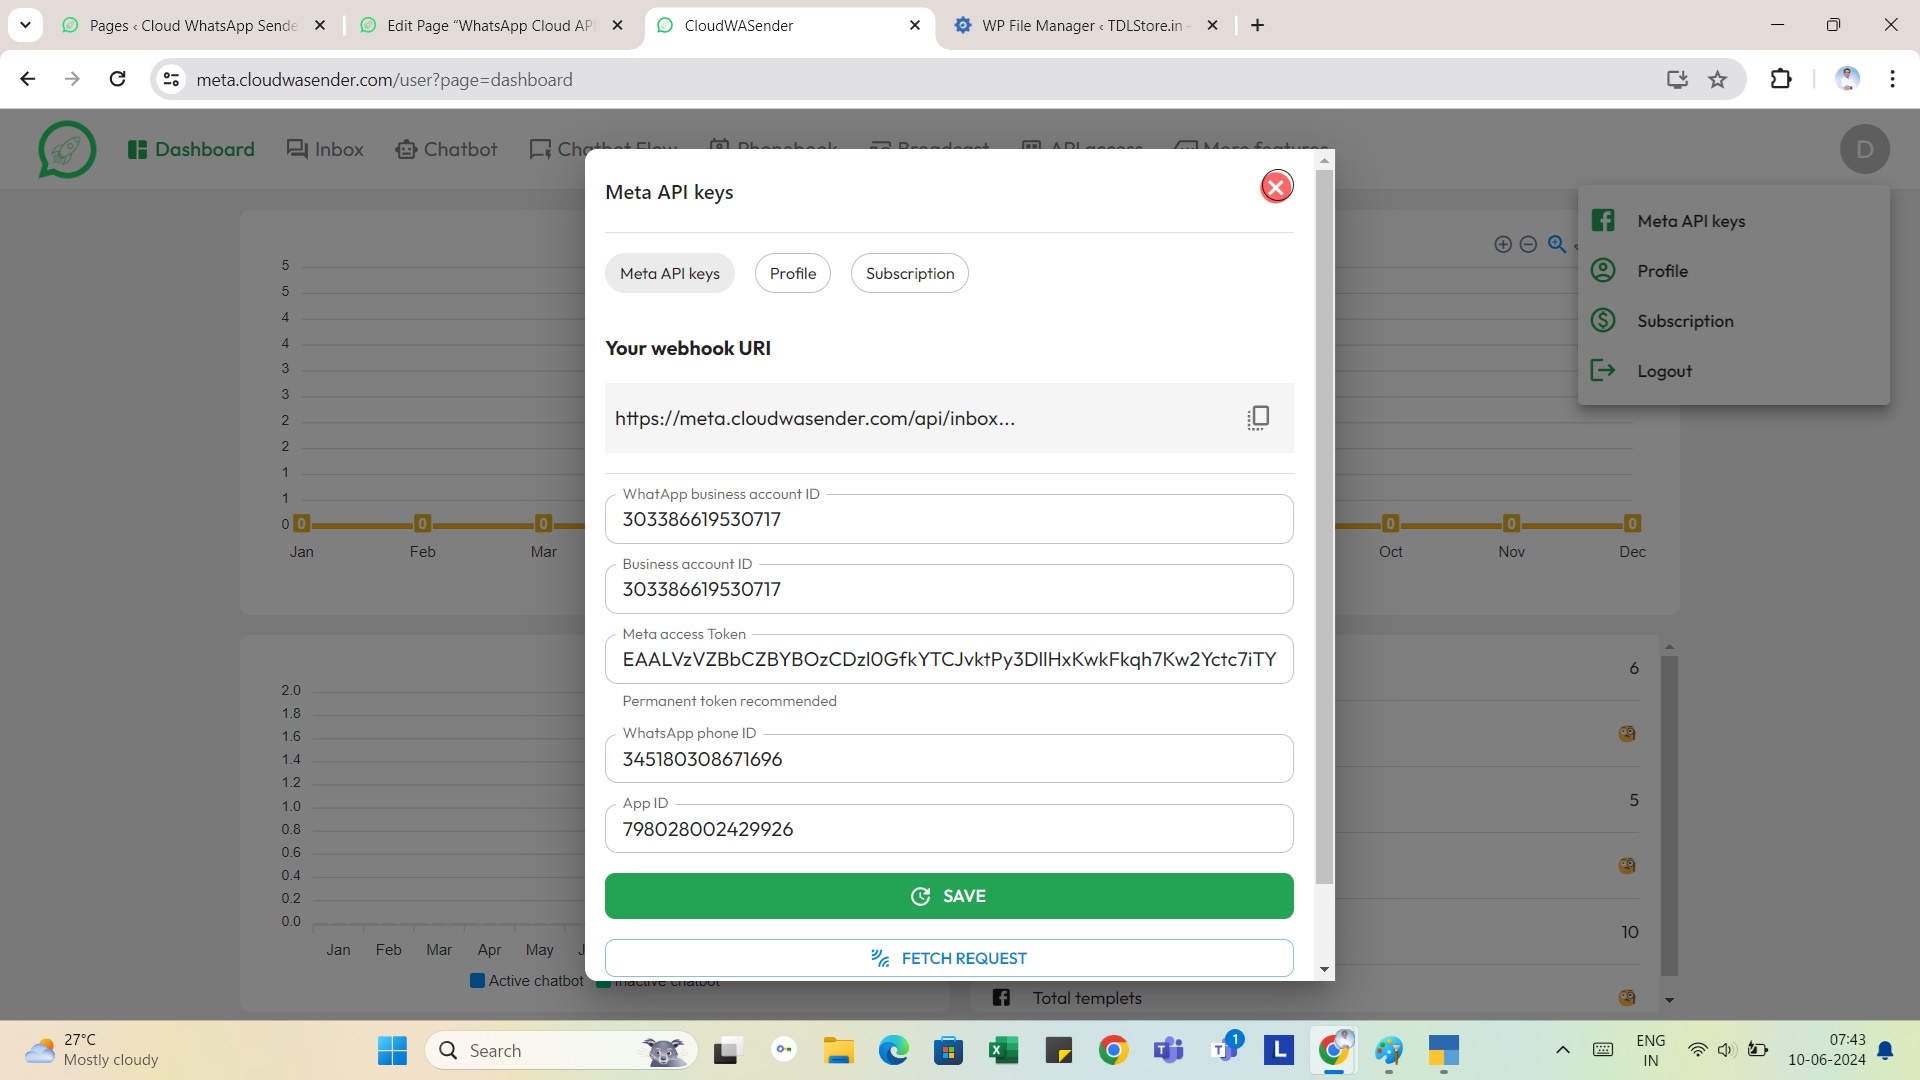
Login to your panel https://meta.cloudwasender.com and copy your Webhook URI to integrate WhatsApp Business API with CloudWASender.com Panel.
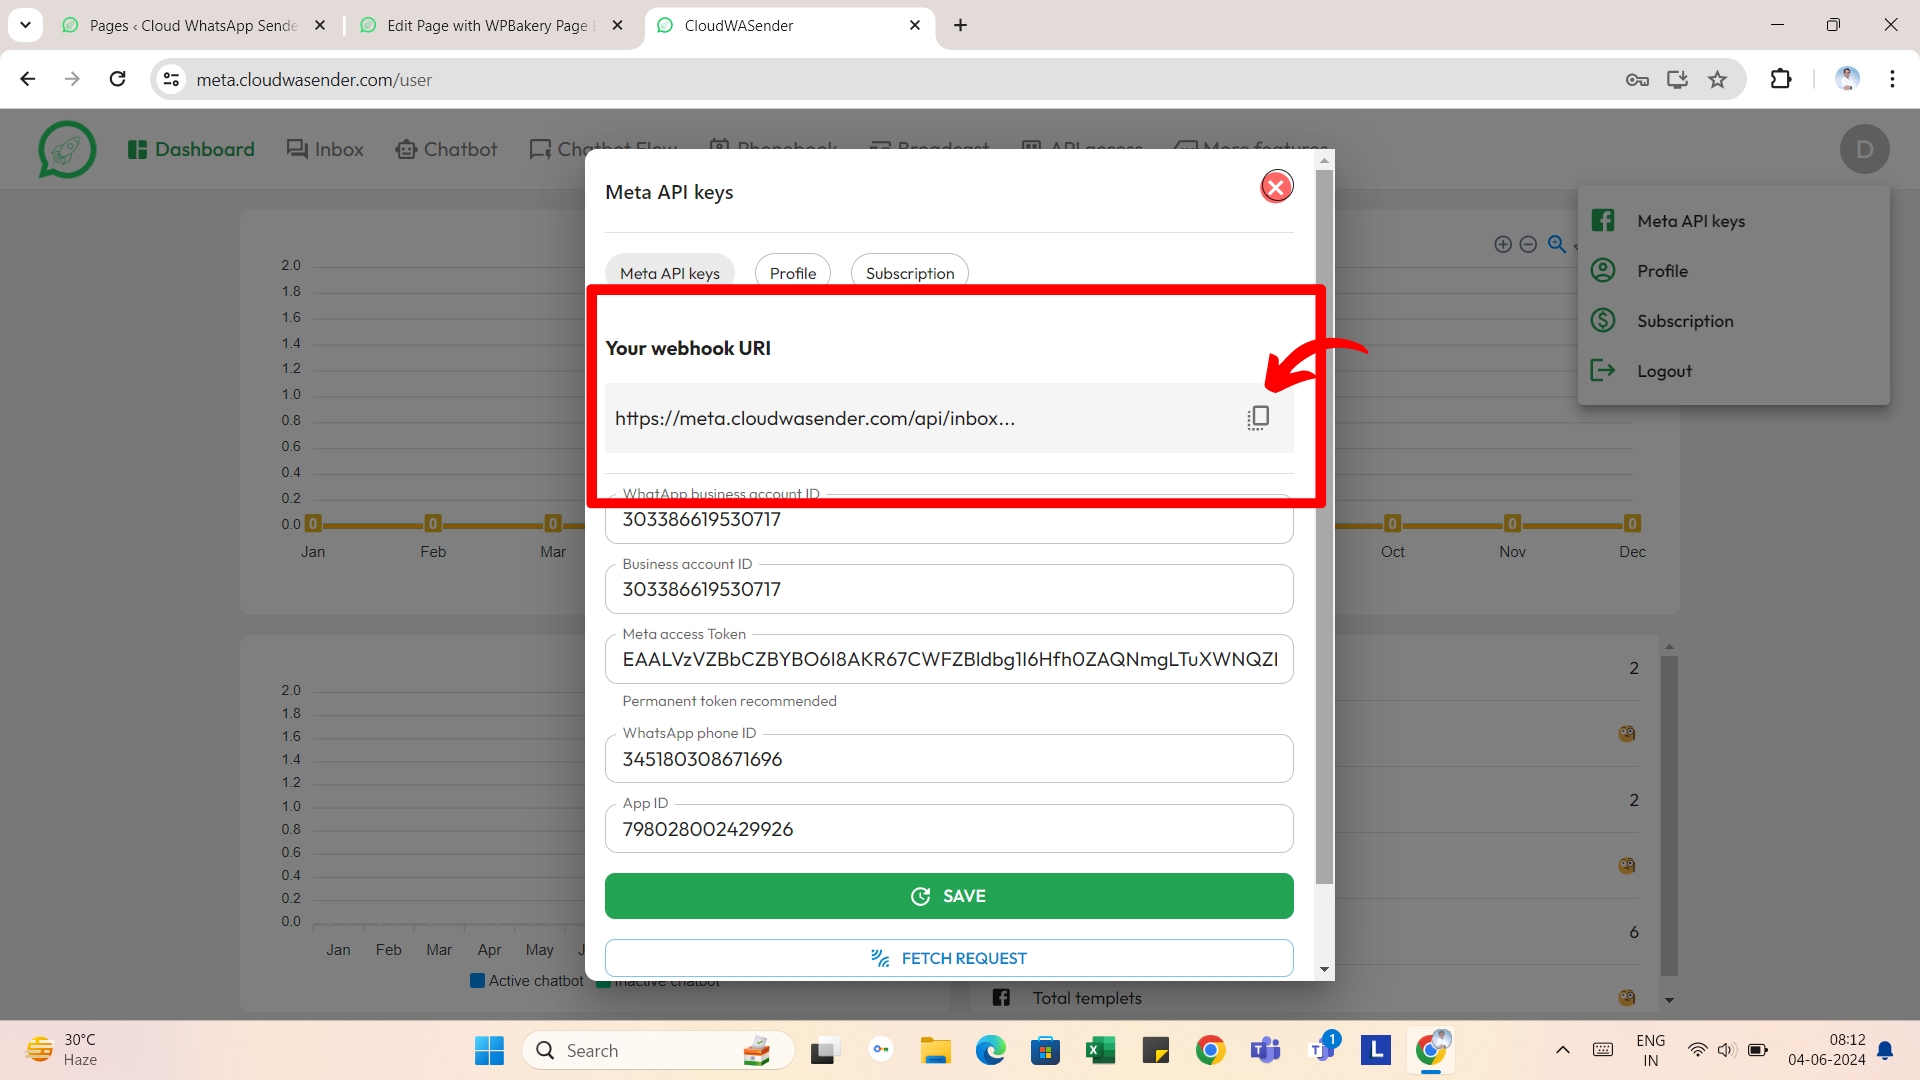
Above Webhook URI includes Callback URL + Verify Token both
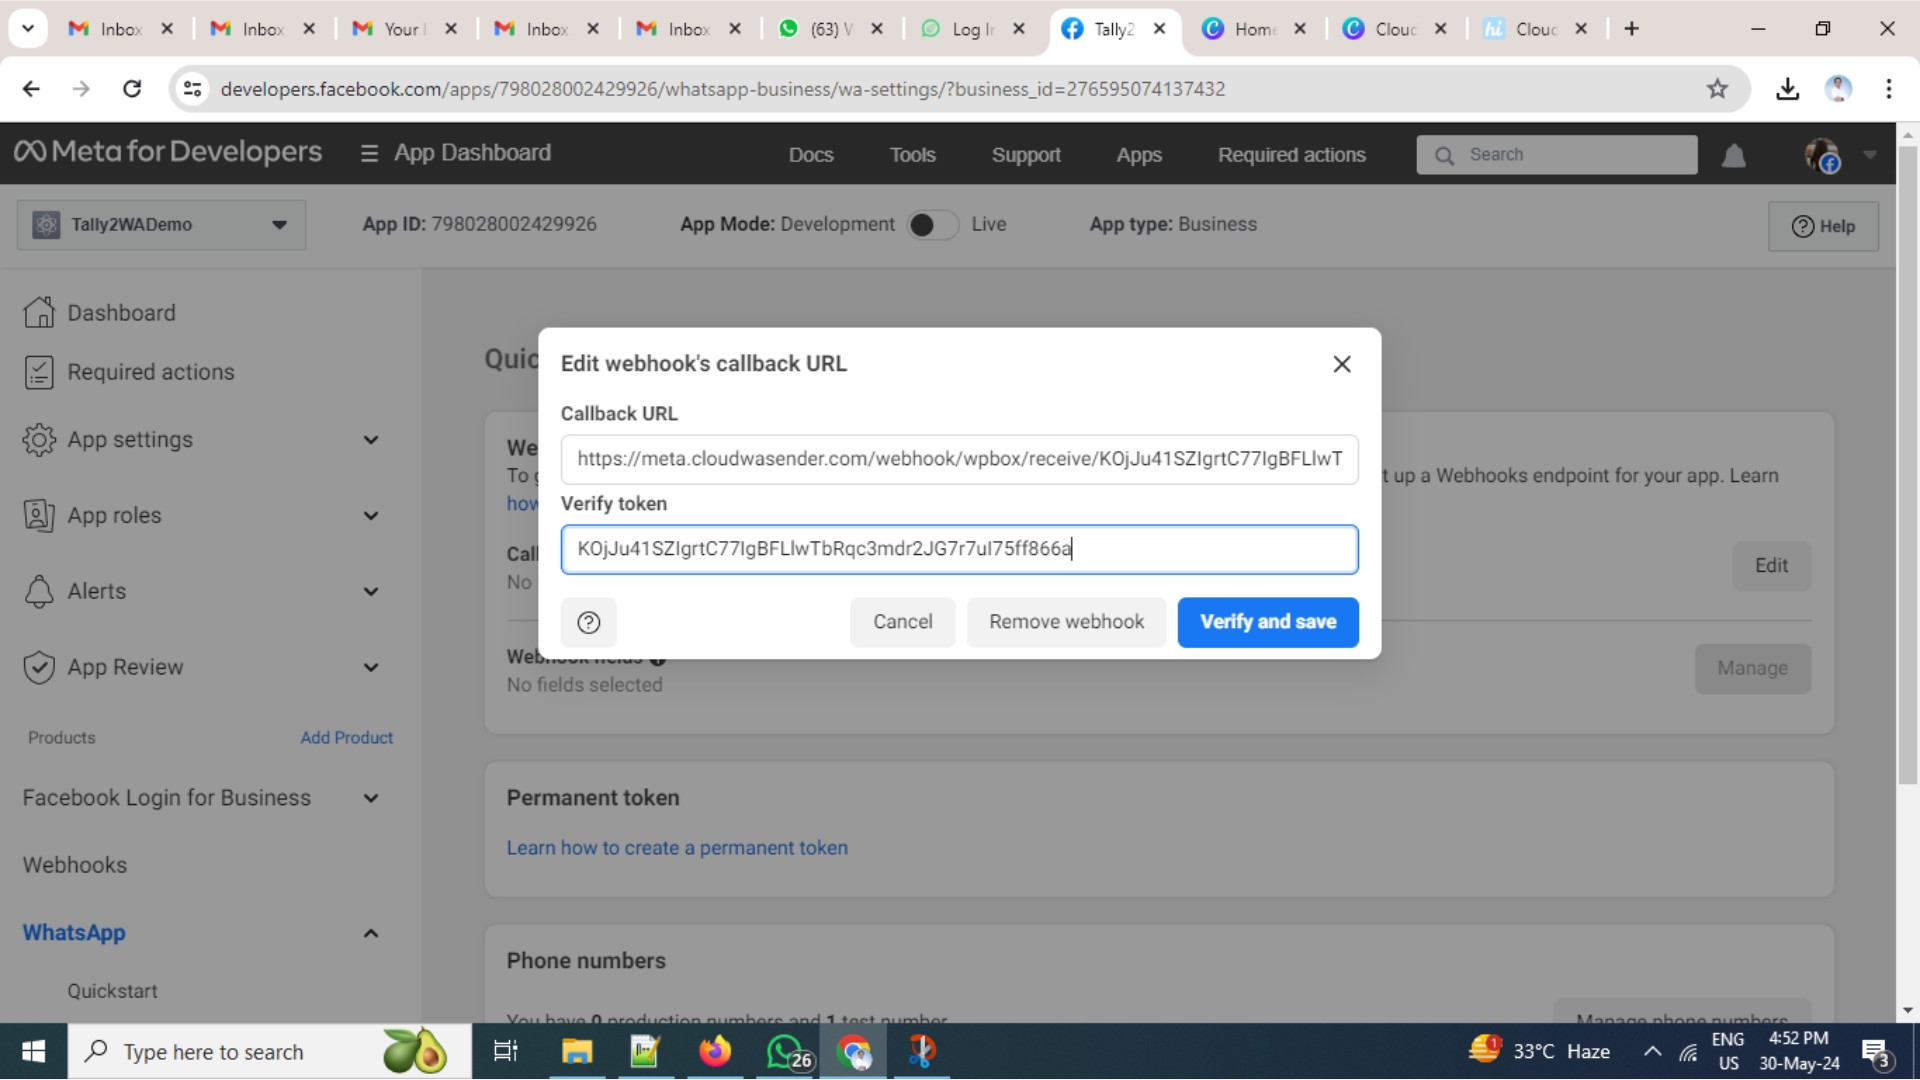
Now click on Webhook fields > Manage
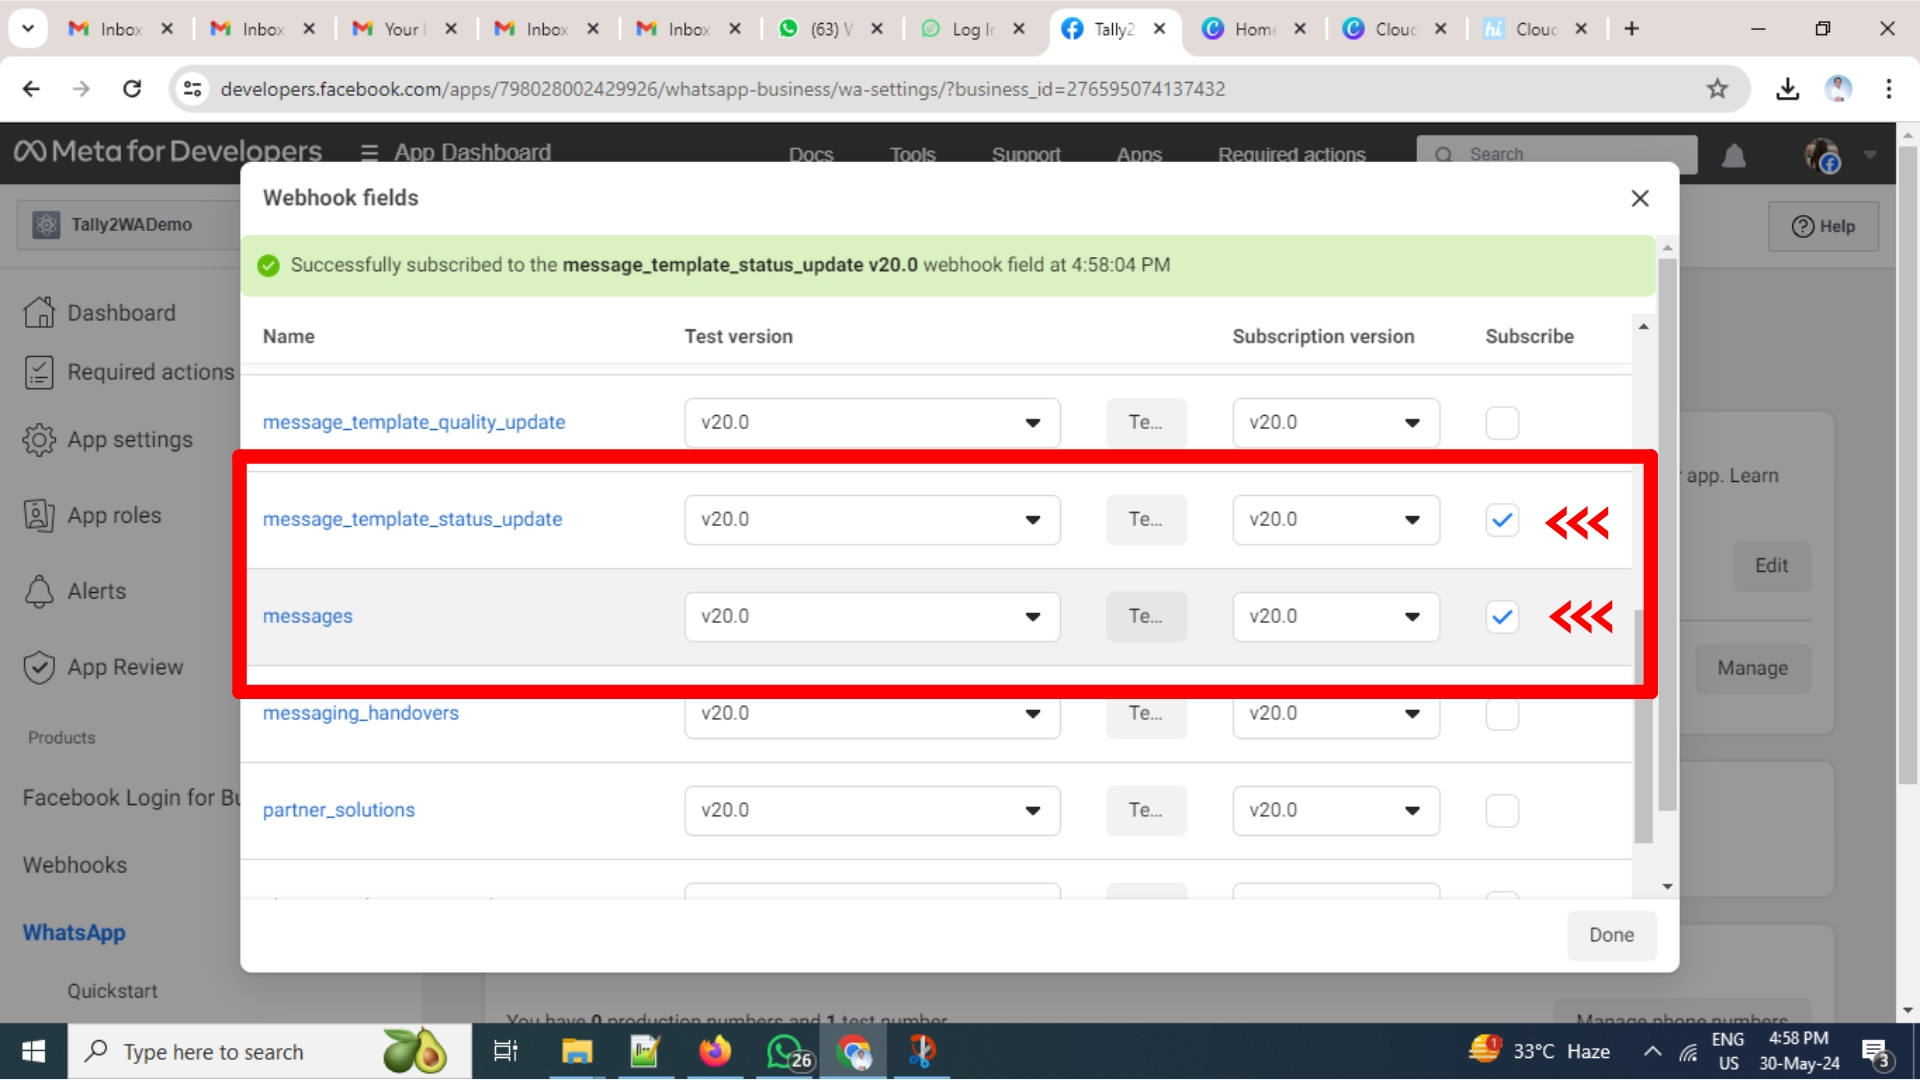
Check detailed guidlines by META
Add Mobile Number to the Facebook App
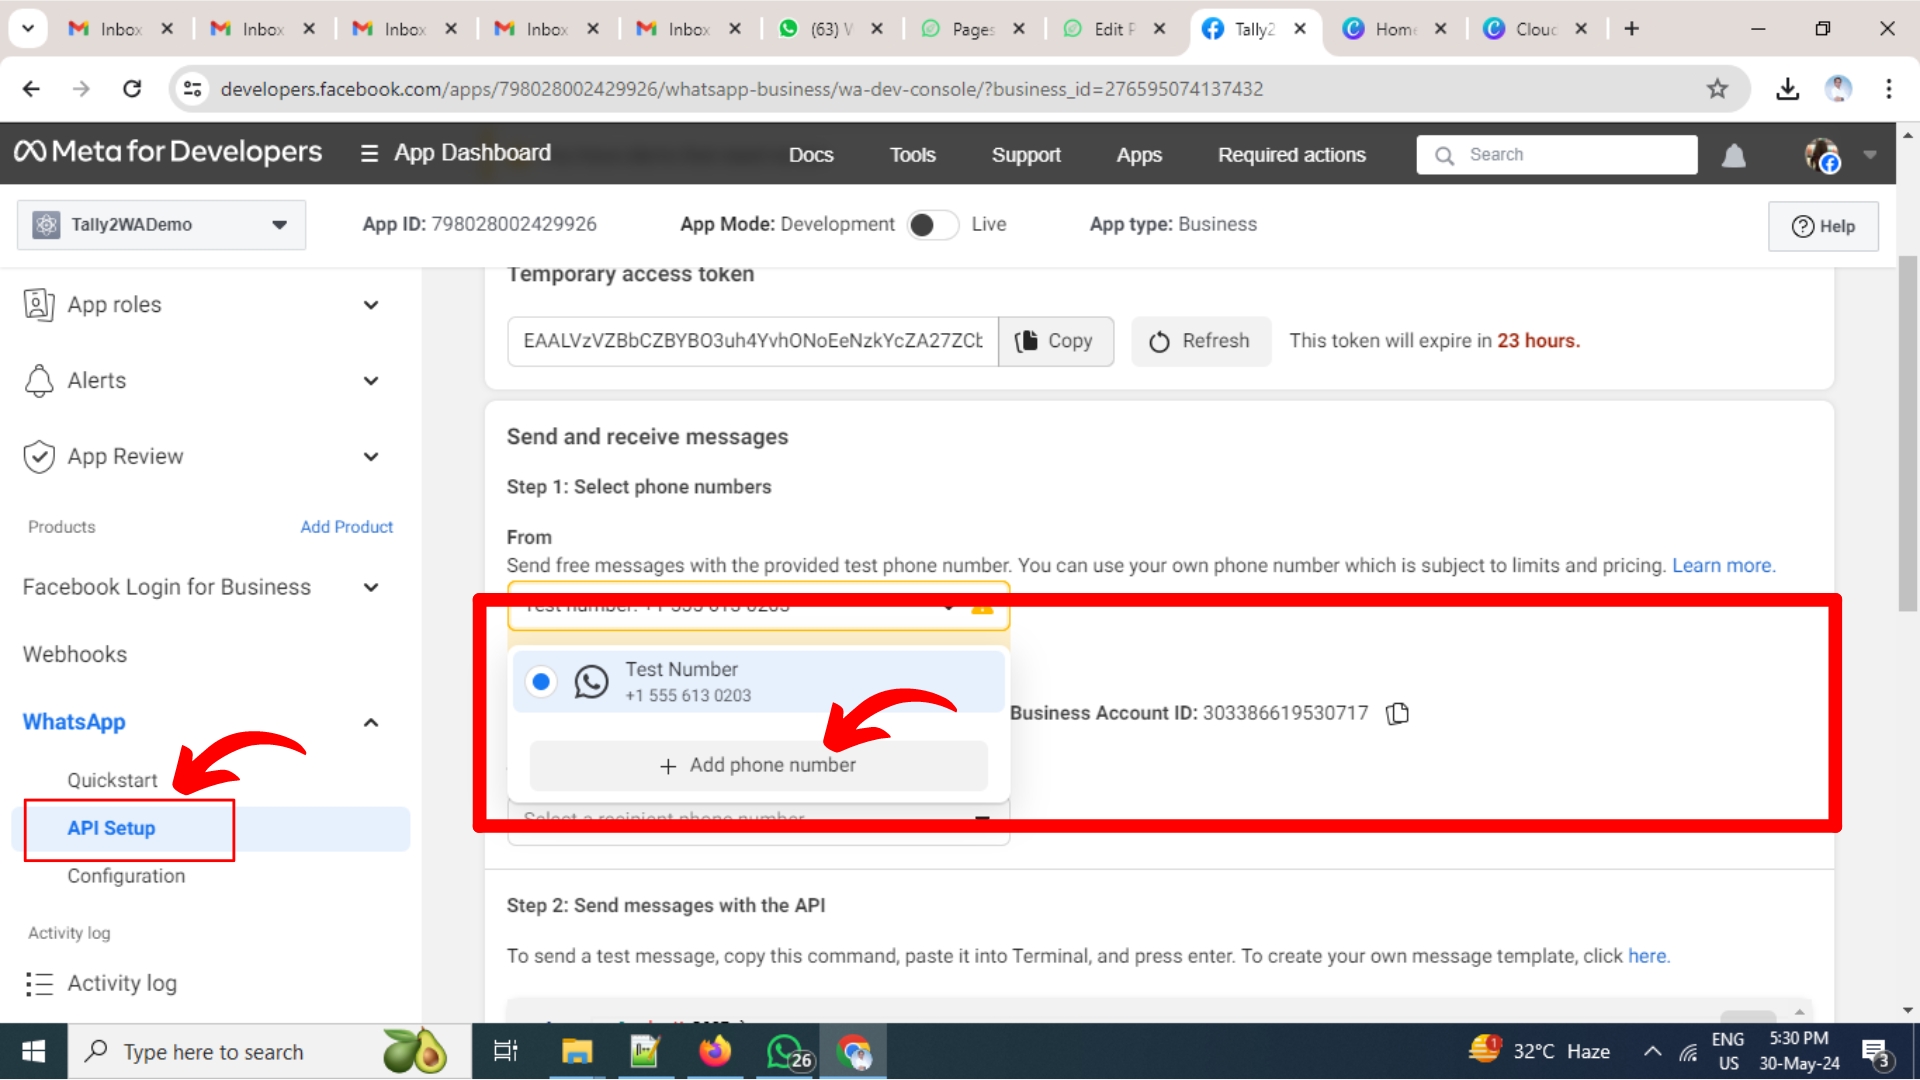
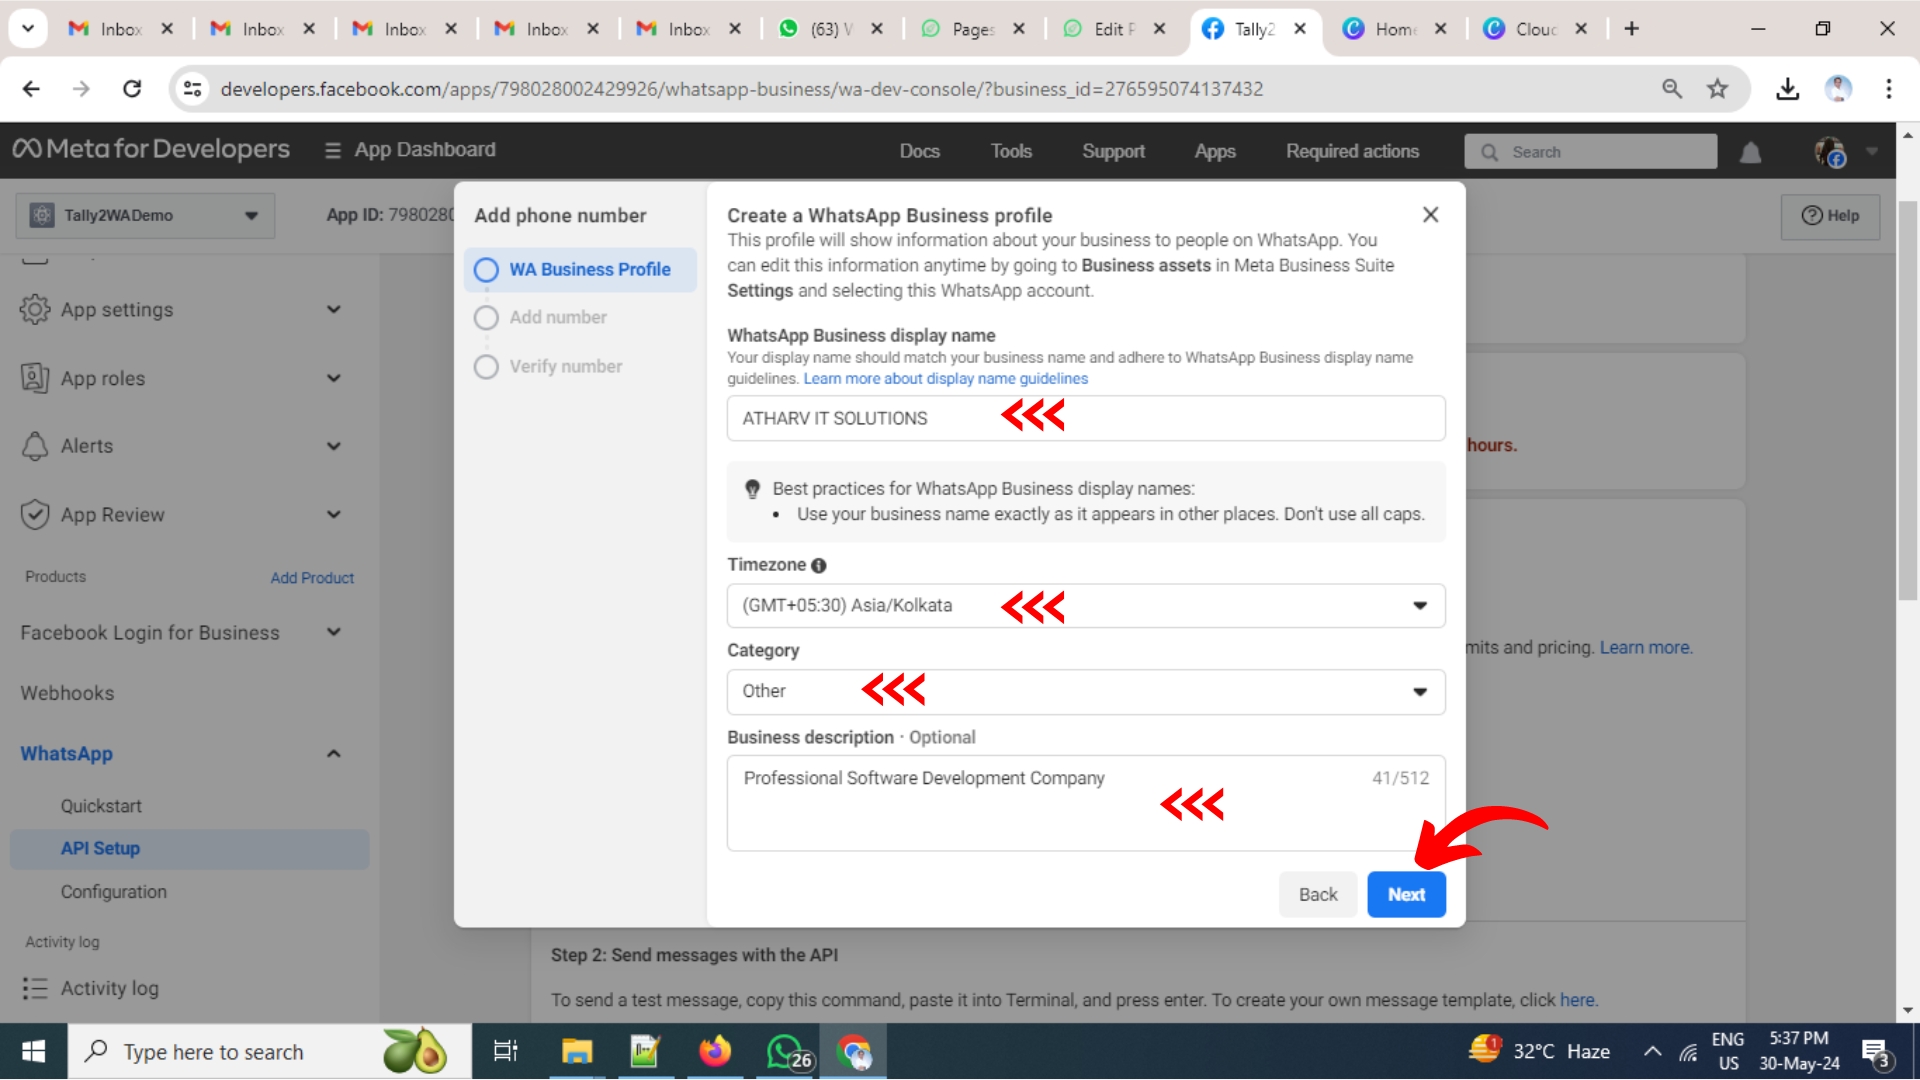
Once you are done with creating a facebook app as per above instructions, you may now add your business mobile number to the app through which you would like to send the WhatsApp API messages as shown in below snapshots;
Find Your App ID, Phone ID and Account ID
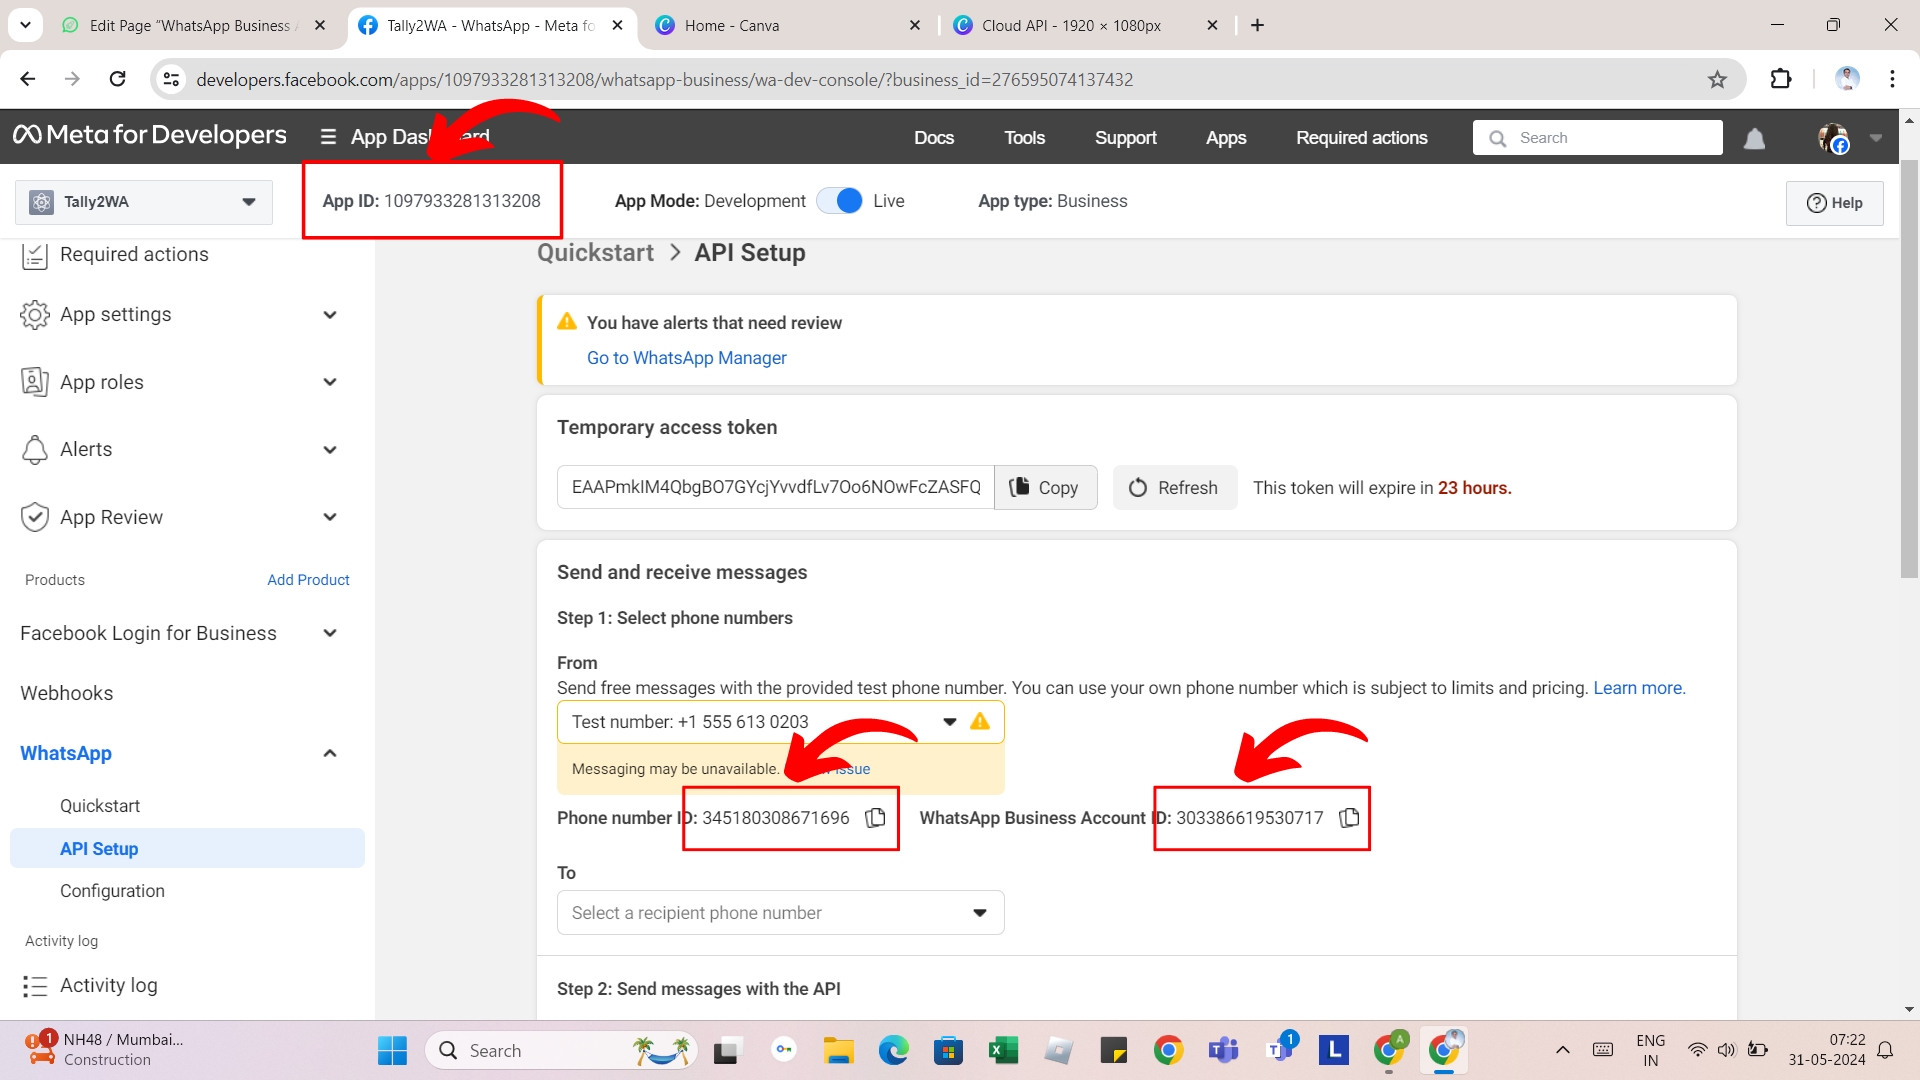
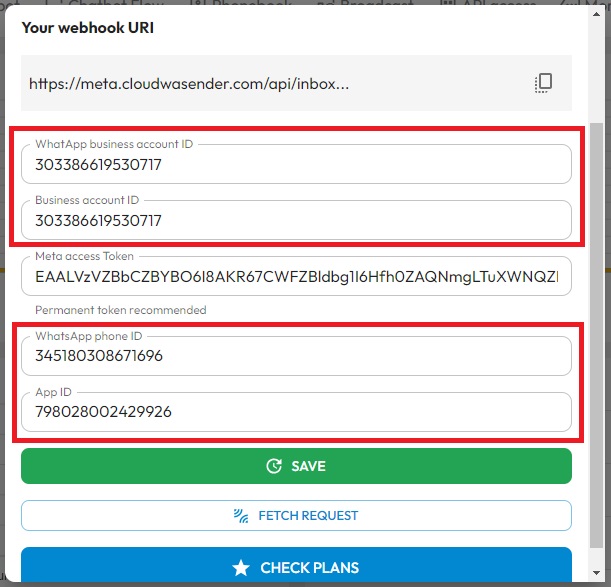
Once your mobile number is added successfully, you need to copy App ID, Phone number ID and WhatsApp Business Account ID assigned to your mobile number and paste the same in your https://meta.cloudwasender.com account as shown in below snapshot;
Check detailed guidelines by META
Generate Permenant Access Token
Once you are done adding your mobile number, you are now required to generate the facebook permenant access token to send WhatsApp API messages via META’s cloud server.
To generate permenant access token you need to visit https://business.facebook.com and follow the steps shown in below snapshots;

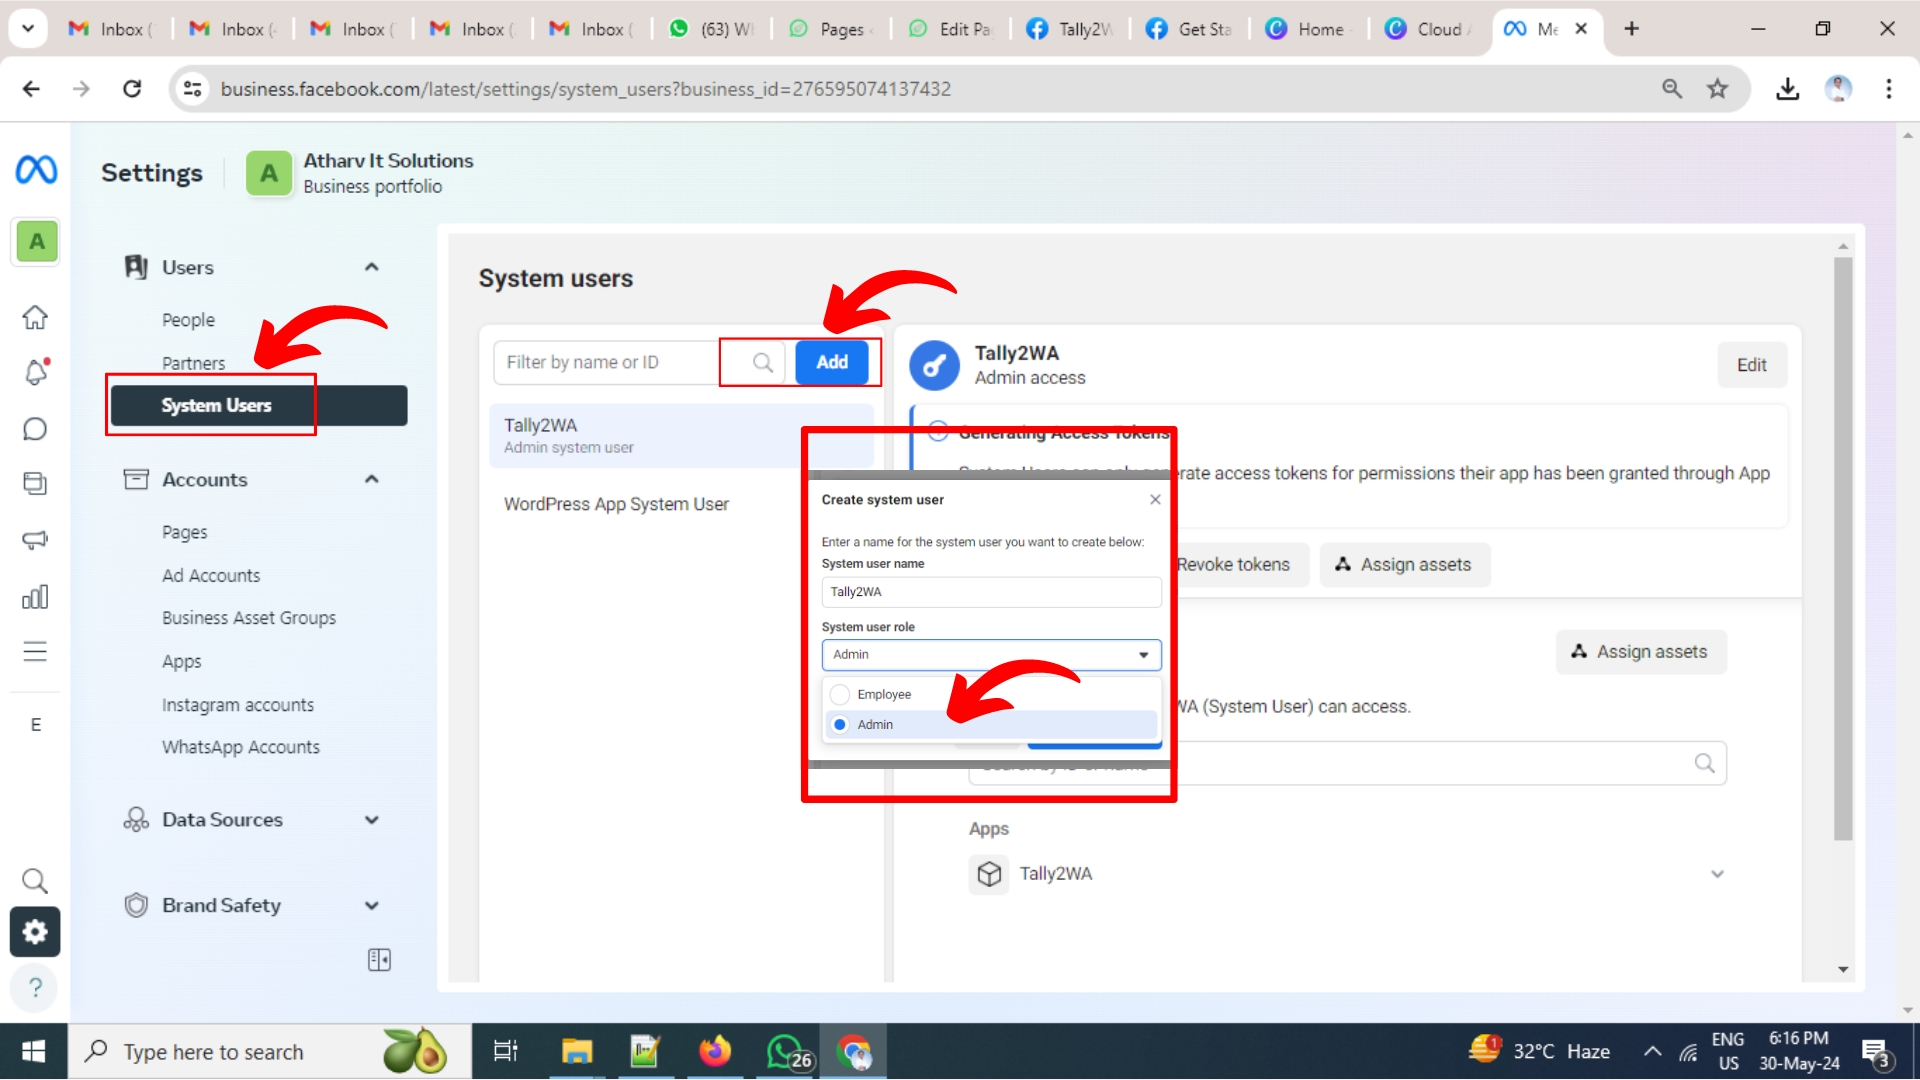
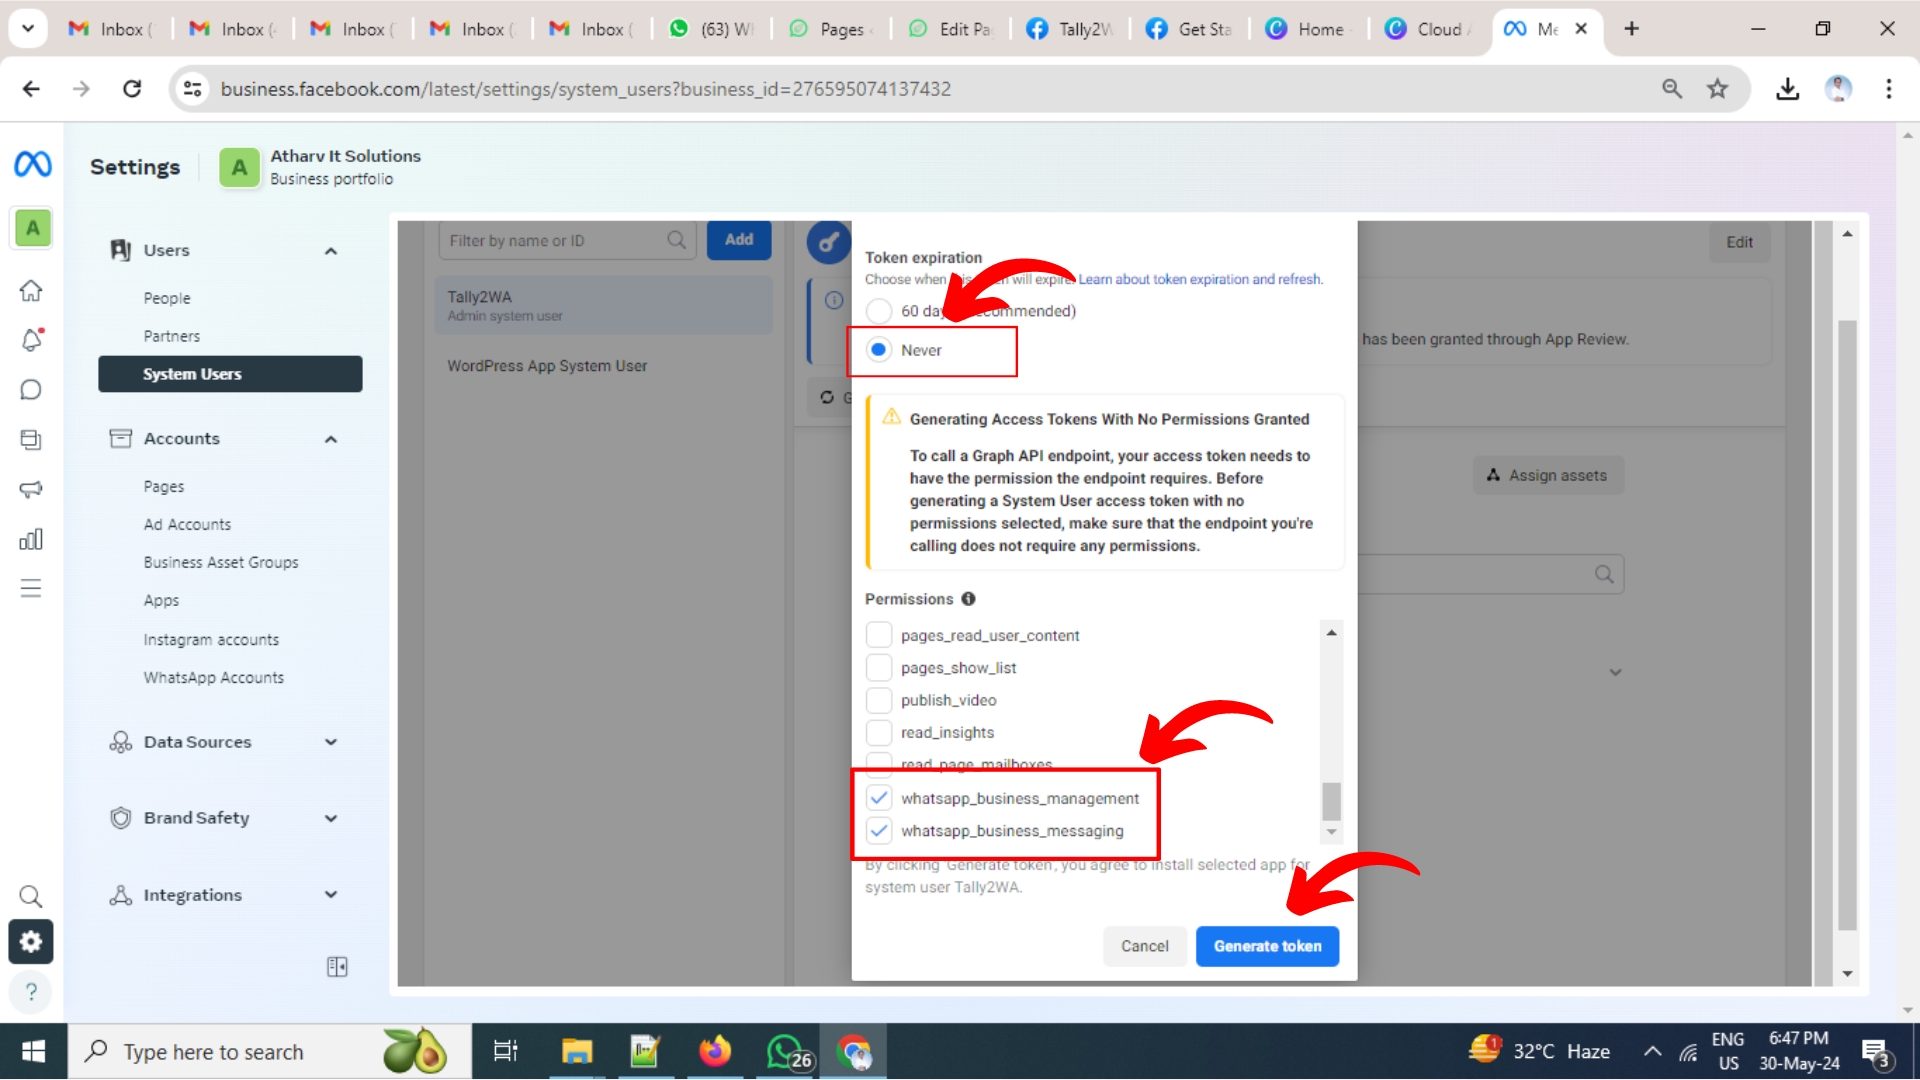
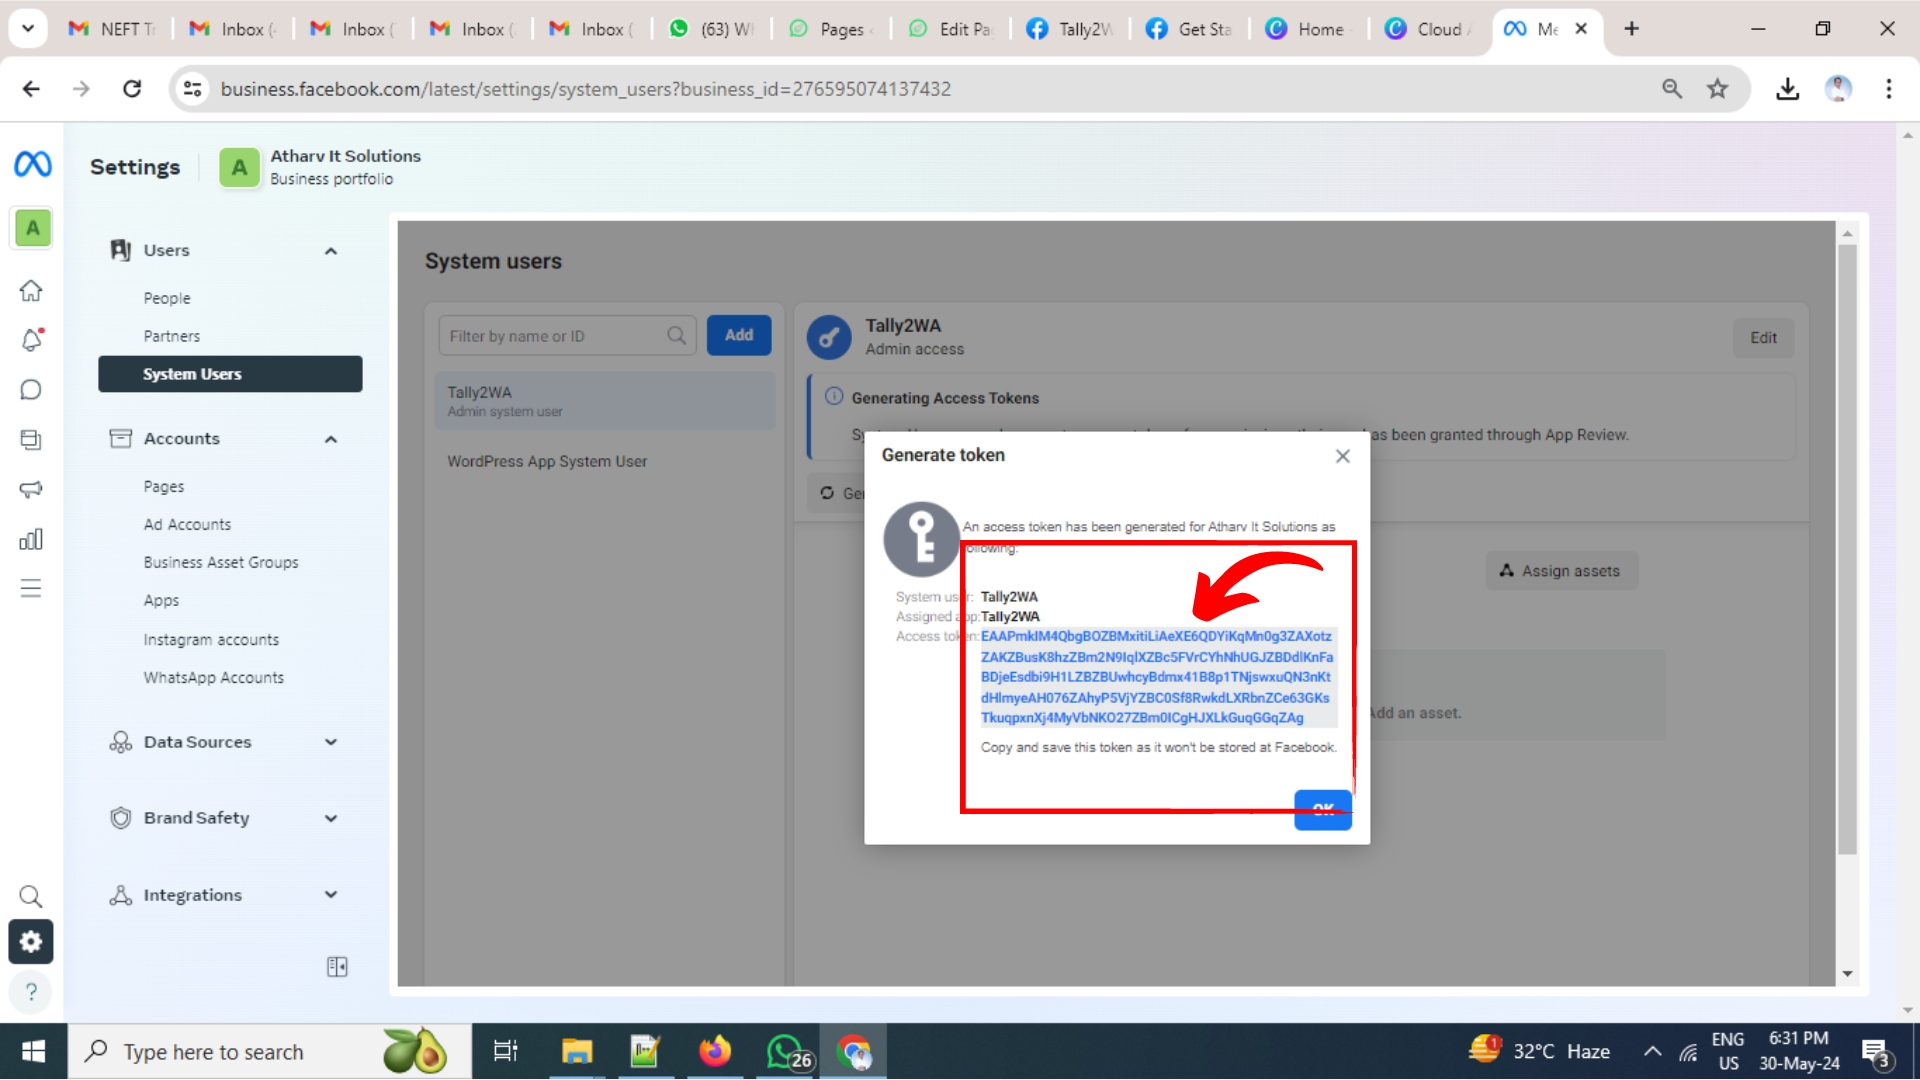
Copy generated token and paste it to your https://meta.cloudwasender.com account as shown below;
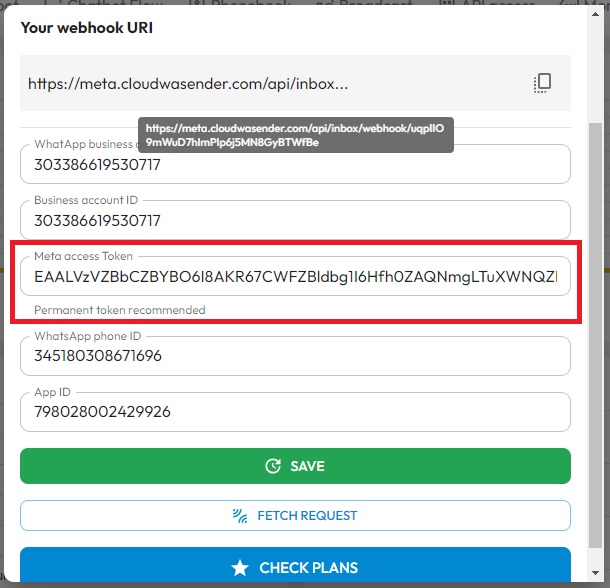
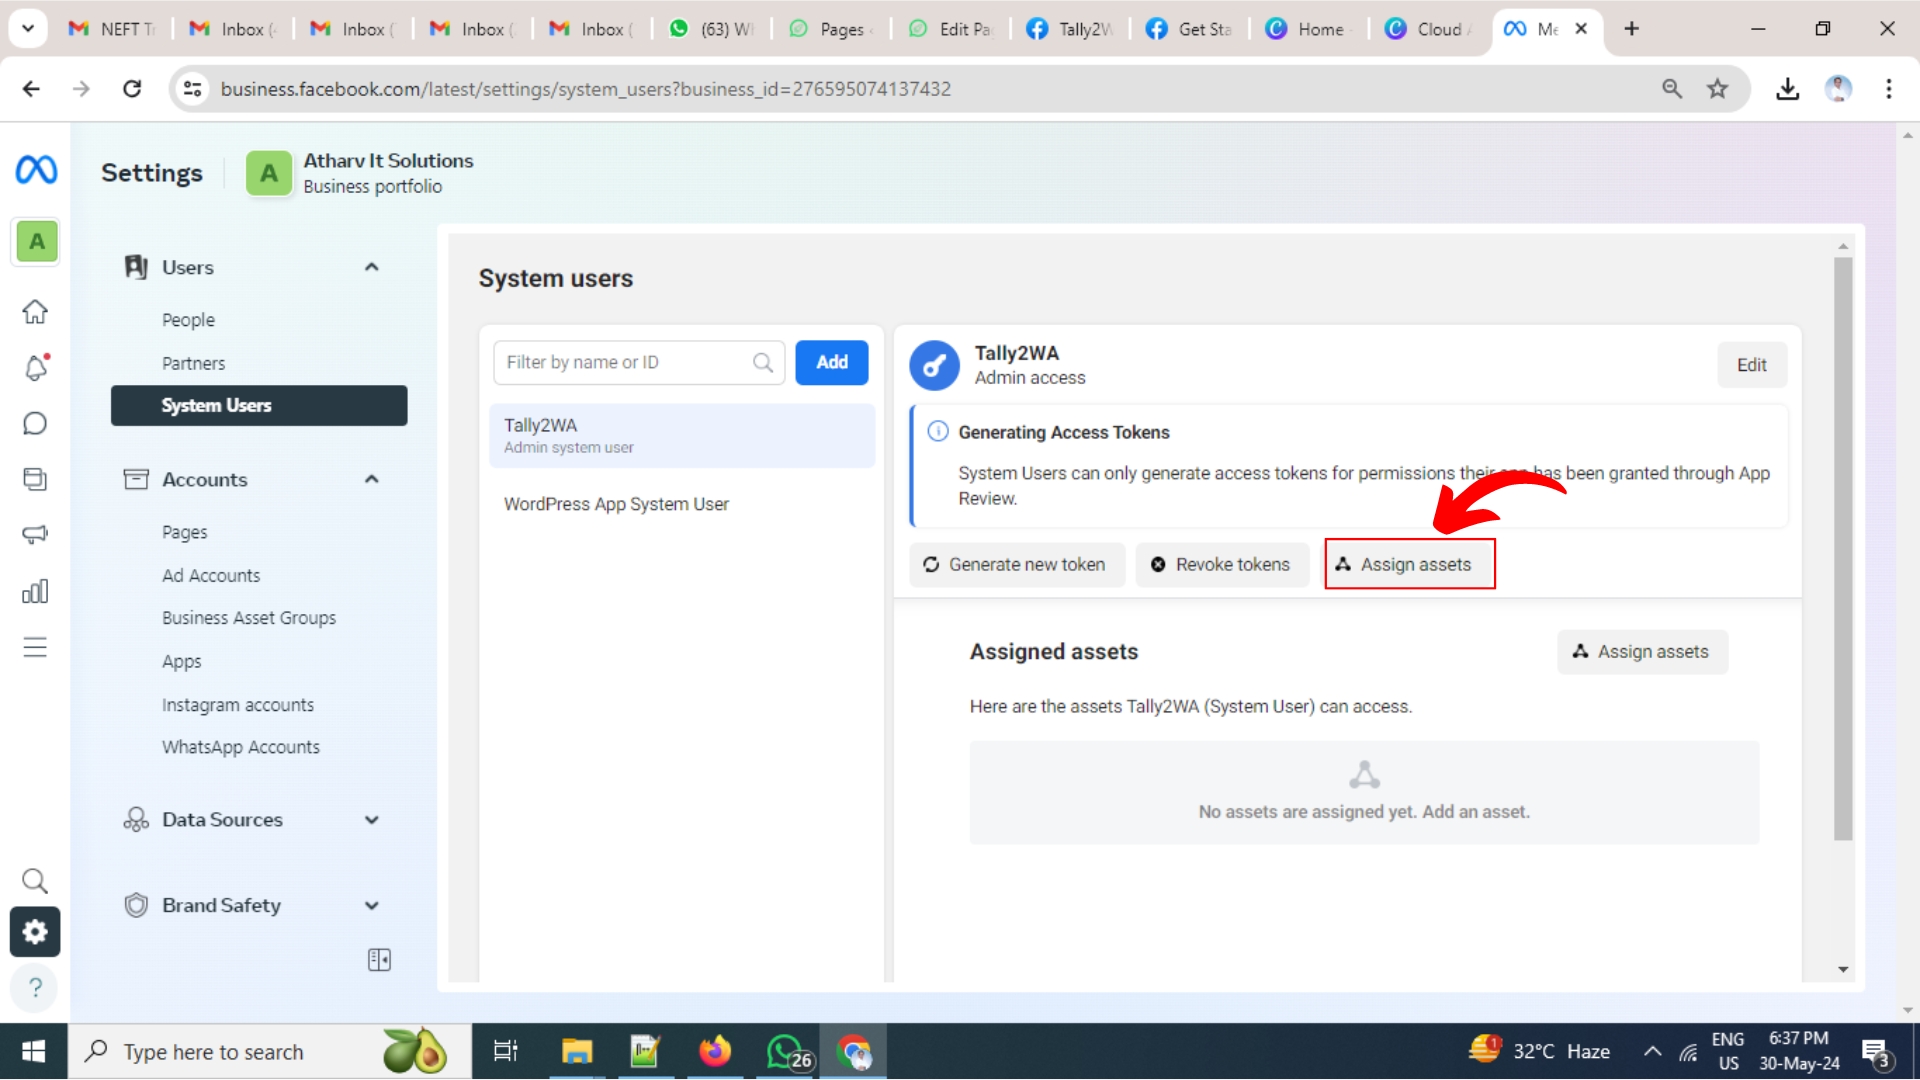
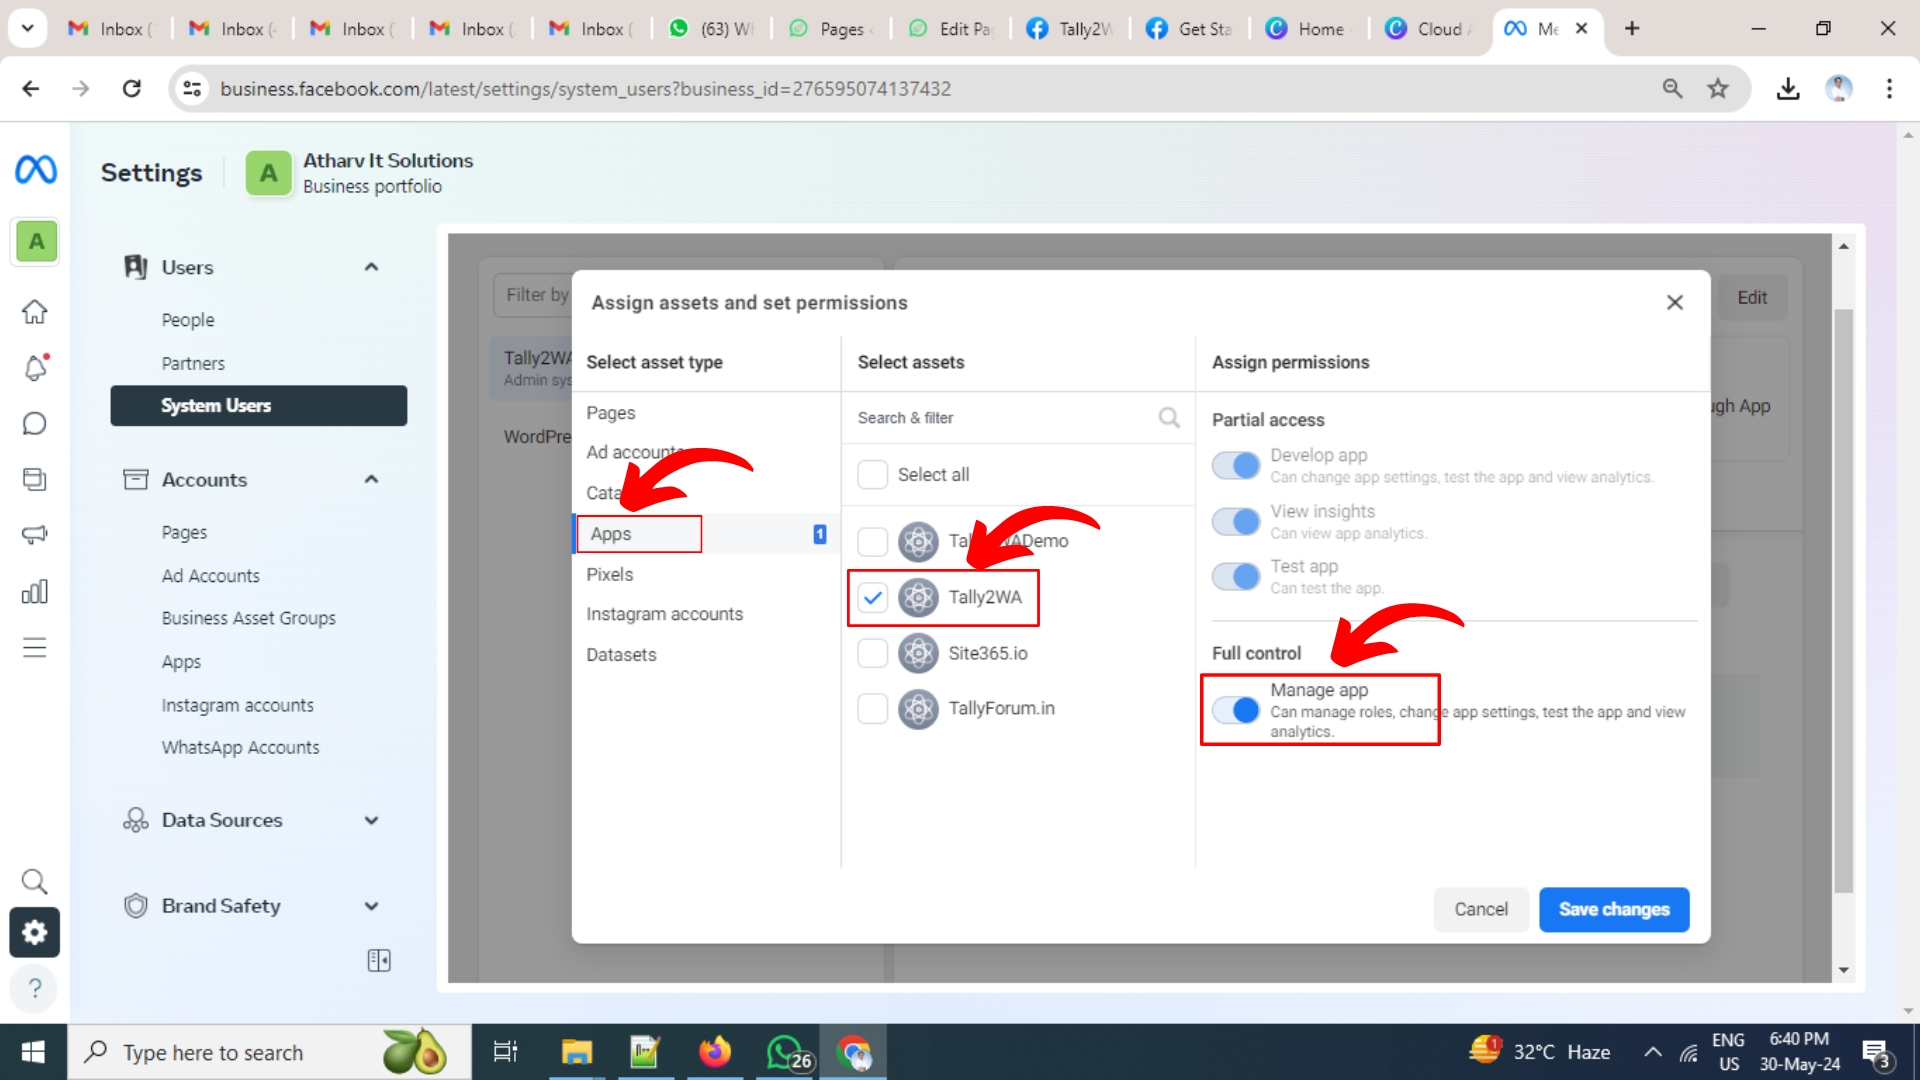
Don’t forget to Assign permenant access token to the App via Assign Assets as shown in below snapshot;
Go Live
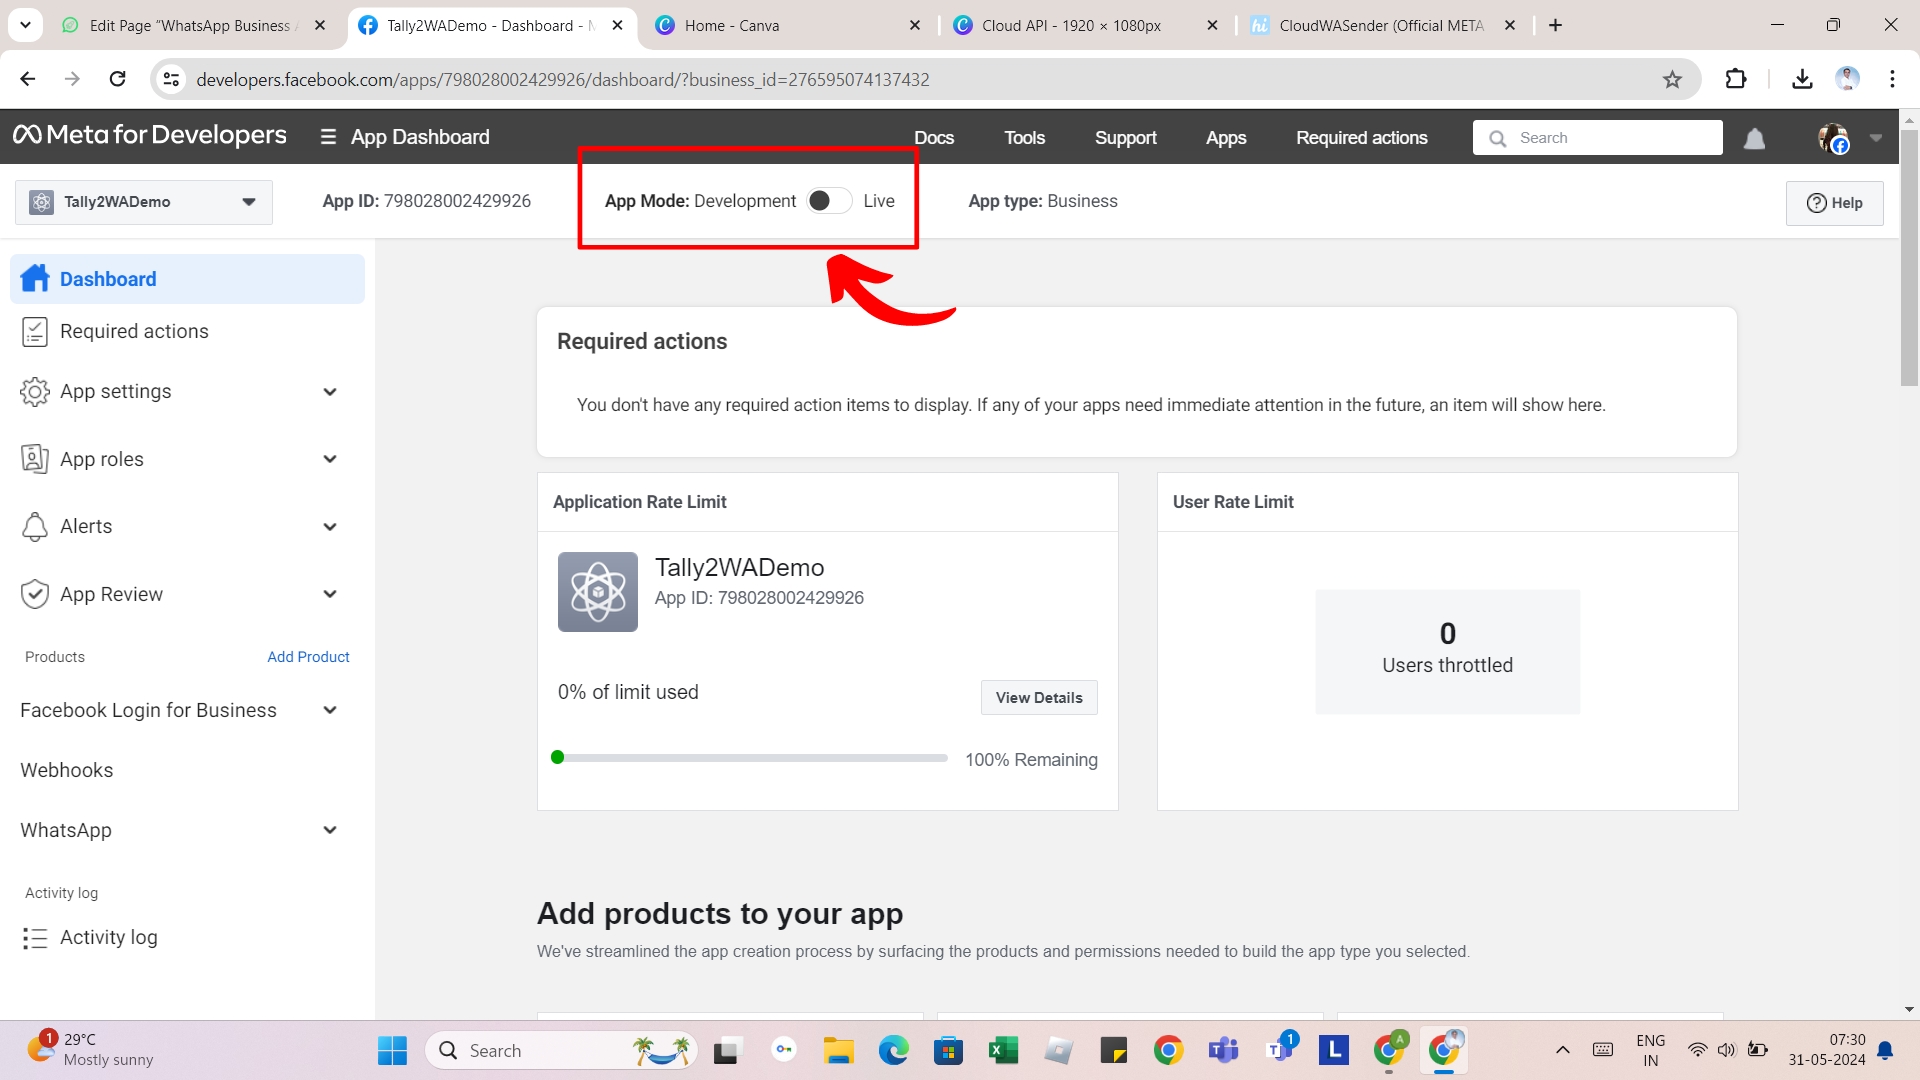
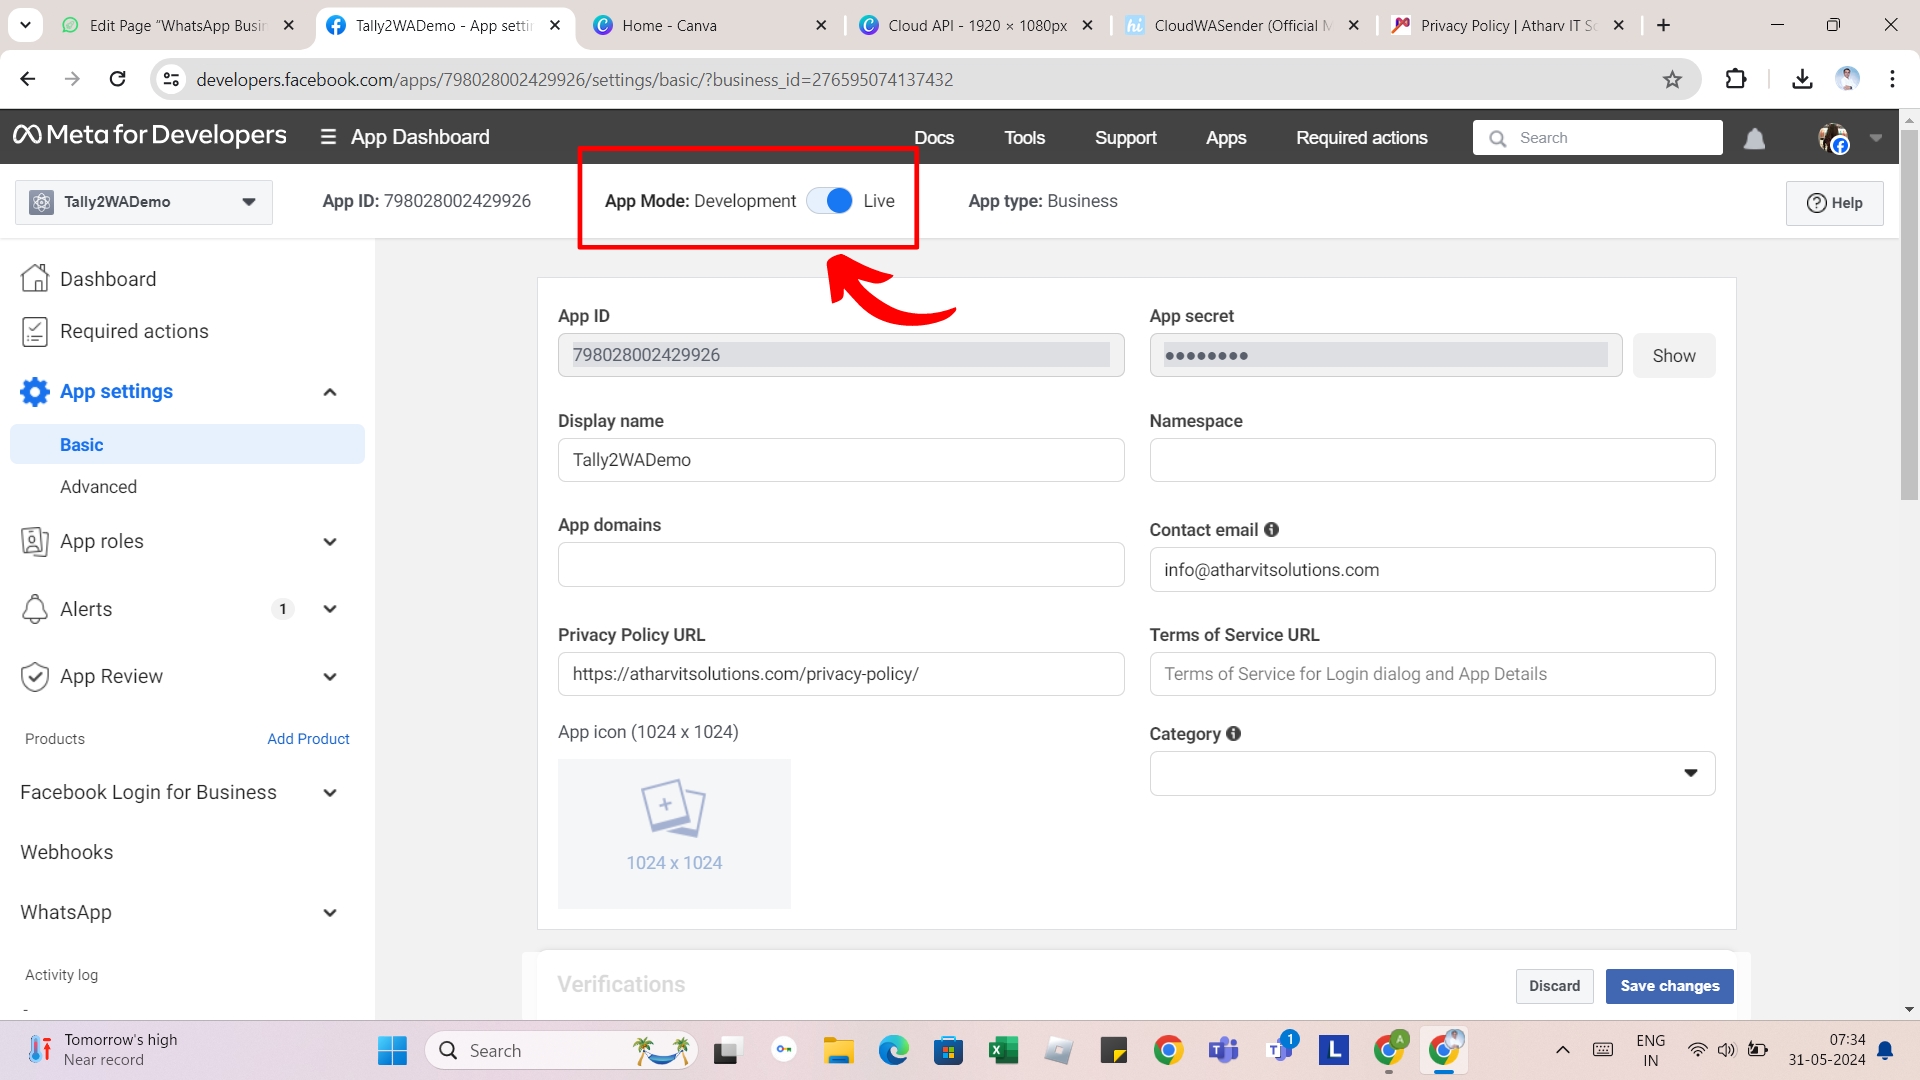
Once you are done with above steps, you can now switch your facebook app to live mode to start sending WhatsApp Business Messages via API using your own mobile number as shown in below snapshot;
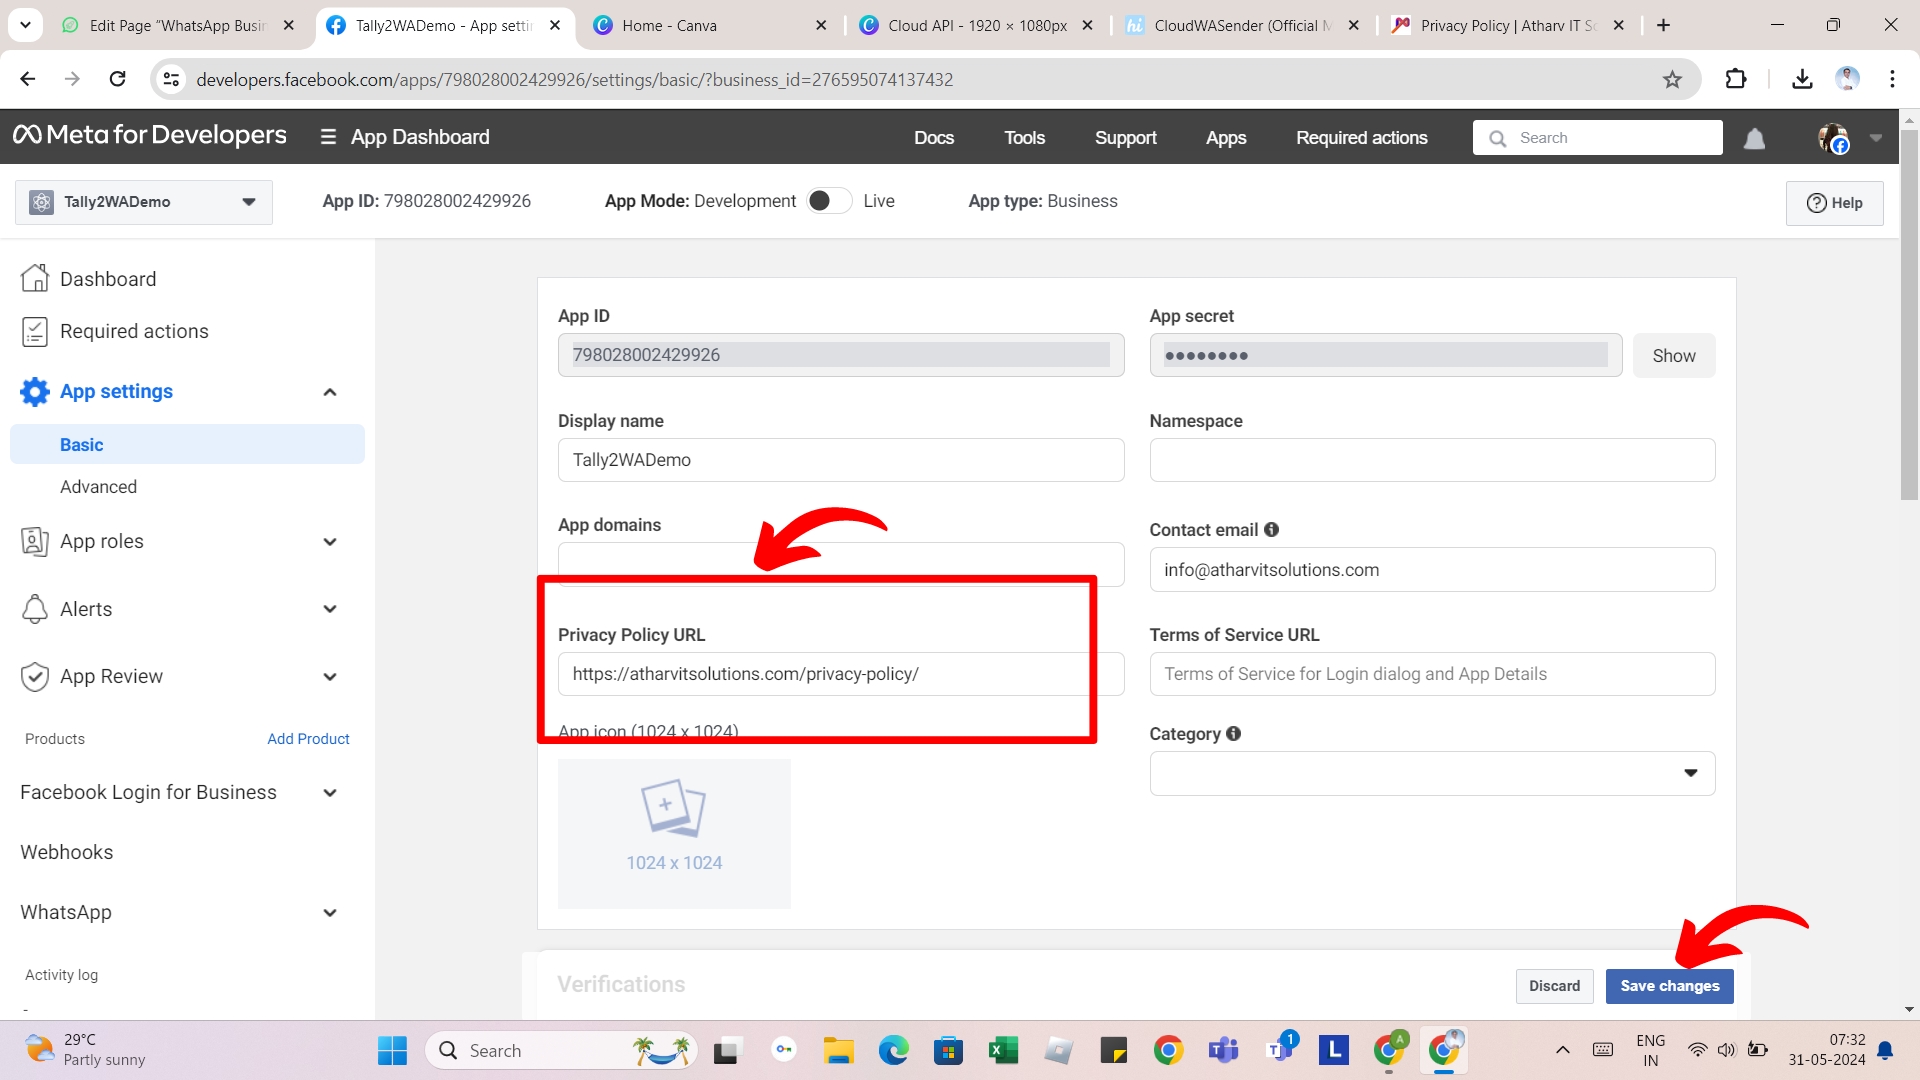
Click on the basic settings option to add your privacy policy
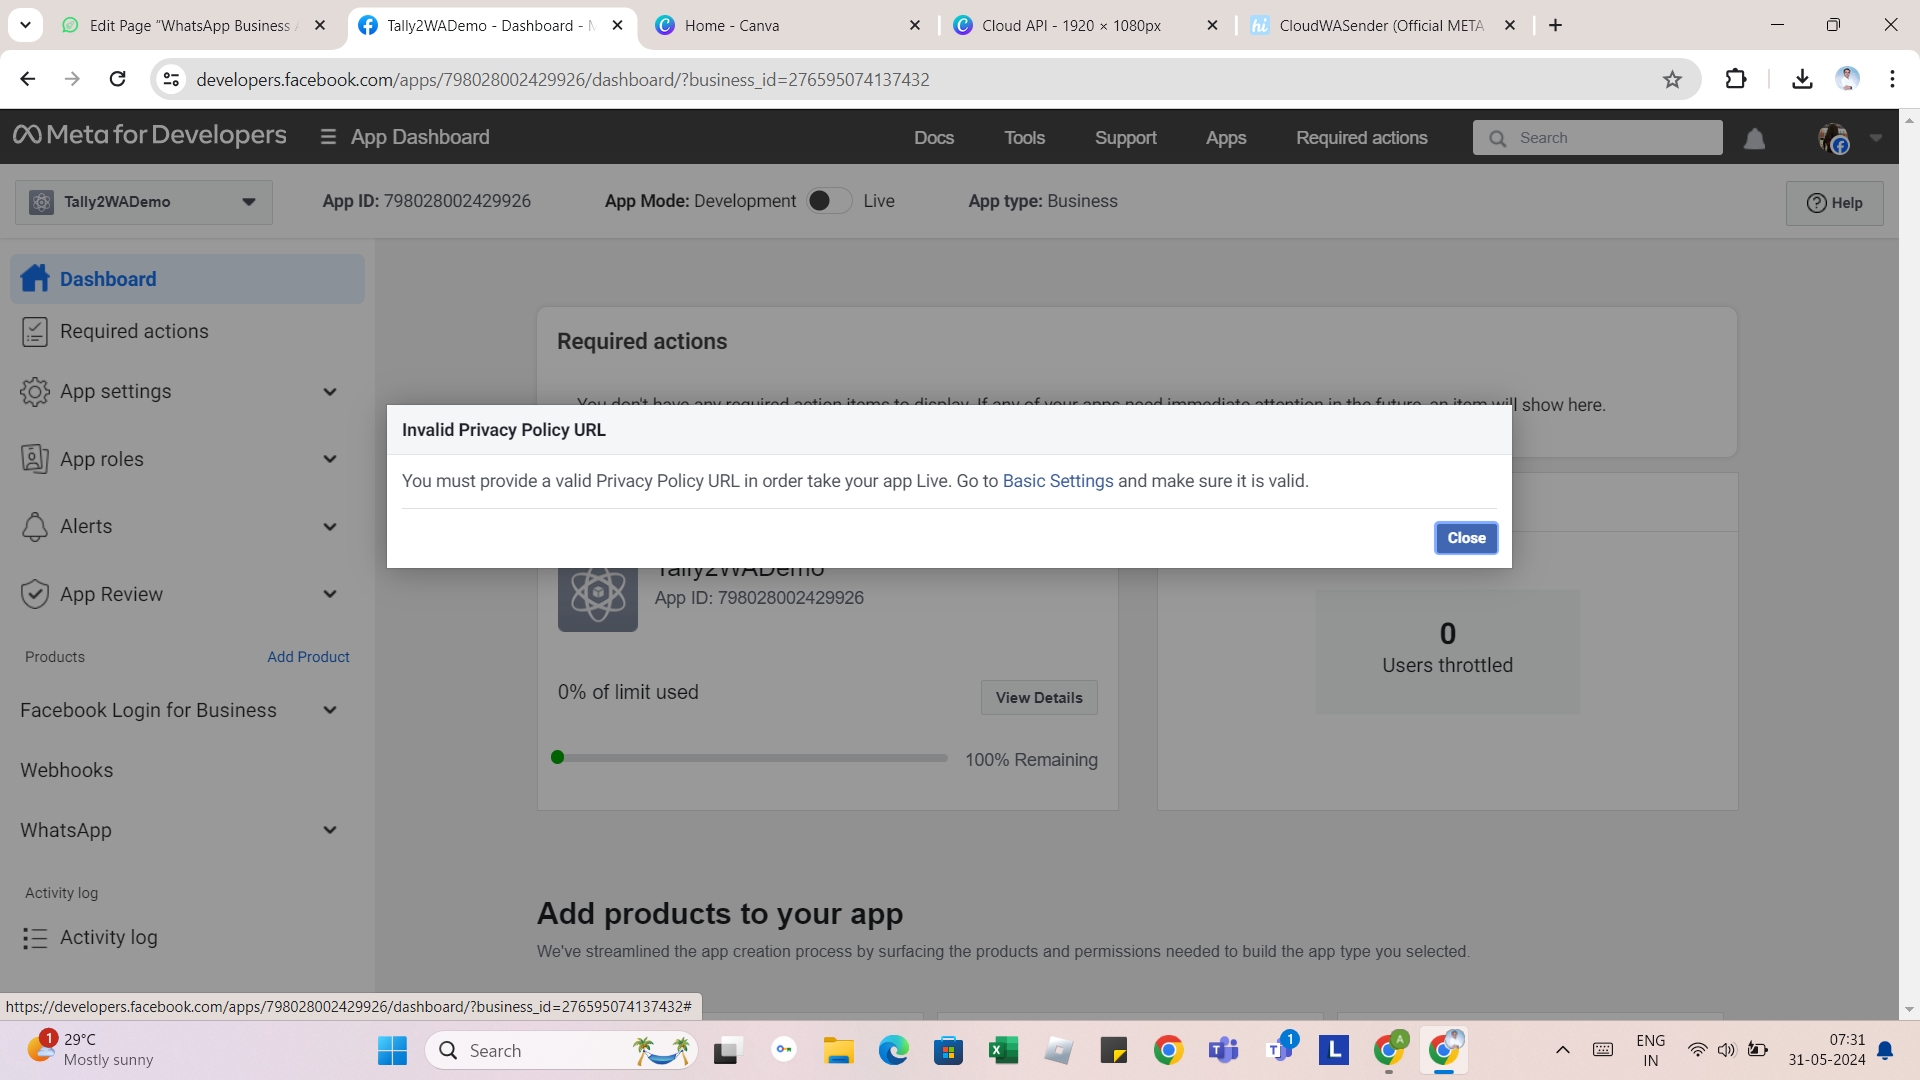
Here you need to add your privacy policy URL or Facebook Page URL
Sending WhatsApp Business Messages
In order to start sending business initiated messages you need to first create message templates that you wish to send to your customers.
Adding Message Template
Facebook allows you to create three types of messages i.e. 1) Utility 2) Marketing 3) Authentication
- Utility messages are ideally a transaction confirmation and notification messages and they are sent via your business application
- Marketing messages are ideally your business promotion or offer related messages that you can sent as a campaign to your contacts in bulk
- Authentication messages are ideally used for sending OTP related messages
To add WhatsApp message templates follow the instructions below;
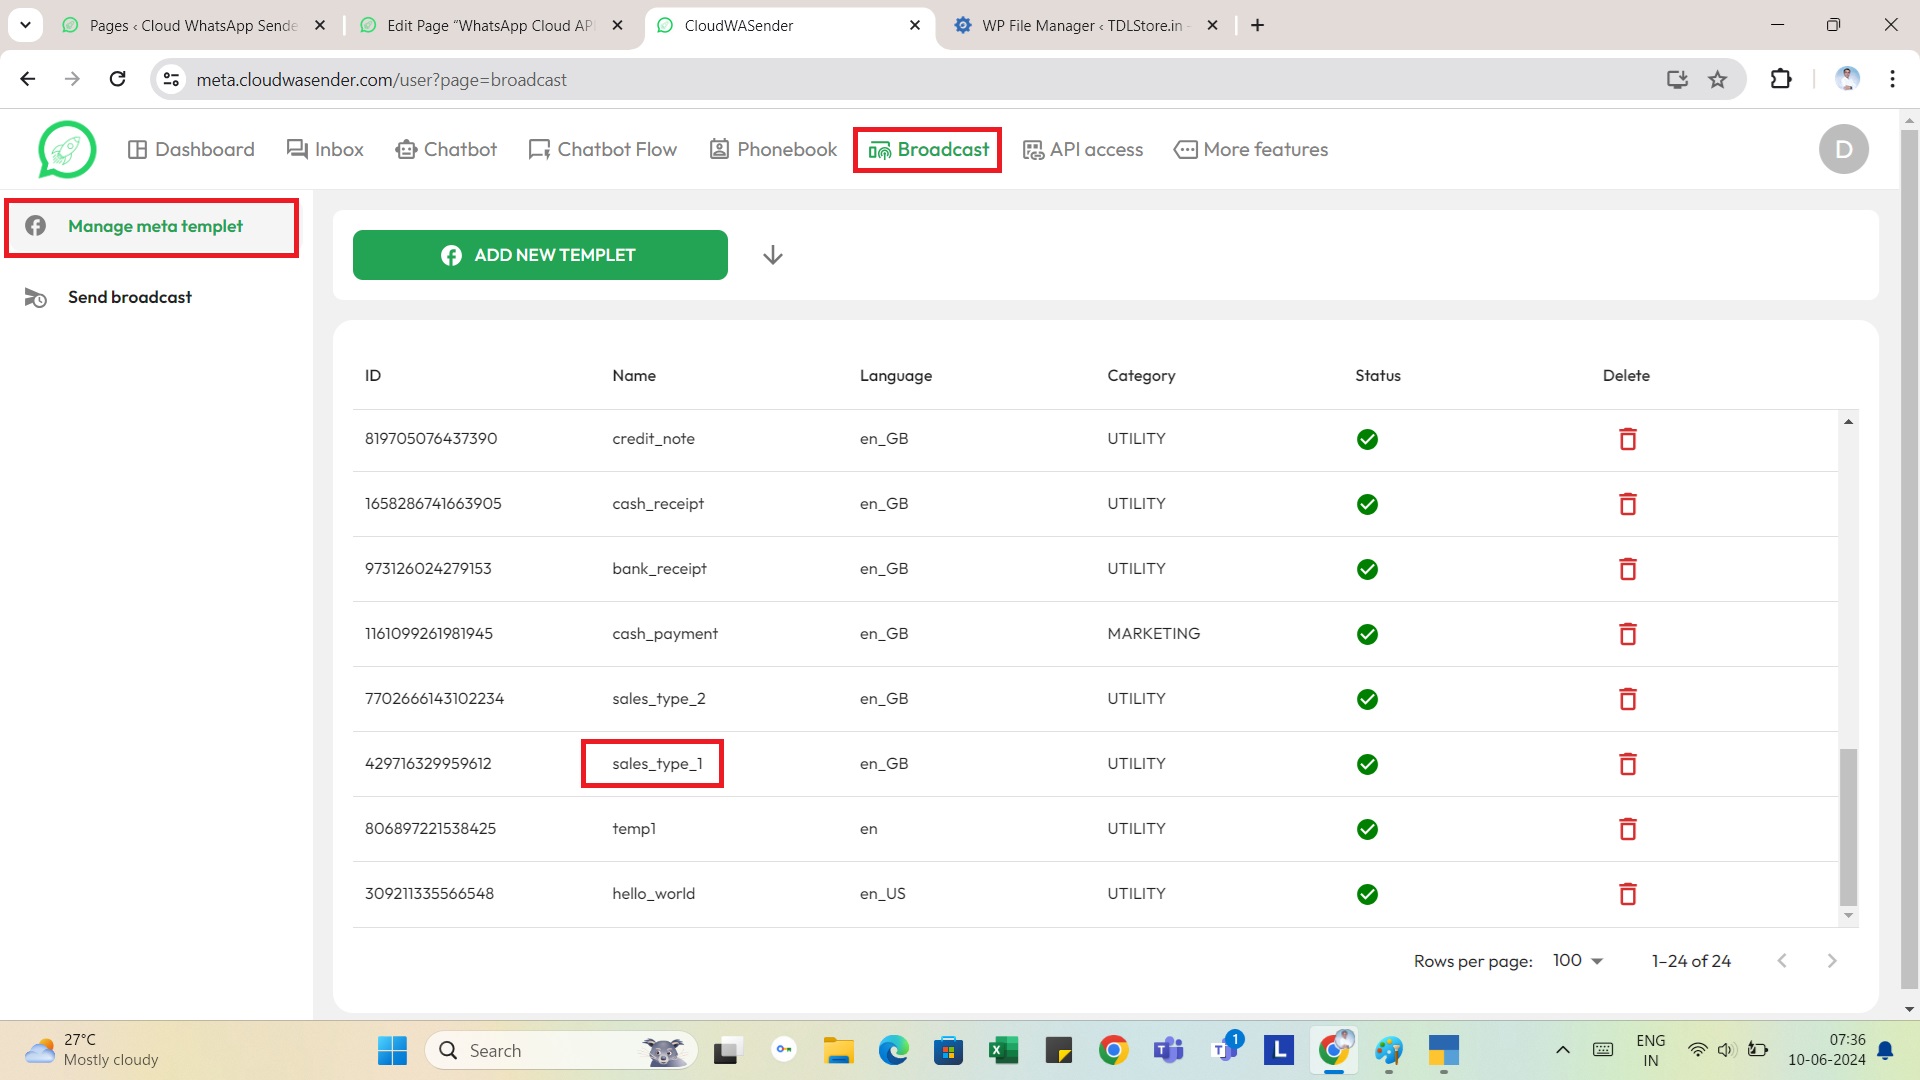
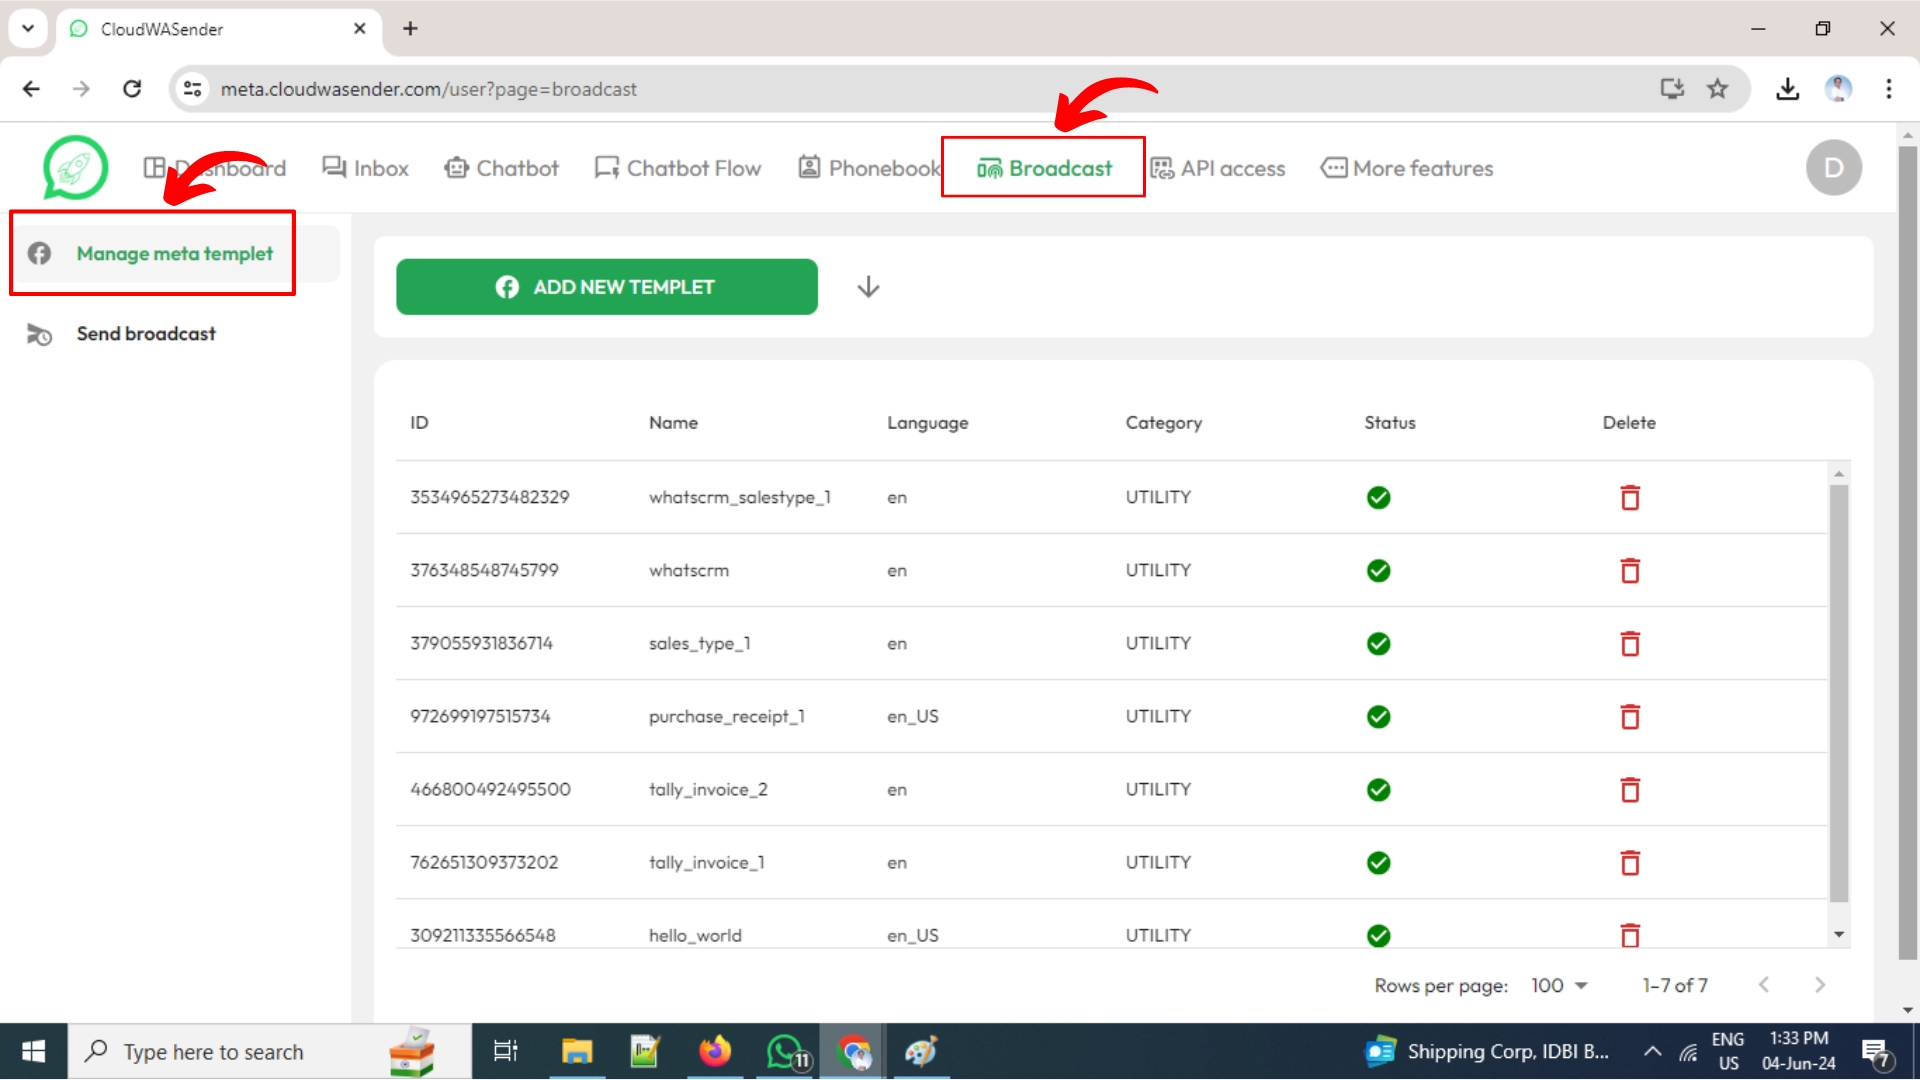
Login to your https://meta.cloudwasender.com account and go to Broadcast > Manage META Templates > Add New Template;
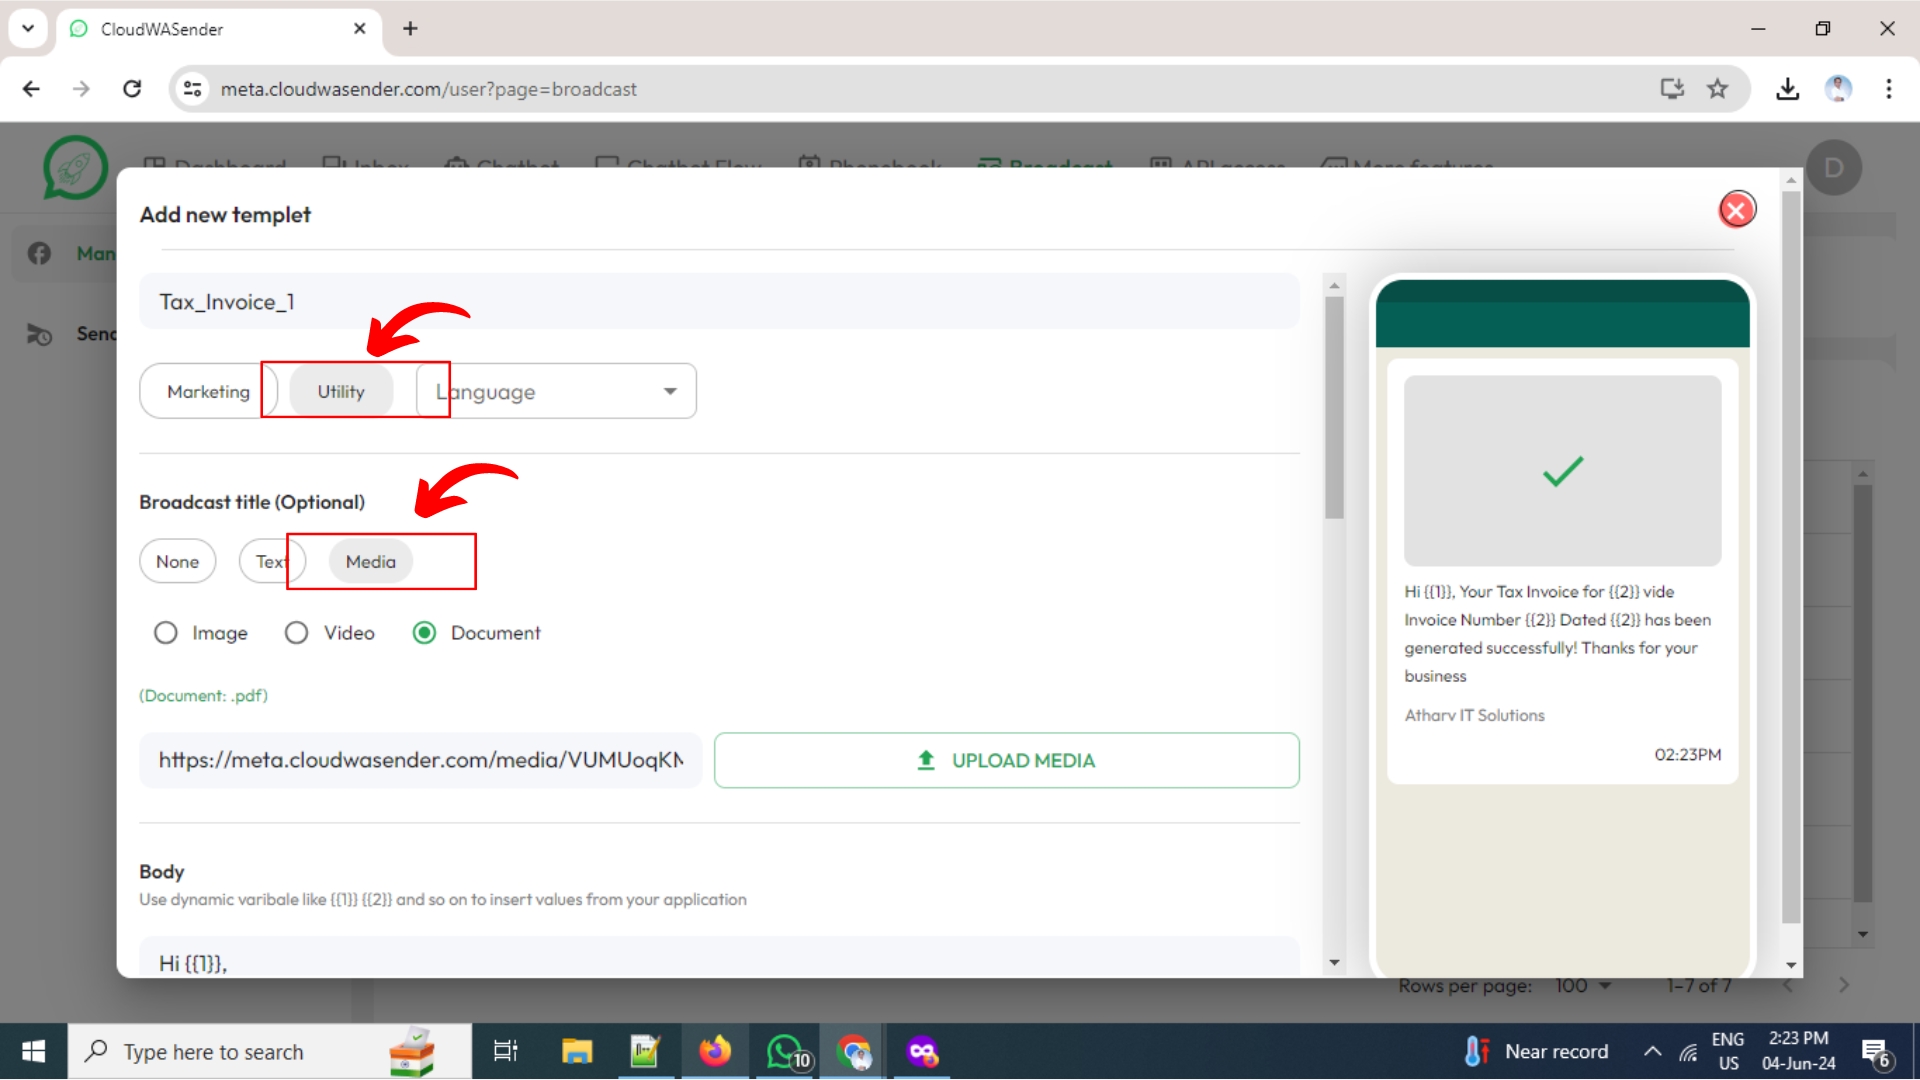
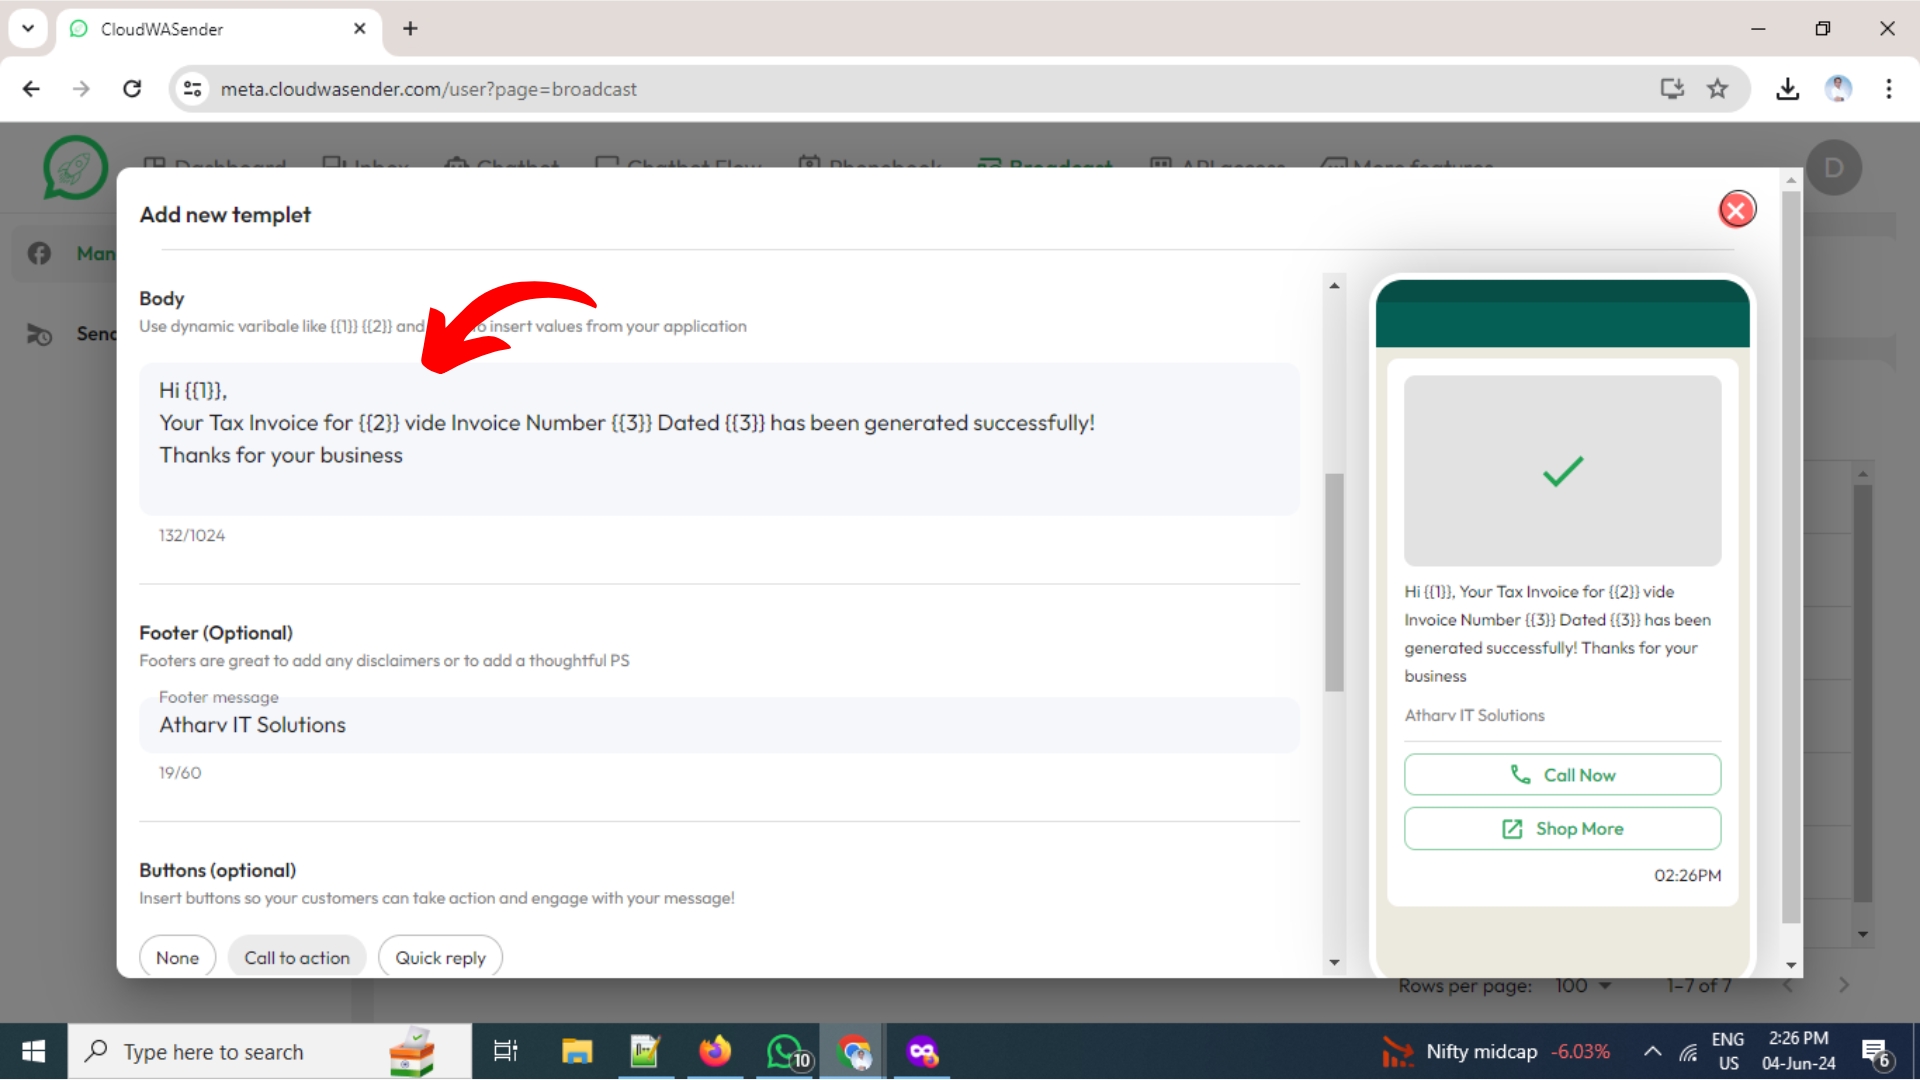
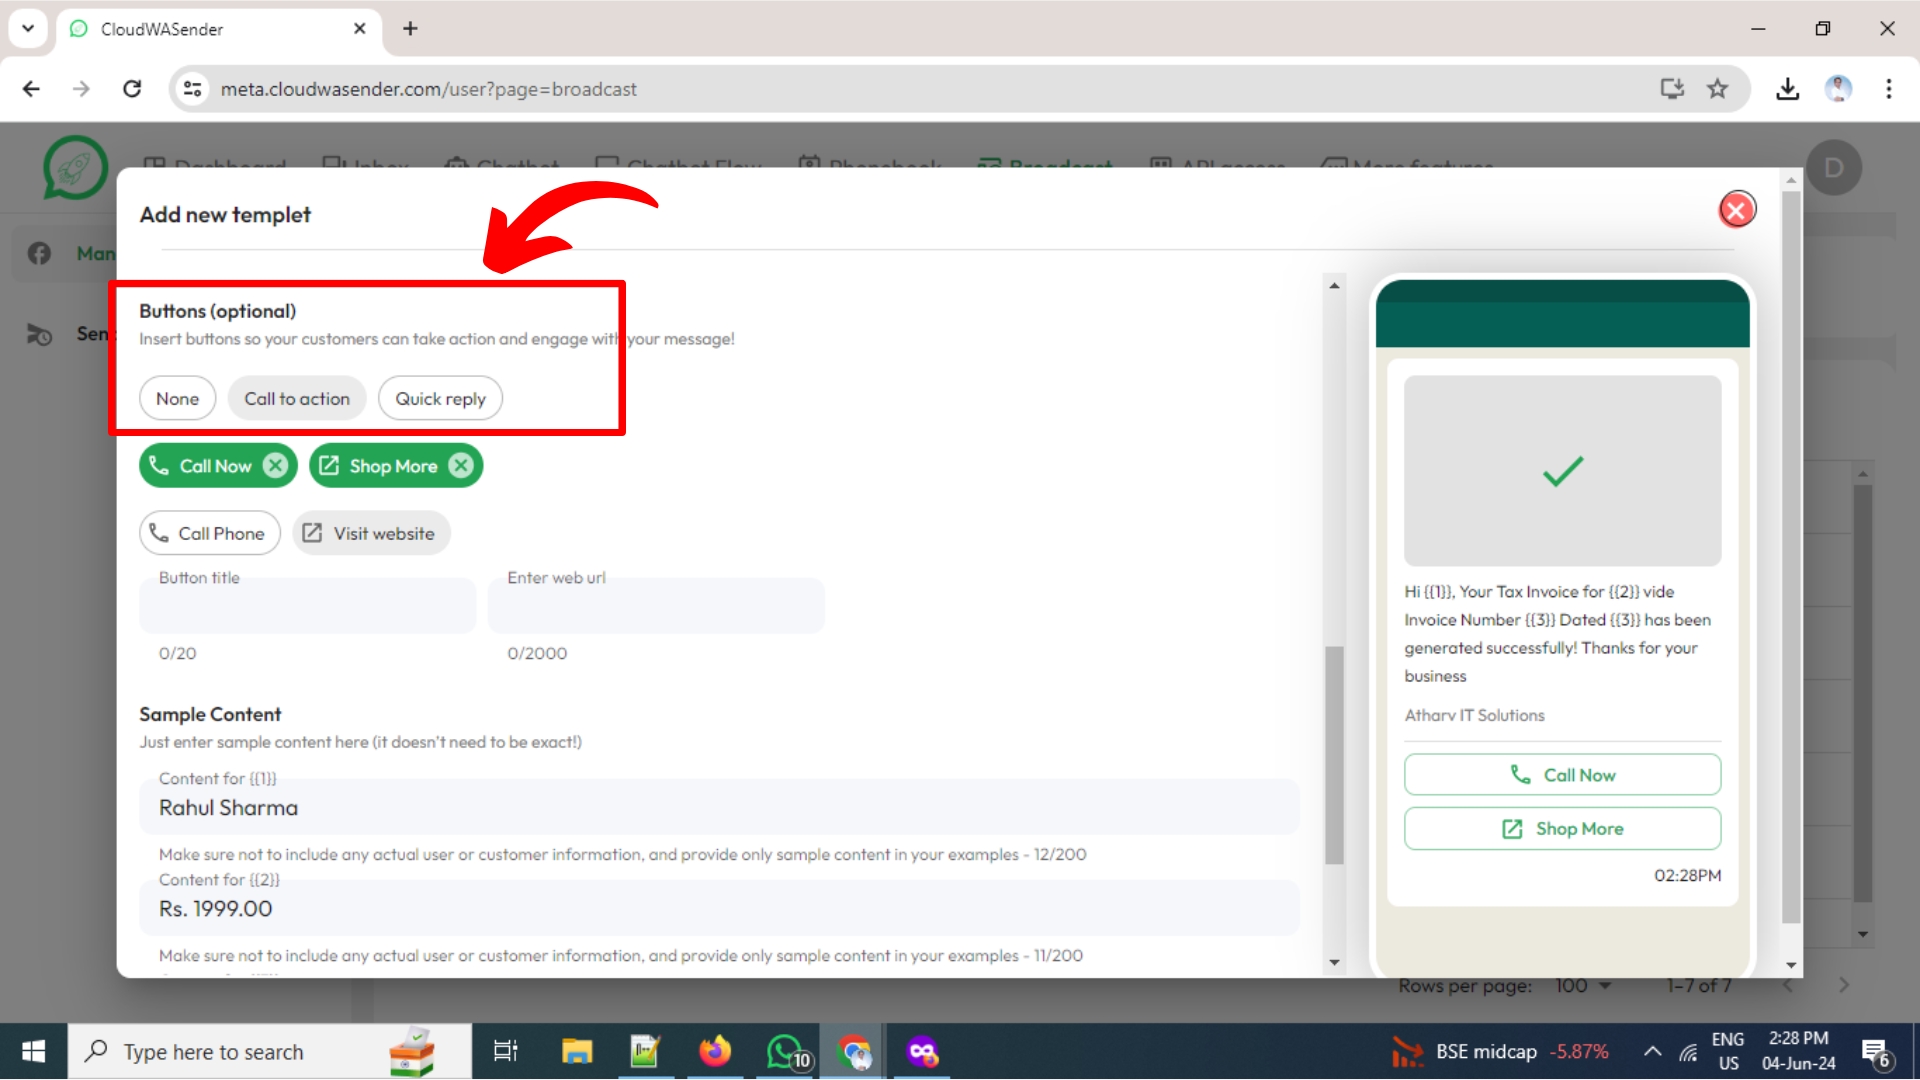
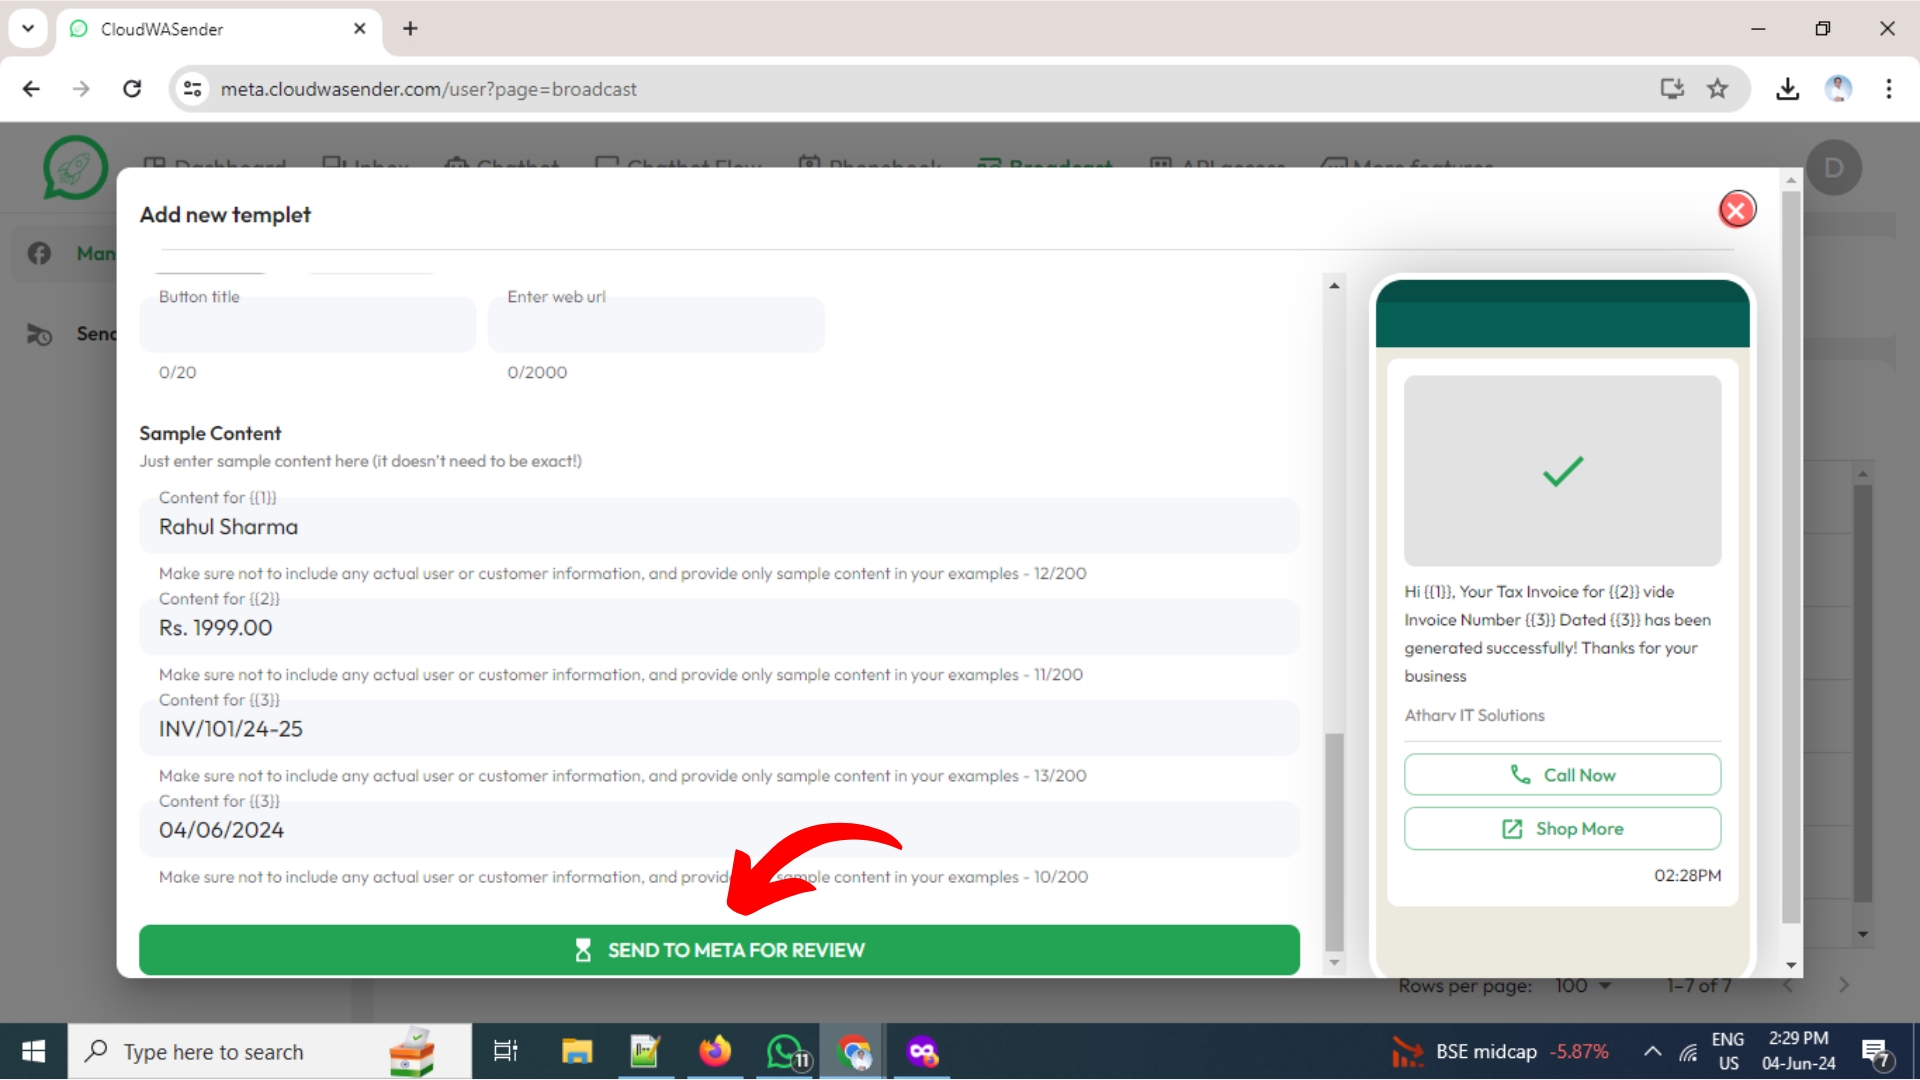
Once your template is approved by META, come back to your account on https://meta.cloudwasender.com > templates and check the approval status of your submitted template. It takes couple of minutes to get approval from META
Broadcast WhatsApp Messages
Once your template is approved you can now use them to send as a Broadcast Message to thousands of customers or can send via API interface.
Check this video guide to learn how to add WhatsApp Template and run WhatsApp Broadcast
WhatsApp API Integration
Once your template is approved by META, you can now use to send WhatsApp messages via your ERP, CRM, eCommerce website or any other application using API Interface.
Login to your https://cloudwasender.com account > API Access > Generate API Key
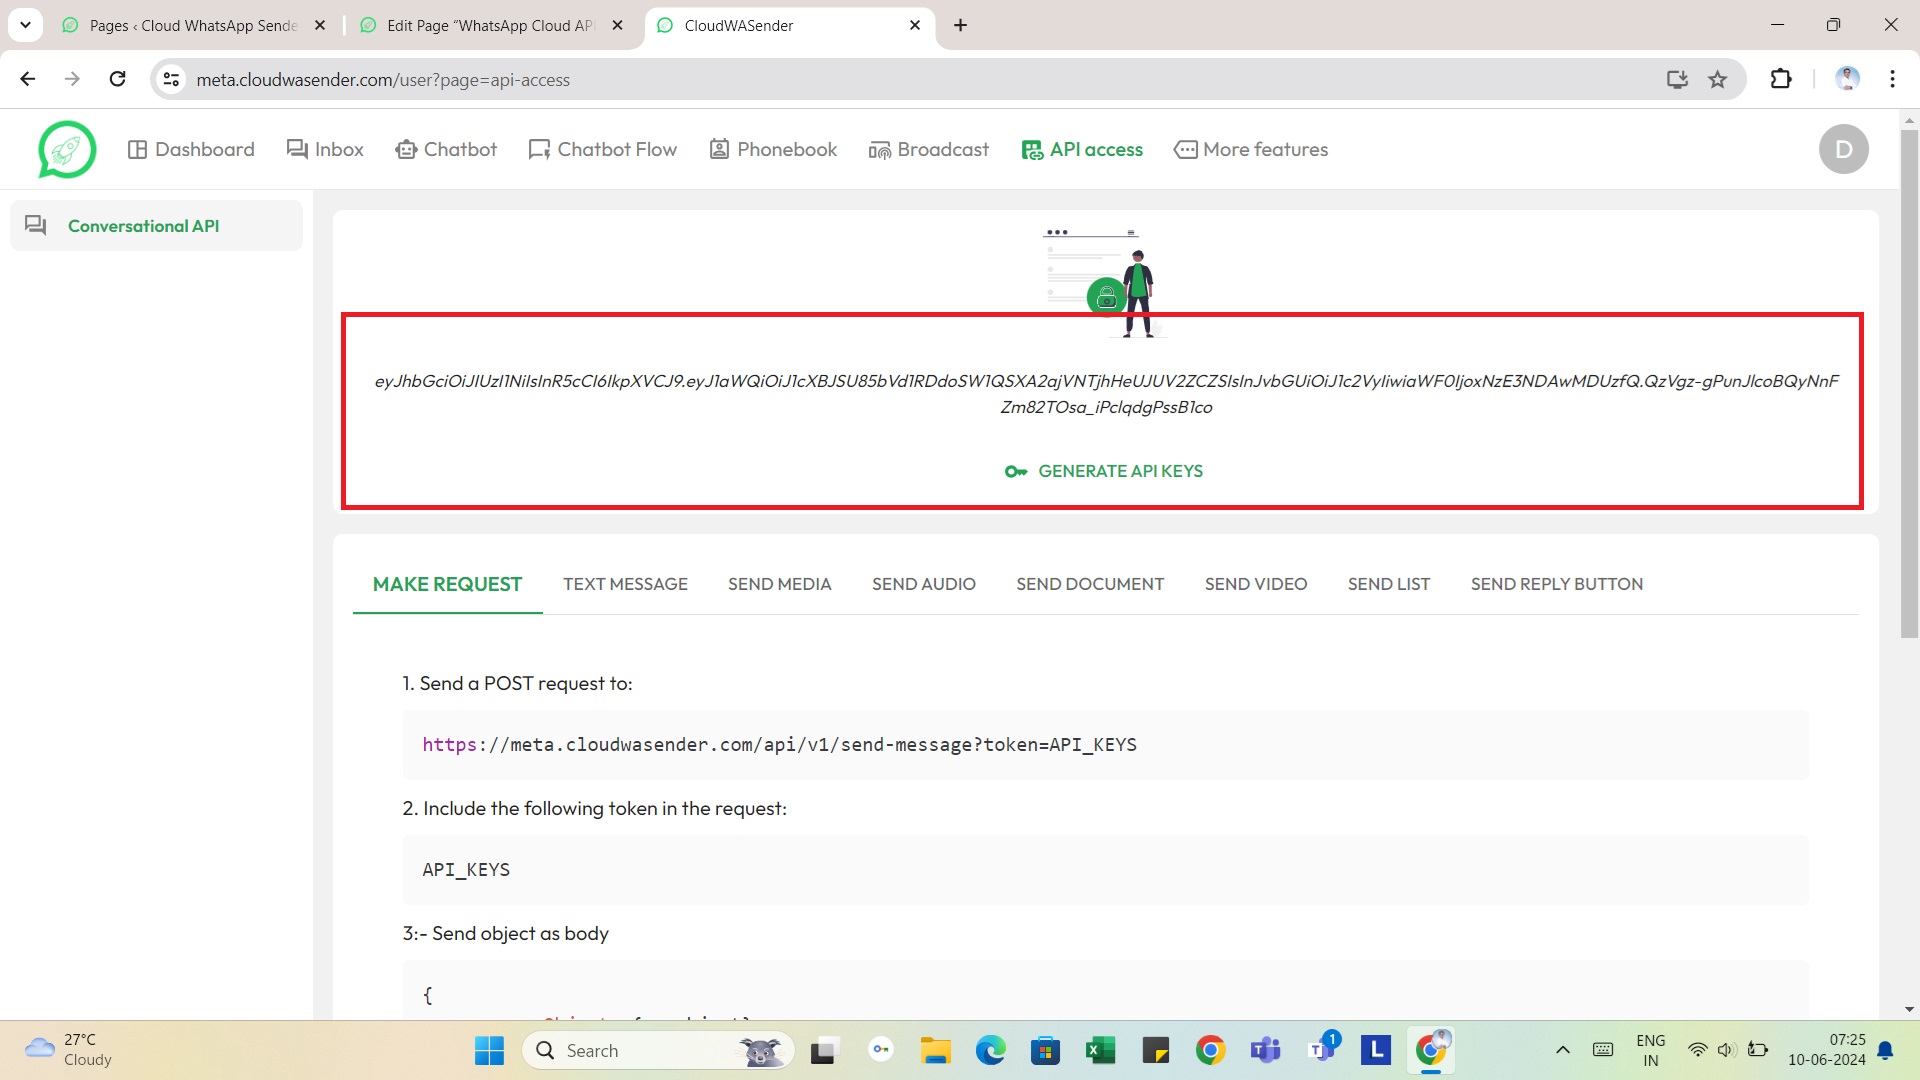 API Documentation: Send Template Message
Endpoint
POST https://meta.cloudwasender.com/api/v1/send_templet
Description
This endpoint allows you to send a templated message to a specified mobile number using the CloudWasender service. You need to provide the required authentication token, the recipient’s mobile number, the template name, and any necessary template variables.
Request
Headers
– Content-Type: application/json
Body Parameters
– token (string, required): The authentication token generated from the user panel.
– Example: “eyJhbGciOiJIUzI1NiIsInR5cCI6IkpXVCJ9…”
– sendTo (string, required): The recipient’s mobile number, including the country code.
– Example: “918888888888”
– templetName (string, required): The name of the template to be used. This can be found in the user panel broadcast section.
– Example: “OrderConfirmation”
– exampleArr (array of strings, required): An array of variables required by the template. These should be in the order specified by the template.
– Example: [“John Doe”, “Order #12345”]
Example Request Body
{
“token”: “eyJhbGciOiJIUzI1NiIsInR5cCI6IkpXVCJ9…”,
“sendTo”: “918888888888”,
“templetName”: “OrderConfirmation”,
“exampleArr”: [“John Doe”, “Order #12345”],
“mediaUri”: “https://yourftpsite.com/order101.pdf”
}
Response
Success Response
– success (boolean): Indicates whether the request was successful.
– message (string): A descriptive message regarding the result of the request.
– metaResponse (object): Additional metadata related to the response.
Example Success Response
{
“success”: true,
“message”: “Message sent successfully”,
“metaResponse”: {
…
}
}
Error Response
– success (boolean): Indicates that the request was not successful.
– message (string): A descriptive message regarding the error.
– metaResponse (object): Additional metadata related to the error.
Example Error Response
{
“success”: false,
“message”: “Invalid token”,
“metaResponse”: {
…
}
}
Plugins
TallyPrime to WhatsApp
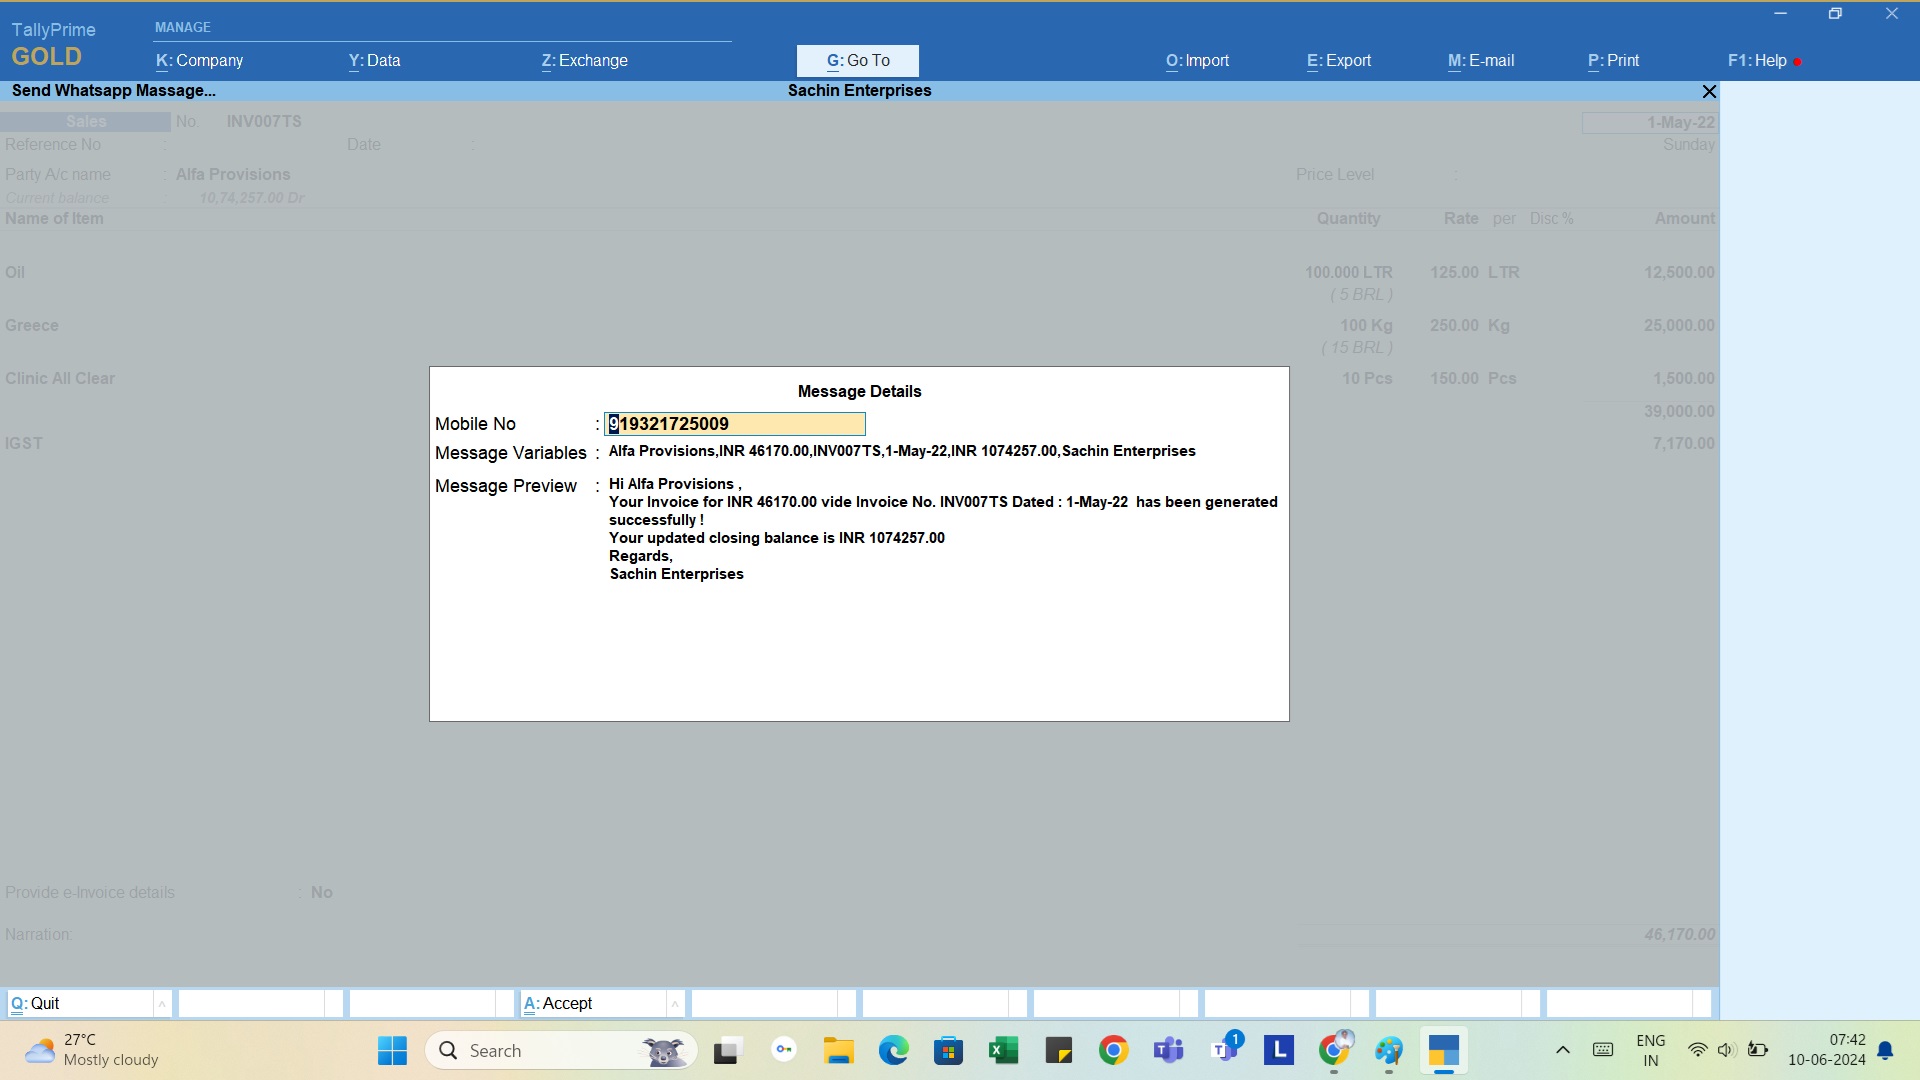
You can now send accounting and transactional updates from your TallyPrime Software to WhatsApp with a click of a button!
To send WhatsApp messages from TallyPrime follow the steps below;
- Setup your WhatsApp for Business account and Phone number as explained above
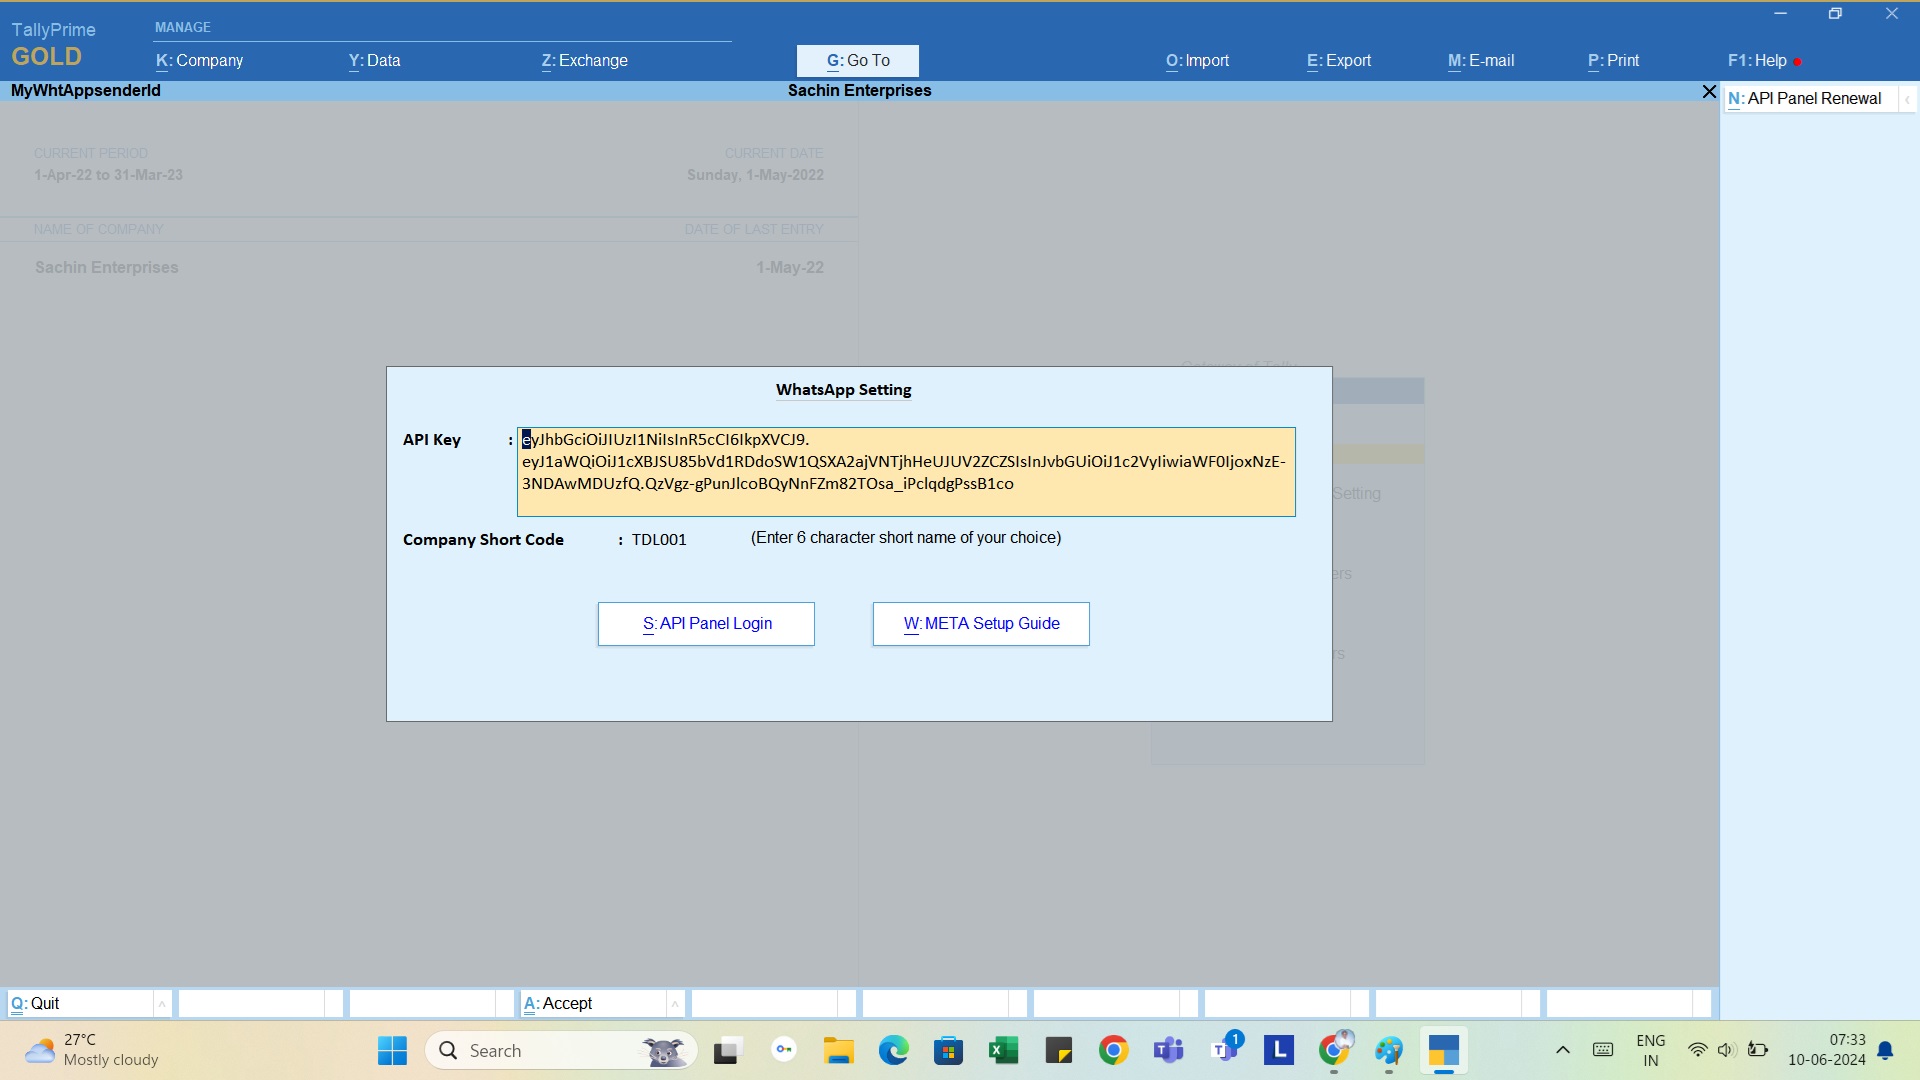
- Login to your CloudWASender.com panel and generate API Key
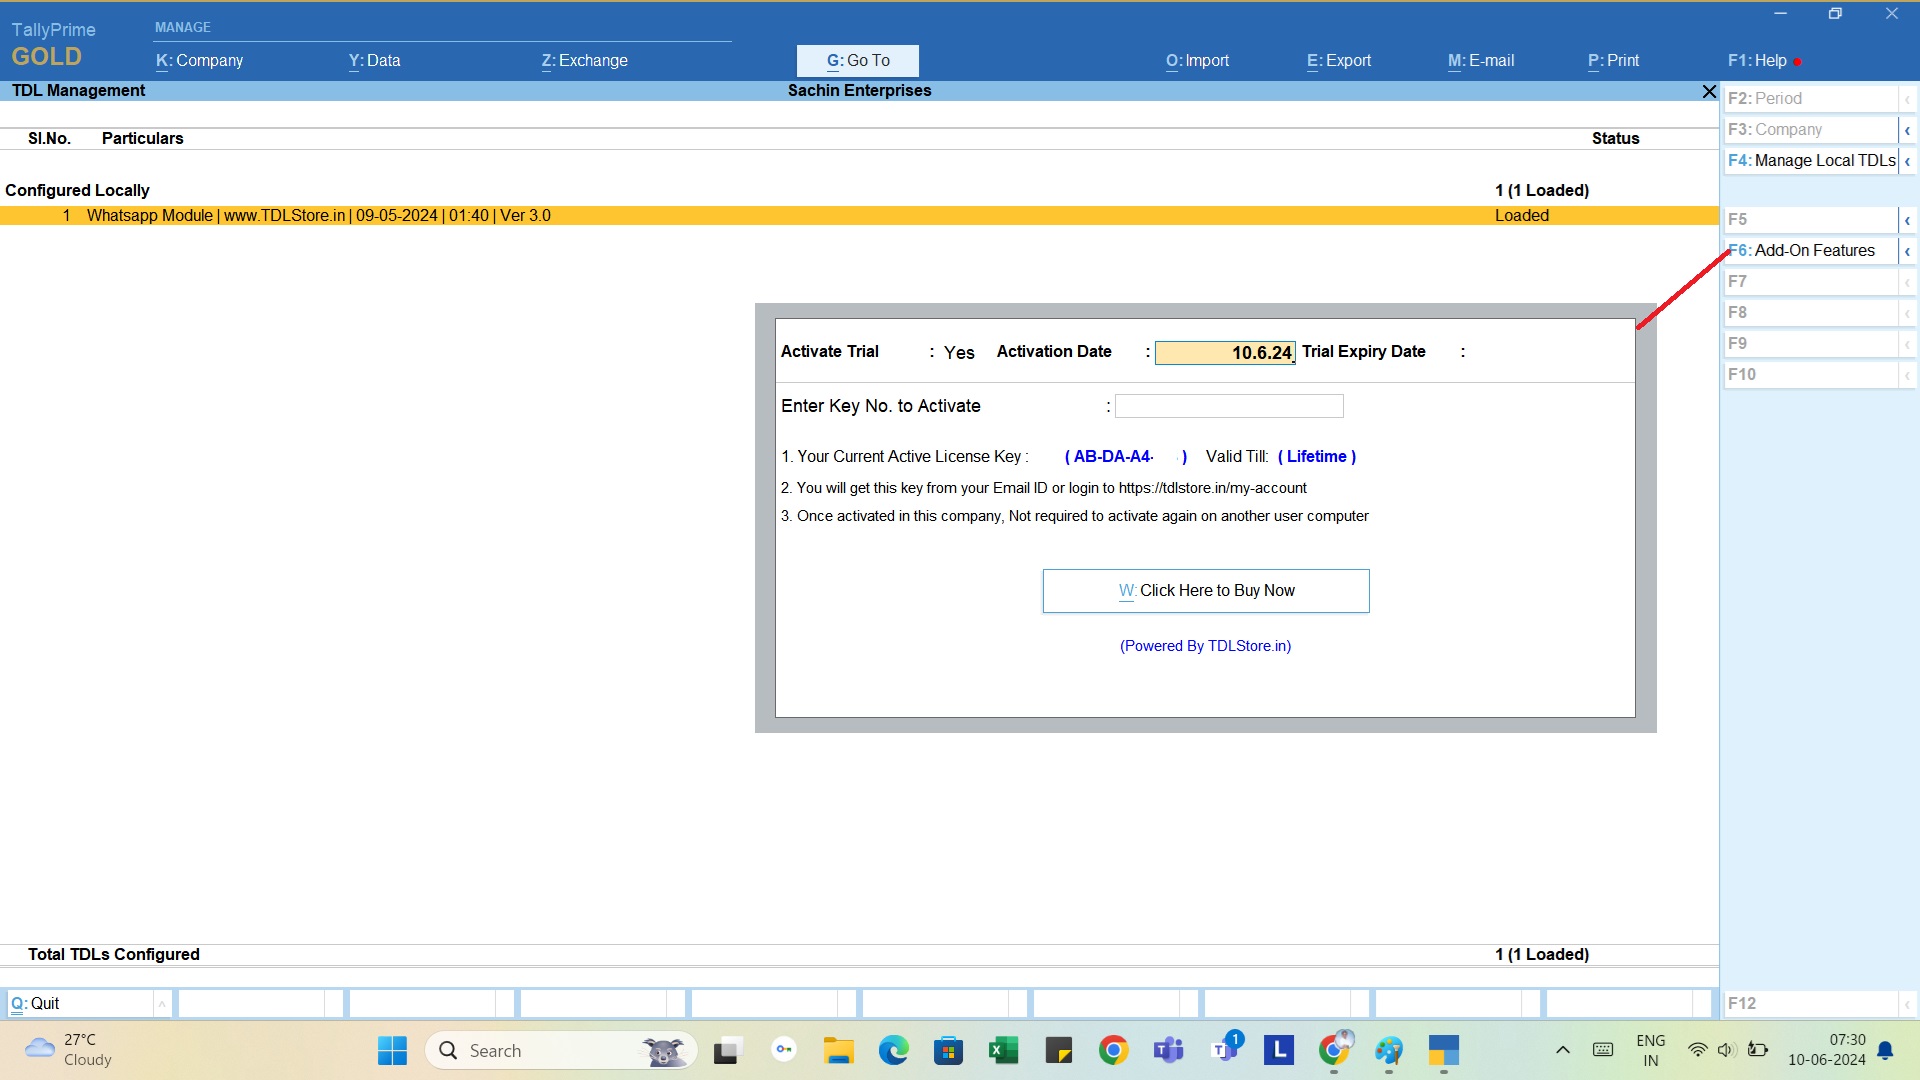
- Download and Activate this TallyPrime TDL add-on
- Go to Tally to WhatsApp > WhatsApp Settings and enter your API Key
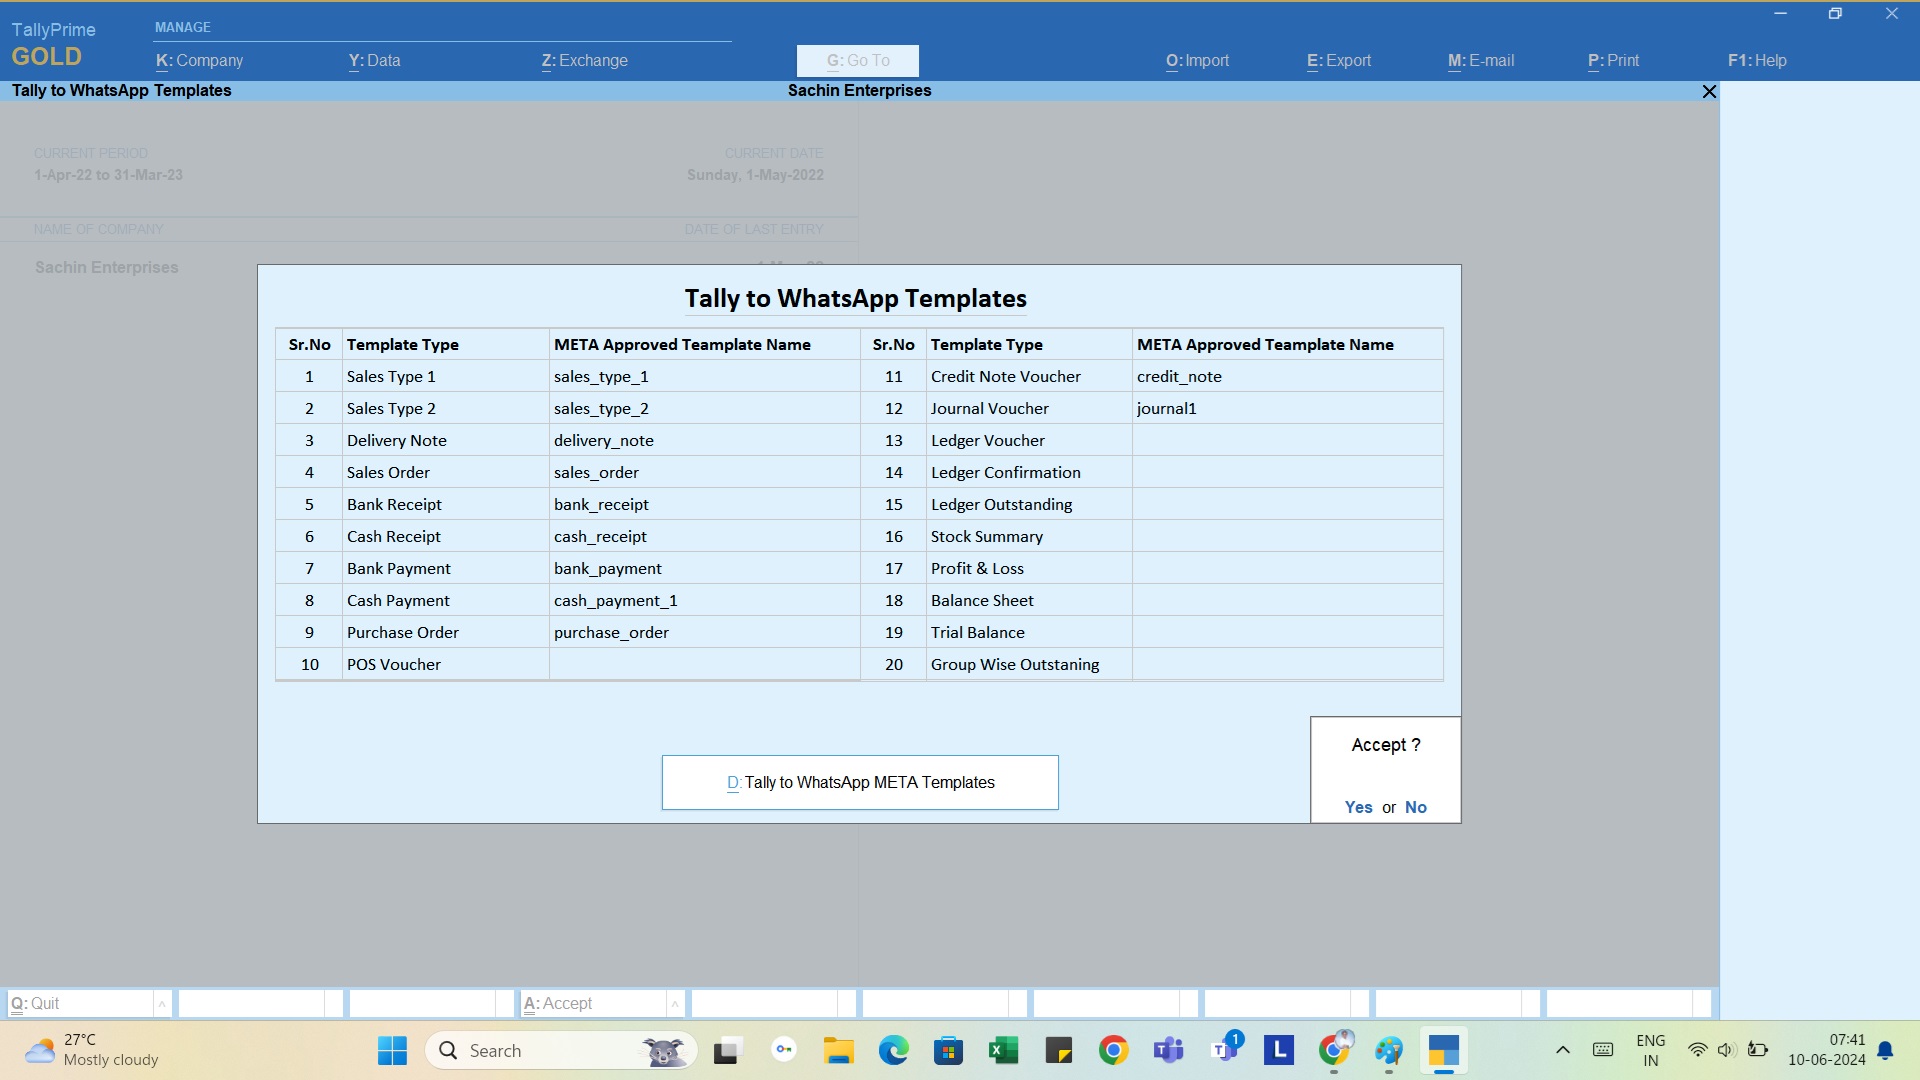
- Add message templates that you wish to send from Tally to WhatsApp from our pre-build message types
- Download pre-built Tally to WhatsApp META templates
- Enter your META approved message template names in WhatsApp Template settings
- It’s done! You are now ready to send the WhatsApp messages from your TallyPrime
WooCommerce to WhatsApp
Coming soon…

